Manual SuperDrum (Combi Bio)
Translation, Übersetzung & Traduction:
Installation and user guide for the SuperDrum (Combi Bio) filter
Table of Contents
1. Foreword
2. Defects, Warranty, Claimsfor compensation, disclaimer
2.1 Defects and claims for compensation
2.2 Warranty
2.3 Hidden defects
2.4 Improper application
2.5 Returning the product
2.6 Claims
2.7 Spare parts
2.8 Subject to alterations
3. General
3.1 Water Quality
3.2 Description of the filter
3.3 Adaptable and versatile
3.4 Used symbols and warning notes
4. Use of the filter/Siting
5. Fields of application
6. Installation/Fitting
7. Commissioning of the filter
7.1 Siting the filter
7.2 Gravity Connection
7.2.1 Sensor setting for the rinse cycle
7.2.2 Waste pump connection
7.2.3 Connecting the drum filter motor
7.2.4 Rinse frequency
7.3 Connecting a pump-fed system
7.4 Control electronics
7.4.1 Before commissioning
7.4.2 Float installation
7.4.3 Operation of control electronics
8. Maintenance and cleaning
9. Winter running
This guide aims to provide you with correct and complete information.
Read this guide through carefully before you start to install the product. If you are uncertain about the contents of this guide or do not fully comprehend the assembly instructions and/or do not understand something regarding this product please contact the shop where the product was purchased.The General Terms and Conditions of Air-Aqua apply for all products.
2. Defects, Warranty, Claimsfor compensation, disclaimer
2.1 Defects and claims for compensation
Except in the case of a further claim, we are only liable for defects to the delivered goods until the risk has been transferred to the purchaser.
Minor deviations between the appearance and workmanship of the product delivered and the specifications in the contract or minor limitations of usability will be deemed insignificant.
The warranted condition, endurance and usability of the product is solely subject to the specifications agreed in writing, in the product specification and/or in this guide.
Further oral agreements, especially from preliminary talks, advertising and/or in related industrial standards are only valid as an integral part of a written contract.
Only conditions and specifications specifically laid down by us are valid. We do not accept conditions or specifications laid down by third parties.
The specifications laid down in this guide are valid. If the customer wishes to use the product for a purpose other than the intended purpose, he or she is obliged to
thoroughly examine the suitability of the product for this other purpose. We give no warranty and accept no liability for any use other than that explicitly approved by us in writing.
Any changes made to the product will result in the loss of warranty and all claims and rights will lapse.
The user is held responsible for the proper use of the filter. The user guide does not discharge you from your liability for the proper and safe
application, installation, operation and maintenance of the filter.
In no circumstances can or will the manufacturer be held liable for any personal injuries or damage to property that might result from using the device.
This applies specifically for any damage due to improper piping or plumbing. Damage due to failure to clean or maintain the filter regularly is not covered by the warranty.
Our warranty for defects is strictly limited to supplementary performance. We will eliminate any defects or deliver substitute goods at our discretion. Where supplementary performance fails or is disputed or impossible the customer has the right to withdraw from the contract. The manufacturer explicitly limits the warranty to the filter itself. We are not reliable for consequential damage, or damage caused by a malfunction or failure of the filter, such as a loss of animals.
The customer is required to conduct a detailed inspection of the goods immediately after delivery. Any defects should be reported immediately in writing. Hidden defects should be reported immediately after their discovery. The customer should report damage caused during transport within 24 hours to the carrier and/or the delivery service. If the customer fails to meet the requirement to inspect the goods and report any defects or damage, then this will result in the loss of warranty.
We except no liability for the improper application, use, maintenance and handling of the product by the customer or its subsidiaries, nor for usual wear and tear. This applies specifically to the consequences of thermal, chemical, electrochemical or electrical influences as well as for infringements of our use and maintenance guides. The same applies to damage resulting from changes or adjustments made by the customer, which have not been approved by us in beforehand.
Damage directly attributed to the improper use of the product is, in principle, for the customer’s account. If the customer returns the product, break-proof packaging should be used. The customer is liable for any damage that can be attributed to inappropriate packaging.
Claims against us become time-barred within a year after the initial delivery of the goods to the customer. The same applies to damage claims regardless of their juridical cause. The limitation period does not apply to claims based on the malicious concealment of damages, injury to life, body or health or other damage resulting from intent or wanton negligence.
We hold spare parts available for a period of 5 years after initial shipment of the product. Our respective list prices apply for spare parts.
The manufacturer has the right to change the product at any time without prior notice being required, as long as these changes advance the reliability or quality of the product. No claims can be made if, for example, the design, functionality or performance of the filter fundamentally changes. The confirmed filter specifications are always guaranteed.
Congratulations on the purchase of your new filter.
SuperDrum filters are ideally suited to koi and swimming ponds, ornamental fish tanks, fish holding systems and aquaculture facilities. They provide excellent water clarity whilst at the same time working as an efficient biological filter, breaking down fish waste. A correctly sized unit can achieve this clean and clear water quality on its own, or it can be used in conjunction with other filter equipment.
The SuperDrum (Combi Bio) consists of a drum sieve that is driven by an electric motor, the moment it is flushed.
Control electronics and a waste pump are also supplied. The drum filter has the job of filtering and discharging suspended substances, dirt particles and algae residue.
In addition, for the Combi Bio models, space is provided for a bubbler in which biological filter medium can be placed.
This drum filter is a product that can only be used in fresh water. The filter has been designed for use with koi and swimming ponds, ornamental fish tanks, fish holding systems and aquaculture facilities.
The water to be filtered flows (by gravity or through a pump) into the inlets in the drum. The dirt remains behind on the outside of the drum because of the
mesh that is spanned over the drum. As the mesh becomes dirtier, less water flows through the drum. The water level after the drum drops (with regard to
a gravity system) and a sensor that is present there that measures the water level, subsequently, switches the electronics. The electronics sends a signal to the drum motor and waste pump.
The drum turns and the waste pump operates the nozzles at a high pressure that spray clean the mesh of the turning drum.
This wastewater is collected by a duct in the drum and flows outside through the duct to, for example, the drains. After the sensor detects that the water level is again sufficient,
it will again switch off the electronics. The drum will stop turning and the pump will stop spraying water to the nozzles.
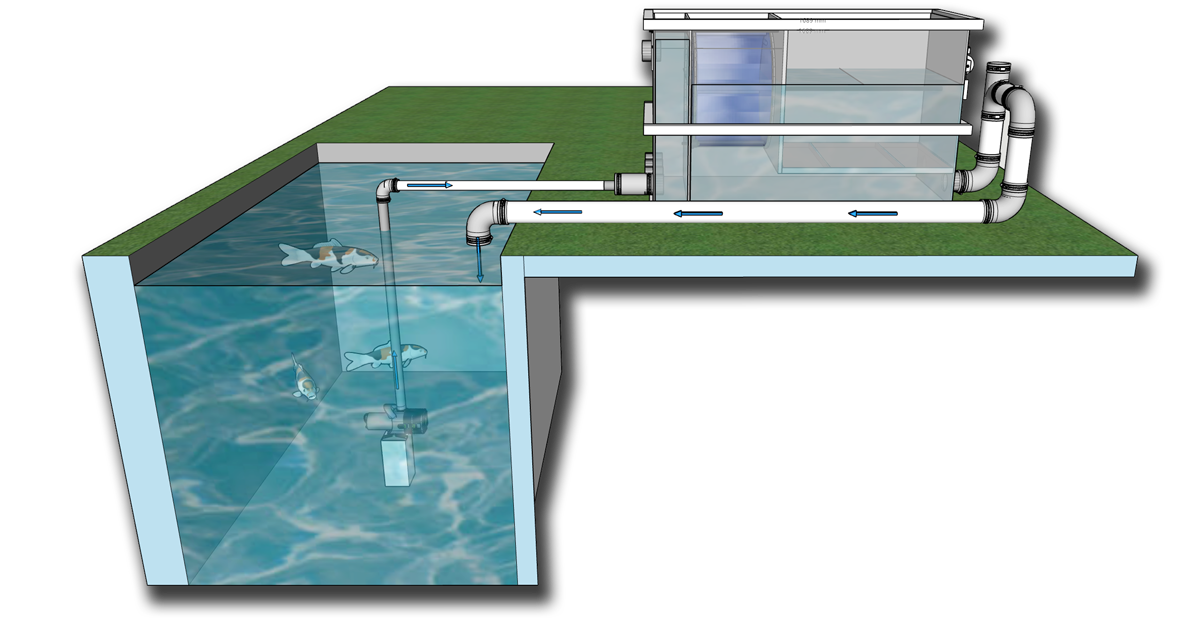
Use the unit as a standalone filter, or use it to boost an existing filter system. Fit the SuperDrum filter near your existing pond, or at a distance. Site it above the pond or as a gravity-fed system at the water level of the pond (top filter is then approximately 12-15 cm above the water level). Hide it behind a bush or fence, or even in a shed or garage. The unit takes up a fraction of the space of some other types of filter, and no labour intensive excavation is necessary to site it.
3.4 Used symbols and warning notes
Only appropriately trained personnel may commission and maintain this drum filter. These personnel must be familiar with international accident prevention regulations.
Connection and setup must be carried out in compliance with the electricity regulations.
Symbols used
 CAUTION!
 WARNING – ELECTRICAL HAZARD! DANGER OF DEATH!
Electrical shocks can cause death or serious physical injury to personnel as well as pose a risk to equipment. Ensure that no unauthorised persons are able
to gain access to or come into contact with the filter. Disconnect the filter from the power supply before working/installing the filter.
Never operate the device when the mains is not properly connected to earth.
 CAUTION! ROTATING PARTS! AUTOMATIC START!
Please take every precaution to ensure that all rotating parts are safe from contact while the filter is cleaning.
Operating the device with open lid can be a source of danger to operating personnel.
 REMOVE PLUGS
Disconnect the filter from the power supply before working/installing the filter. Never operate the device when the mains is not properly connected to earth.
Caution:


Only use the filter when no body parts are in contact with the water! Before you reach into the water, always disconnect the filter from the power supply.
Compare the electrical specification on the type label of the device with the specification of the power supply. Make sure that the device is connected to an
ELCB (earth leakage circuit breaker) with an assigned leakage rating of max. 30 mA (DIN VDE 0100T739). Only operate the device on a correctly installed power plug.
Keep the power plug and the wiring dry! Install the wiring protected in order to avoid damage.
The wiring may not be modified or replaced. Electrical installations on garden ponds must always comply with national and international directives and requirements. Never open the case of the device(s) or of the appending parts if this is not explicitly suggested in the user manual. Never apply technical modifications of the device(s). Only use original spare parts and accessories. Only allow authorised customer service facilities to conduct repairs.
Never use the filter with any other liquids than water.
The units are heavy when full of water and must be adequately supported for safety. Position the filter on a level, purpose made slabbed area or concrete plinth.
Choosing the wrong site may cause the filter to function less well or make it awkward to carry out maintenance in the future. Use fittings/couplings so that the filter is easy to dismantle. The filter can be some distance from the pond, but use wider pipe bore and a more powerful pump may be required to overcome the friction loss in the longer pipework.
The SuperDrum Combi Bio is suitable for freshwater and brackish water.
Let op:
7. Commissioning of the filter
Temperature of the water: +4 to +40°C.
Environment temperature: +2 to +50 °C
Protection class control box: IP54
When unpacking the filter, check whether all parts have been delivered completely and undamaged. Any damage detected must be reported to your retailer within
24 hours of purchasing the filter. Please check the device for damage before you operate it. Do not use the device if it is damaged.
Please inform your retailer immediately if the device is used despite being damaged. Any warranty and liability will then be invalid.


Remove all plugs from the electric sockets and make sure that the filter cannot be switched on. During the course of the installation, the device may not be connected
to the power supply. To avoid injury, take care not to reach into any moving/rotating parts with your hands or fingers when the device is connected to the power supply.
You must carefully follow the instructions below to work safely and prevent damage to the equipment.
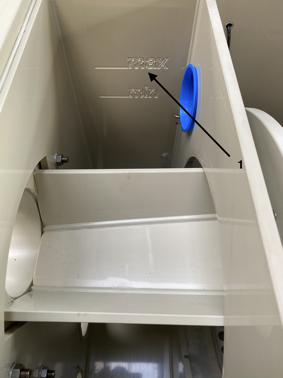
If water flows into the drum due to gravity, the maximum water level must be correctly aligned with the drum.
The maximum and minimum water levels are indicated on the inside of the filter and must be between these values and, by preference, as close as possible to the maximum level (see the figure).
7.2.1 Sensor setting for the rinse cycle
The sensor will already have been installed for use as a gravity sensor and in such a way that it will operate correctly in most situations.
You must, however, check its correct operation after installation and adjust the float as correctly as possible.
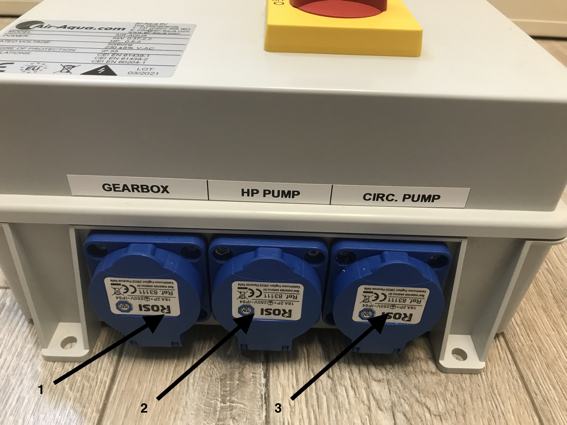
The filter is equipped with an internal rinse pump as standard, all connections are already pre -assembled in that case. The plug of the rinse pump is connected to the electronic in the 'HP Pump' socket
7.2.3 Connecting the drum filter motor
The drum filter motor plug must be connected to the control electronics. Use the ’GEARBOX’ plug connection for this.
Ensure that the rinse frequency is not too high. A rinse frequency that is too high will lead to a high rinse water consumption.
If the drum is being installed in an existing system, the rinse frequency will be high during
the first days/weeks because the pond will be ‘cleaned’.
The rinse frequency will also be considerably higher when the weather is hot (more food and more algae growth) than during colder weather.
7.3 Connecting a pump-fed system
The SuperDrum works as standard for installation in a so-called Gravity-Fed System.
For defects and claims for compensation regarding the Control electronics, we refer to section 2.
BE CAREFUL!
Make sure there is no damage to the control electronics before you connect it. Check the power cord and the plug carefully before connecting it.
If the control box has been used and it is damaged, the warranty and liability will expire.
Only use wiring, installations, adapters, extension cables and connection cables with grounding-type plugs, which are approved for outdoor usage (DIN VDE 0620)
with sufficient cable diameter.
7.4.3 Operation of control electronics
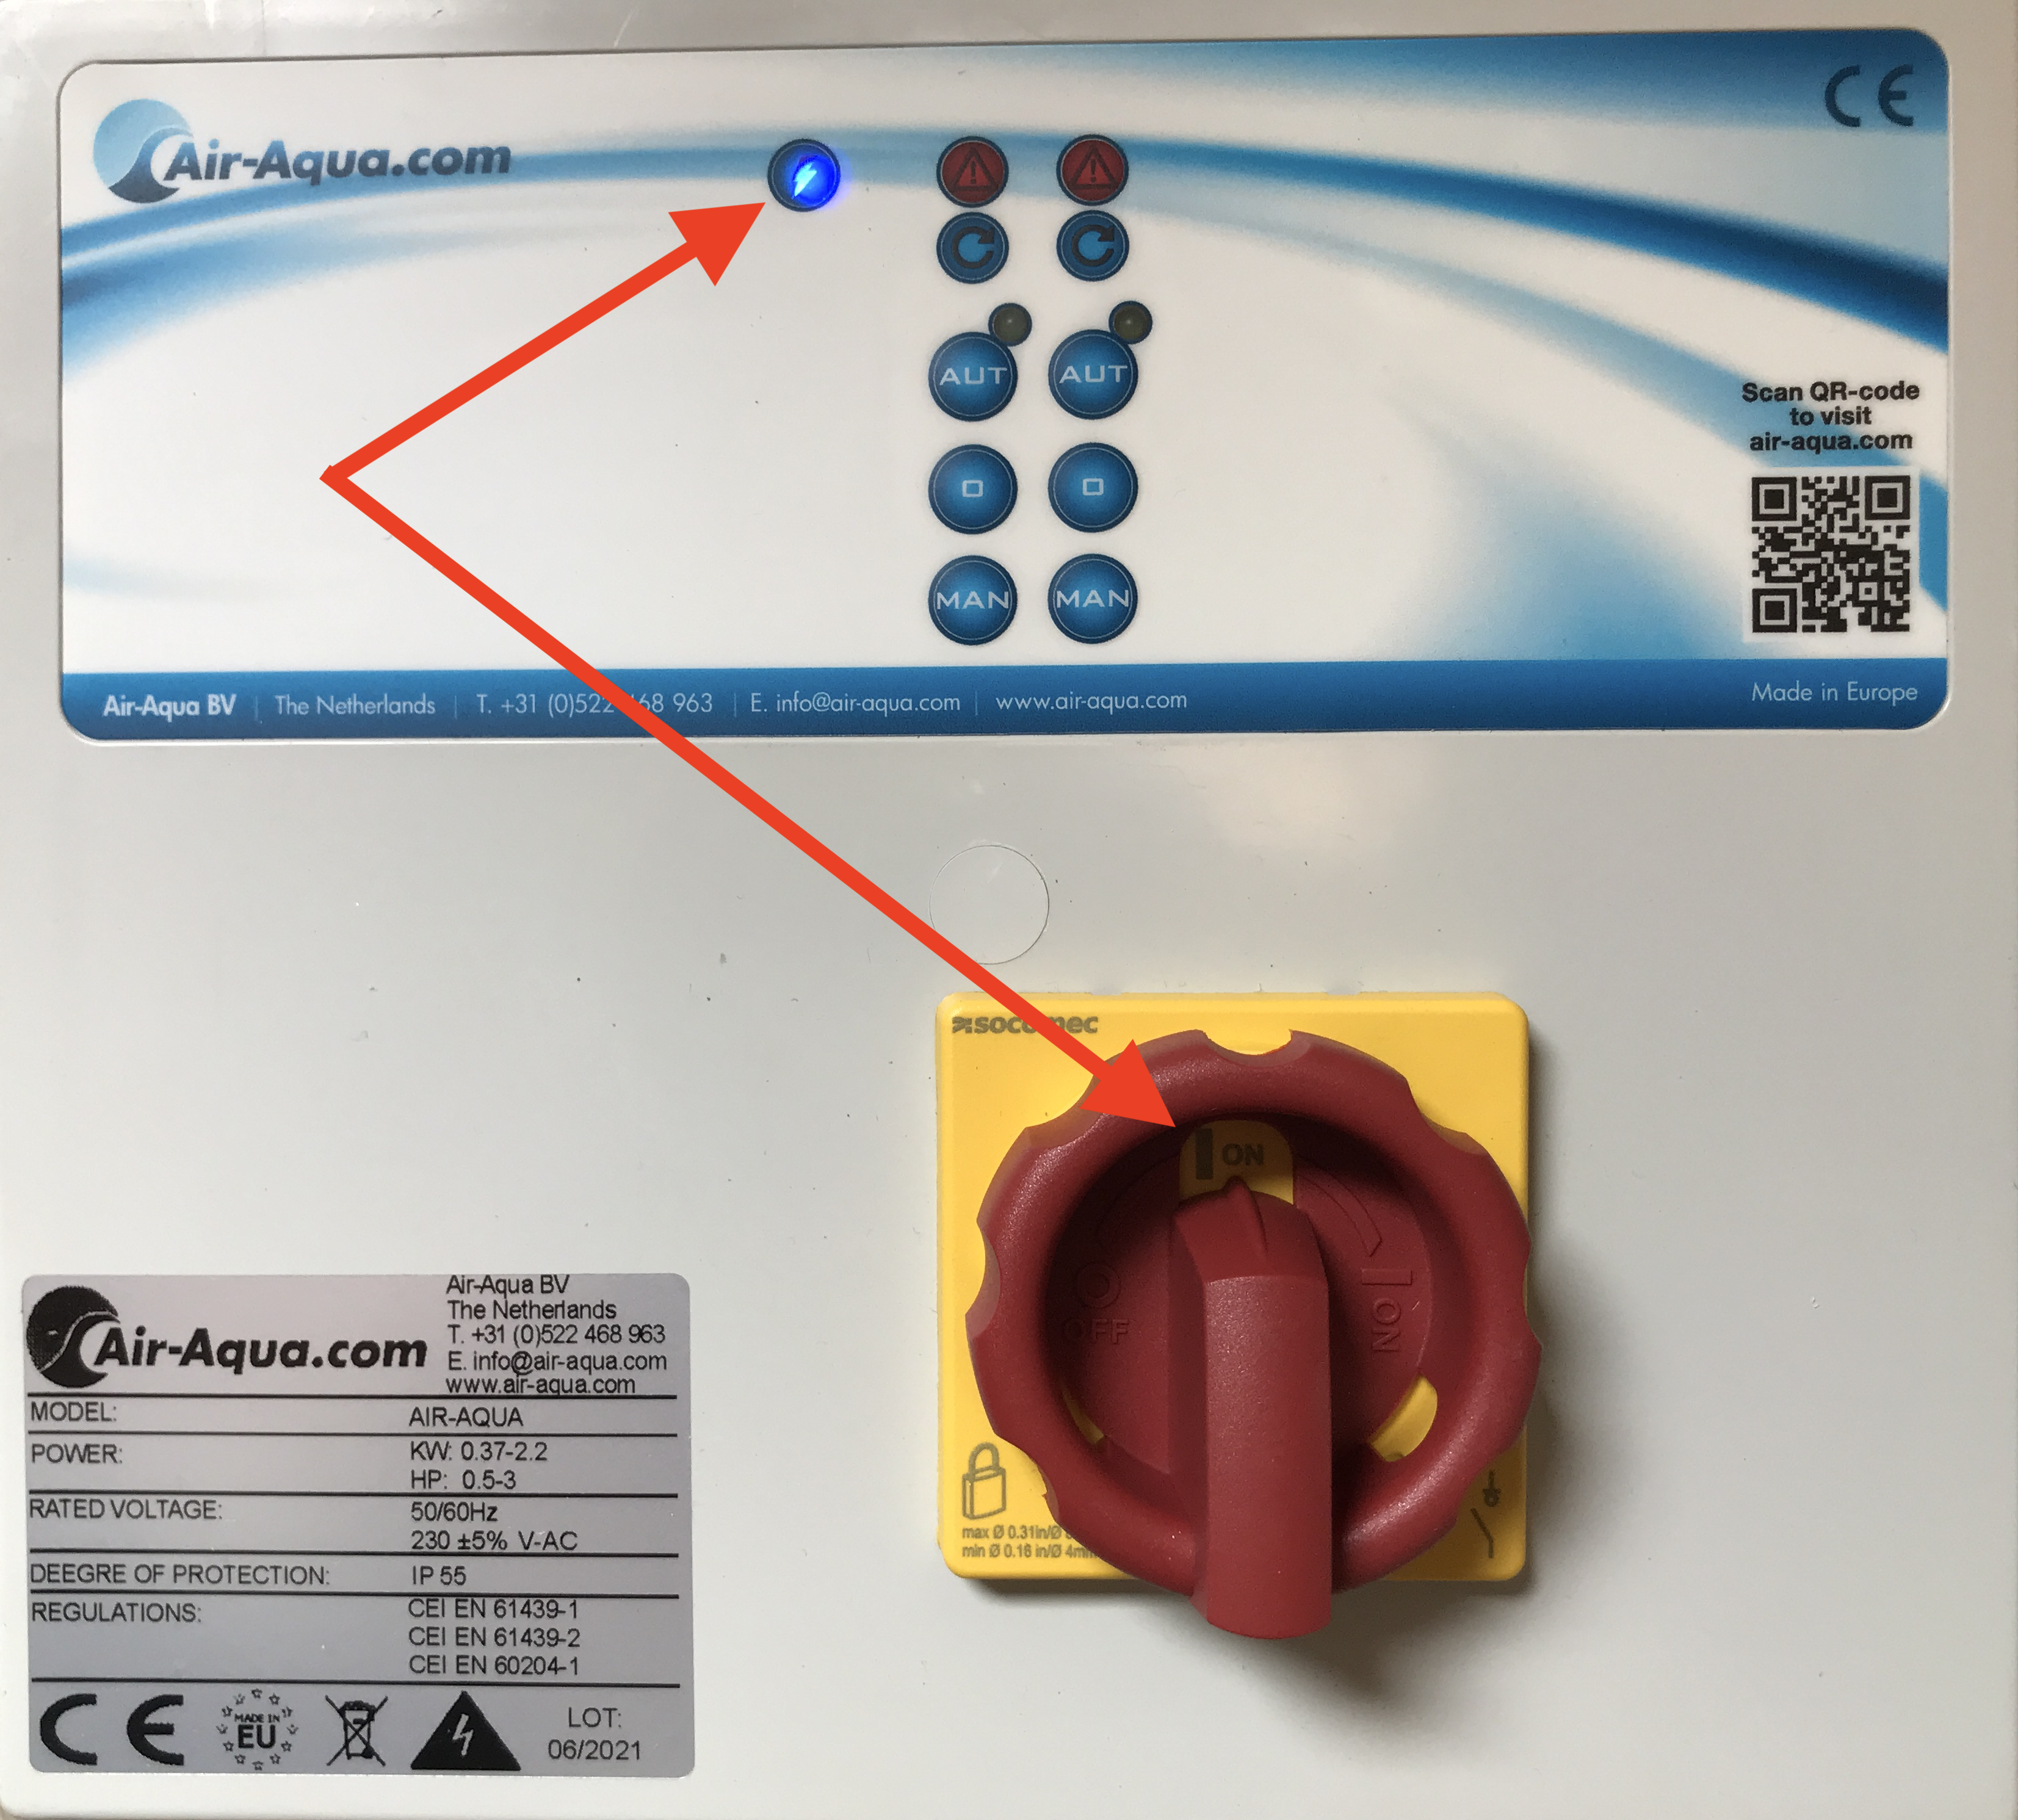
If you connect the control cabinet to the socket, you must first turn the main switch from 0 (off) to 1 (on) (quarter stroke with the clock).
The LED of the voltage now comes on.
ICE CAN DAMAGE YOUR FILTER!
Wherever penetrating frost may be a problem, insulate filter pipework, valves, the filter, external UVs and top-up valves and pipework.
Take special care of pipes where there is little water movement e.g. the rinse pump. Standard closed-cell pipe insulation wrap and hot- water-cylinder
jackets can be used but make sure that they are kept dry for maximum insulation.
It is often desirable to position it in a frost-free outhouse, garage or utility room. This gives additional protection from freezing even if the pump should stop due to power failure.
If you require further assistance please contact your dealer. It is helpful if you have all the relevant information about the filter (model), pump type, valves and hoses etc. to hand.
The drum motor must be arranged dry, protected against weather influences, otherwise the warranty will expire.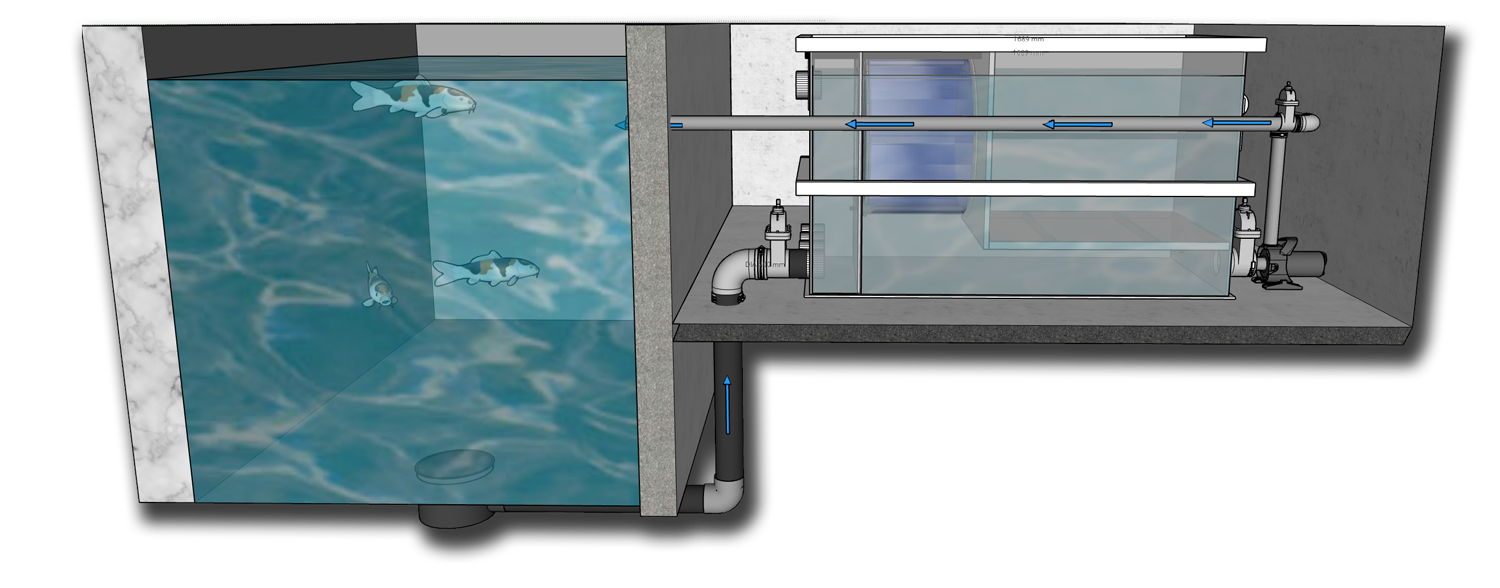
Attention:
It is essential that sufficient water arrives in the filter when installing on a gravity basis to ensure its correct operation! If insufficient water arrives because the
system has been installed incorrectly, you run the risk of the waste pump running dry and that the rinse cycle is switched on very frequently.
If not enough water arrives in a Gravity setup, this is visible when the water level for the drum drops a lot if the pond pump is switched on.
It applies as a general rule that approximately 10 m3/hour can flow per 110 mm of pipe in a gravity set-up. This quantity, however, will depend on the length
of the pipe and the maximum height difference between the pond water and filter. In some cases, for example, only 3 m3/hour can flow per pipe.
Therefore, pay attention to the following issues for a maximum flow per pipe:
The pond water level may not drop too much. If the pond water level drops 1 cm, the flow rate can already drop by 1 or 2 m3/hour per pipe.
There is a risk that insufficient water arrives in the filter when there are considerable fluctuations in the pond water level
(due to evaporation, water change or when you rinse the filter). If your pump pumps away more water than arrives in the filter, the drum filter will be emptied,
the sensor will run dry and the filter will start the rinse cycle.
If the supply pipes are long and with many bends, there are many friction losses and much less can arrive instead of 10 m3/hour per pipe system.
Inlets that are not used must be plugged.
Discharge of dirt::
The dirt is sprayed off by the mesh nozzles into the rinse duct. The rinse duct can be connected to the sewer system or discharge drain directly.
Pond return:
The circulation (pond) pump must be connected to a 110 mm discharge. If required, use a flexible connection for a good transition to your pump. A flexible connection will reduce vibrations.
Ensure that you never install a larger pump than recommended for the filter, otherwise the rinse frequency will be very high.
If the pump you have selected is close to the maximum of the filter, you must ensure that sufficient water arrives and that the filter is not suctioned dry. In that case, the dry run protection will be switched on.
If the float goes down, the water level behind the drum is too low because the mesh is clogged: the pump pumps away
more water than is being supplied through the bottom drains/skimmer. The electronics will switch and the filter will rinse.
The float can only be adjusted correctly when the system is commissioned.
The water level for the drum will then drop. Now, the float must not be set lower than 10 cm below the water level inside the drum.
By preference, this difference level between the inside and outside of the drum should not be more than 8 cm during operation.
If the difference in level is too great, the drum will turn heavily and the load exerted on the drum filter motor will be high.
If the difference in level is too little, the rinse frequency will be too high.
The drum filter rinses as long as the float is in the lower position. If the rinse lasts longer than 45 seconds, the electronic switches the drum into security mode (pond and rinse pump and the drum motor will be switched off).
Only when the float is back at its upper level, the drum and pond pump will be switched on again.
Only the filters that do not fit the rinse pump are equipped with an external rinse pump.
Deliberately, there has been made no transit for the connection of the suction side of the rinse pump, so that you are free to choose where you want to suck the water out of the filter.
Attention: the supply of the rinse water should be taken after the drum filter so that the waste pump has clean water and the nozzles cannot be obstructed.
The supply of the rinse water should be as low as possible to prevent the pump from running dry.
The pressure side of the pump must be connected to the pipe to which the nozzles have been connected.
Ensure that the connection on the pressure side is good and properly sealed because the pressure of the pump is high (up to 5 bar).
Do not therefore use sewer PVC but high-pressure PVC that can withstand at least 10 bar and certainly no flexible couplings.
Although the motor has an IP class 55, the motor is not suitable for unprotected use outside. In that case you must protect the motor against rain.
Other reasons why the rinse frequency is (too) high include:
If you want to use this for a pump fed system, you must pay attention to a number of adjustments:
If the water now rises in front of the drum filter, it will be contaminated and the rinse cycle must be activated.
So if the float now goes up, then a rinsing cycle follows (ca. 14 seconds).
If the float remains in the highest position (if the pond pump is on) then too little water flows from the filter.
The drum flushes 45 seconds (standard value) and then the electronics switch to the dry running protection.
If the flushing frequency is too high or the electronics are repeatedly in the dry running protection, see, among other things, the points under 7.2.4.
With a pump -fed system, the following points can also play a role: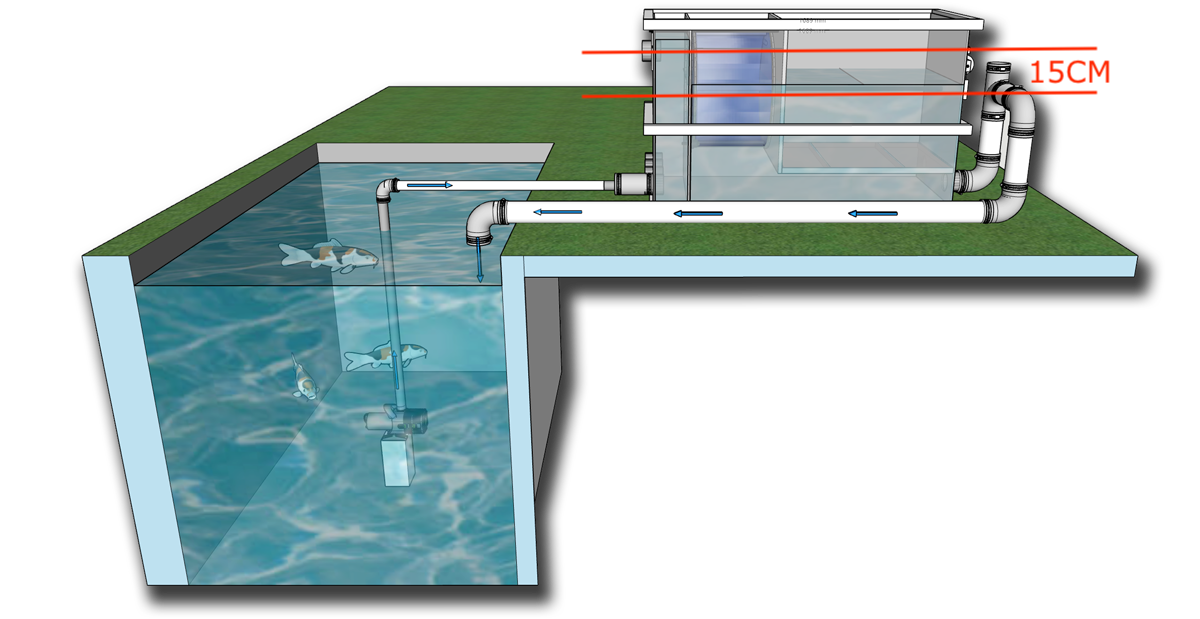
Compare the electrical specification on the type label of the device with the specification of the power supply.
Make sure that the device is connected to an ELCB (earth leakage circuit breaker) with an assigned leakage rating of max. 30 mA (DIN VDE 0100T739).
Only operate the device on a correctly installed power plug. Keep the power plug and the wiring dry!
Install the wiring protected in order to avoid damage.
Do not pull on the wiring of the devices or use the wiring to carry the devices! If a wiring is damaged or broken, the device may no longer be used!
Take care that power plugs never falls into water or gets wet. If a plug gets wet, it must be opened by a professional and cleaned by purging with demineralised water.
Protect plugs and the wiring from heat, oil, UV light and sharp corners.
The manufacturer is not liable in any way for any damage caused by improper installation or by the carelessness of the user or installer.
If the control box is taken out of use for a longer period of time, it must be stored in a dry, warm place to avoid condensation/moisture in the electronics.
This prevents possible corrosion damage of electronics.
Never open the case of the device(s) or of the appending parts if this is not explicitly suggested in the user manual. Never apply technical modifications of the device(s).
The maximum power for peripherals to be connected: 2.2 kW
Ambient temperature: 5-35 oC
Protection class: IP55
Voltage: 230V/50-60Hz
Conformity:
EN 61439-1
EN 61439-2
EN 60204-1
The control box may not be mounted outside under weather influences; It is only intended for indoor use.
In addition, the control box may not be mounted in the direct sunlight or at a heat source.
Ensure a distance of approx. 10 cm around the control box.
The control box produces heat itself and sufficient air circulation must be guaranteed so that the heat from the control box is sufficiently removed.
Be aware that a garden shed can get very hot during sunny days (above 40 °C).
The control box has protection class IP55. Remember that electronics and water/moisture are enemies of each other. Ensure good protection against a humid environment.
If the control box is taken out of use for a longer period of time, it must be stored in a dry, warm place to avoid condensation/moisture in the electronics.
This prevents possible corrosion damage of electronics.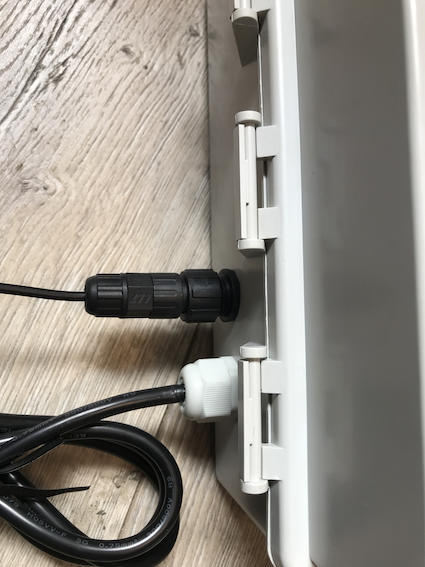
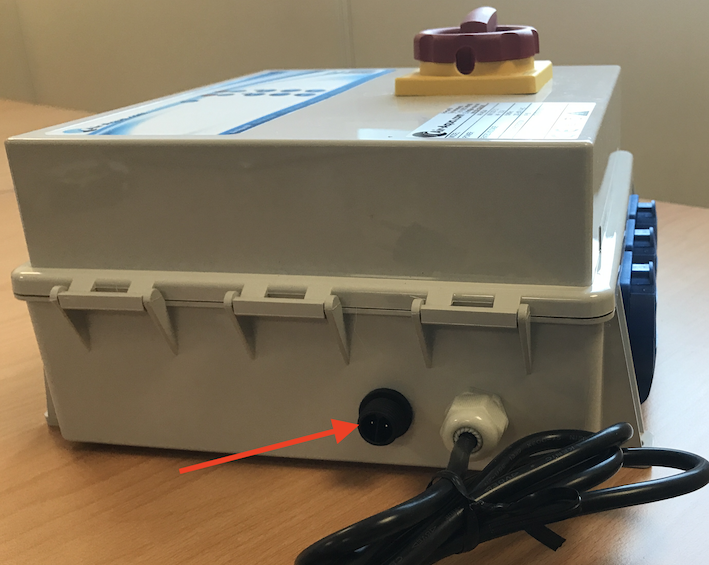 The control electronics ensures the automatic rinse of the filter. In addition, you have the option to rinse manually.
The plug of the sensor of the drum filter must be connected to the control box (see photos).
2 rows of LEDs are provided on the display. The left row shows the operation/activation of the circulation pump (CIRC.PUMP).
If the LED with the round arrow is on, there is voltage on the connection 'CIRC. PUMP'.
You can always manually activate the 'CIRC. PUMP' by pressing the 'MAN' push button of the left row.
The right row shows the operation/activation of the 'Gearbox' and 'HP Pump'. If the LED with the round arrow is on, there is voltage on the 'Gearbox' and 'HP Pump' connections.
With the push button 'MAN' of the right row you manually activate the 'GEARBOX' and the 'HP PUMP'.
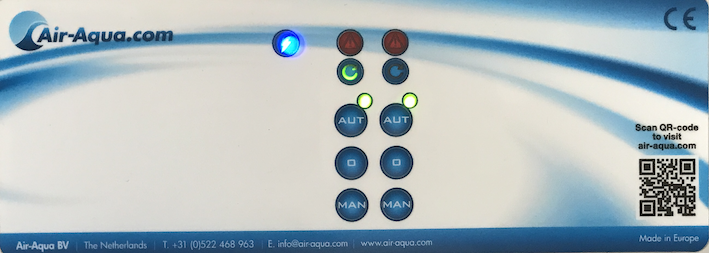 To make the electronics function automatically on the float, press 'AUT' from both rows.
Both LEDs of 'AUT' must be on, otherwise the electronics will only work if you operate manually via the 'MAN' buttons.
Below is described how the electronics work automatically when the filter is set up in Gravity Modus.
The float is installed behind the drum filter. If it is a pump -fed system, then the sensor is reversed before the drum.
In that case, the operation of the electronics is the same, but the float position where a rinsing process starts exactly reversed.
Float in the upper position (pump-fed in the lower position):
Float to the lower position (pump-fed to the top position) -> rinsing cycle:
float to the top position (pump-fed to the lower position): -> end of rinsing cycle.
ATTENTION:
If the electronics turns off the 'CIRC PUMP' very frequently because the rinse takes too long and the float does not return quickly enough in the upper position, then there is a problem with the flushing frequency (see 7.2.4). In such a case, the water consumption is increasing sharply.
Bypass:
You can remove the blue caps in the front chamber if there are calamities with, for example, the motor or controlbox. This allows you to continue to use the filter without pre-filtering.
SuperDrum filters undertake continuous product development which may make technical modifications to current models. The information and pictures shown here are for guidance only.
