
Installation and User Guide for the SuperBead Automatic (Model 2024)
Translation, Übersetzung & Traduction:
Installation and User Guide for the SuperBead Automatic (Model 2024)
SuperBead filters and the SuperBead Automatic are manufactured by:
Air Aqua BV
Weth. Ohmannstraat 1
7951SB Staphorst
Netherlands
+31 (0)522 468963
info@air-aqua.com
Table of Contents
1. Foreword
2. Defects and claims for compensation, disclaimer
2.1 Defects and claims for compensation
2.2 Warranty and subsequal damage
2.3 Hidden defects
2.4 Improper application
2.5 Returning the product
2.6 Claims
2.7 Spare parts
2.8 Subject to alterations
3. General
3.1 Warning
3.2 Use of the control box
4. Installation
4.1 Motor assembly on 3-way Valve
4.2 Electronics
4.2.1 Connections
4.2.2 Operation of the control box
4.2.3 Changing the flush frequency
4.2.4 Changing the flush position of the valve
4.2.5 Additional remarks
5 Technical specifications
1. Foreword
This manual is intended to correctly and thoroughly inform you about the use of the SuperBead Automatic.
KEEP THIS MANUAL CAREFULLY! IF THIS PRODUCT CHANGES OWNERS, PLEASE HAND OVER THE COMPLETE MANUAL.
Please read this manual carefully before you start the installation of this product. If you are unsure about the content of this manual, or do not fully understand the assembly instructions, or if there is something about the product you do not understand, please contact the store where you purchased this product. For all Air-Aqua products, the general terms and conditions of Air-Aqua BV apply.
2. Defects and claims for compensation, disclaimer
2.1 Defects and claims for compensation
Except in the case of a further claim, we are only liable for defects to the delivered goods until the risk has been transferred to the purchaser. Minor deviations between the appearance and workmanship of the product delivered and the specifications in the contract or minor limitations of usability will be deemed insignificant. The warranted condition, endurance and usability of the product are solely subject to the specifications agreed in writing, in the product specification and/or in this guide.
Further verbal agreements, especially from preliminary talks, advertising and/or in related industrial standards, are only valid as an integral part of a written contract. Only conditions and specifications specifically laid down by us are valid. We do not accept conditions or specifications laid down by third parties. The specifications laid down in this guide are valid.
If the customer wishes to use the product for a purpose other than the intended purpose, he or she is obliged to thoroughly explore the suitability of the product for this other purpose. We give no warranty and accept no liability for any use other than that explicitly approved by us in writing.
Any changes made to the product will result in the loss of warranty and all claims and rights will lapse. The user is held responsible for the proper use of the product. The user guide does not discharge you from your liability for the proper and safe application, installation, operation, and maintenance of the product. On using this guide, you agree that in no circumstances can or will the manufacturer be held liable for any personal injuries or damage to property that might result from using the device. This applies specifically to any damage caused by improper piping or plumbing.
2.2 Warranty and subsequent damage
Our warranty for defects is strictly limited to supplementary performance. We will eliminate any defects or deliver substitute goods at our discretion. Where supplementary performance fails or is disputed or impossible, the customer has the right to withdraw from the contract. Air-Aqua explicitly limits the warranty to the product itself. We are not liable for any consequential damage or damage caused by a malfunction or failure of the product, such as loss of animals.
2.3 Hidden defects
The customer is required to conduct a detailed inspection of the goods immediately after delivery. Any defects should be reported immediately in writing. Hidden defects should be reported immediately after their discovery. The customer should report any damage caused during transport within 24 hours to the carrier and/or the delivery service. If the customer fails to meet the requirement to inspect the goods and report any defects or damage, this will result in the loss of warranty.
2.4 Improper application
We accept no liability for the improper application, use, maintenance, or handling of the product by the customer or its subsidiaries, or for normal wear and tear. This applies specifically to the consequences of thermal, chemical, electrochemical, or electrical influences as well as for infringements of our use and maintenance guides. The same applies to damage resulting from changes or adjustments made by the customer, which have not been approved by us beforehand.
2.5 Returning the product
In principle, the customer is responsible for damage directly attributed to the improper use of the product. If the customer returns the product, break-proof packaging should be used. The customer is liable for any damage that can be attributed to inappropriate packaging.
If it becomes apparent during our examination of damage reported by the customer or in the course of repairing defects that the reported damage or claims were made wantonly or were unwarranted, we may charge for inspecting and repairing defects. The customer has the right to reject a necessary repair and to demand the return of the product. In general, every inspection of damage is bound to lump sum compensation if it appears that the customer is responsible for the damage.
2.6 Claims
Claims against us expire within a year after the initial delivery of the goods to the customer. The same applies to damage claims, regardless of their legal cause. The limitation period does not apply to claims based on the malicious concealment of damage, injury to life, body, or health, or any other damage resulting from intent or wanton negligence.
2.7 Spare parts
Our liability to deliver and stock spare parts is limited to the period of 5 years after initial shipment of the product. Our respective list prices apply to spare parts.
2.8 Subject to alterations
The manufacturer is entitled to change the product at any time without prior notice being required, as long as these changes improve the reliability or quality of the product. No claims can be made if, for example, the design, functionality, or performance of the product fundamentally changes. The confirmed specifications are always guaranteed.
3. General
Congratulations on purchasing the SuperBead Automatic. The SuperBead Automatic is specifically designed to automatically flush the SuperBead filter. The set consists of 2 parts (a motor and a control unit) which, together with the 3-way valve included with the SuperBead, form the automatic flushing system.
3.1 Warning
 WARNING – ELECTRICAL HAZARD! LETHAL DANGER!
Only personnel with the necessary knowledge of electronics may perform maintenance/work on this device. This personnel must be familiar with international accident prevention regulations. Connection and settings must comply with applicable electrical regulations.
- Compare the electrical specifications on the device's nameplate with the specifications of the connection to the grid.
- Ensure that the device is connected to a grounded socket and a residual current device with a max. leakage current of 30 mA (DIN VDE 0100T739). Use the device only on a properly installed power outlet.
- Use only cables, installations, adapters, extension cords, and connection cables with grounded plugs, approved for outdoor use (DIN VDE 0620) with sufficient cable diameter.
- Do not pull the cable of the control box, and do not use the cable to lift the control box! If the wiring is damaged or broken, it must be replaced.
- Ensure that the plug does not fall into the water or get wet. Ensure that the cables are protected to prevent damage and consequently short circuits. If the plug gets wet, it must be cleaned by rinsing with demineralized water and dried.
- Protect the plug and wiring from heat, oil, UV light, and sharp edges.
The manufacturer is in no way liable for any damage caused by improper installation or by the carelessness of the user or installer.
3.2 Use of the Control Box
 REMOVE PLUGS
During assembly work, remove all plugs of the device from the outlet.
 CAUTION!
Ensure that there is no damage to the components before you connect this product. Carefully inspect the power cord and plug before connecting them.
WARNING – ELECTRICAL HAZARD! LETHAL DANGER!
Electric shocks can cause death or serious bodily injury to personnel, as well as damage to equipment. Ensure that no unauthorized persons can access or come into contact with the device. Disconnect the device from the power supply before working on it. Do not operate the device if the power supply is not properly connected to ground.
 CAUTION! ROTATING PARTS! AUTOMATIC START!
Take adequate measures to ensure that all rotating parts are safe for physical contact. Do not try to stop the rotating valve with your fingers as it rotates due to the danger of physical injury. After a power failure, the motor automatically restarts!
The cable may not be modified or replaced. Electrical installations must always comply with national and international requirements/guidelines.
4. Installation
4.1 Motor Assembly on 3-way Valve
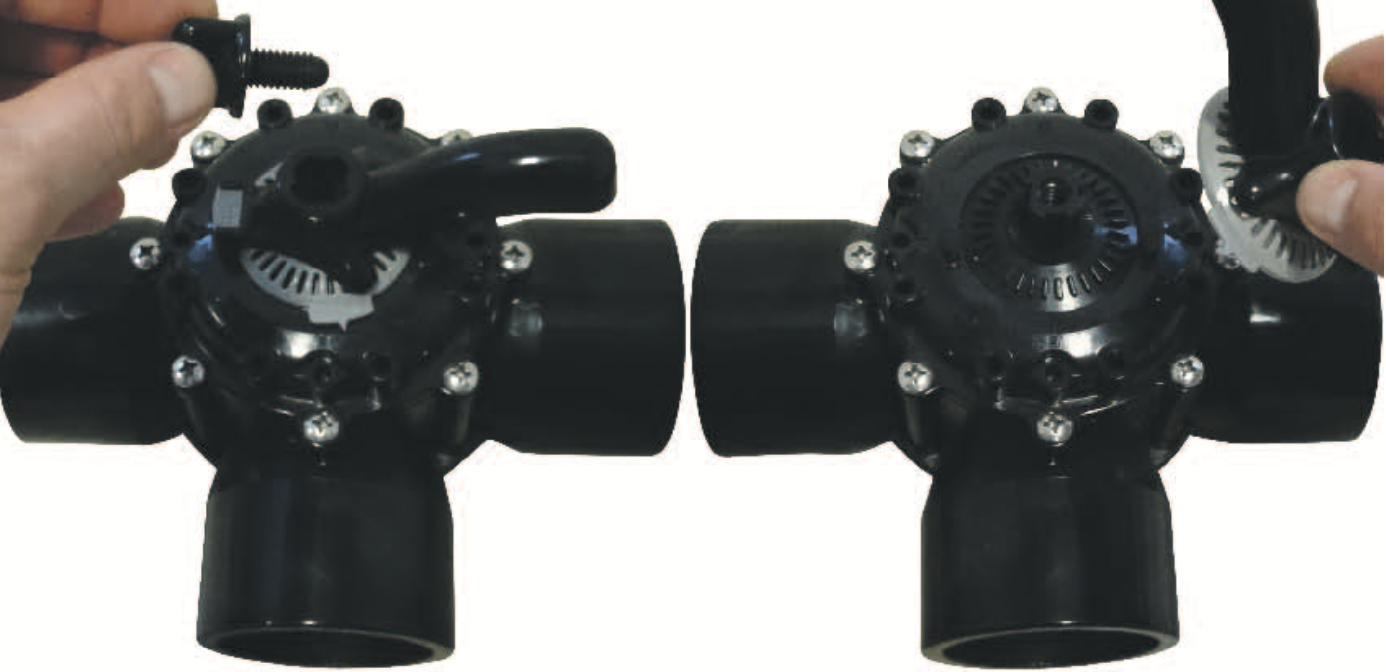
For installation, you must first remove the handle from the 3-way valve.
- Remove the plastic screw from the handle
- Remove the handle
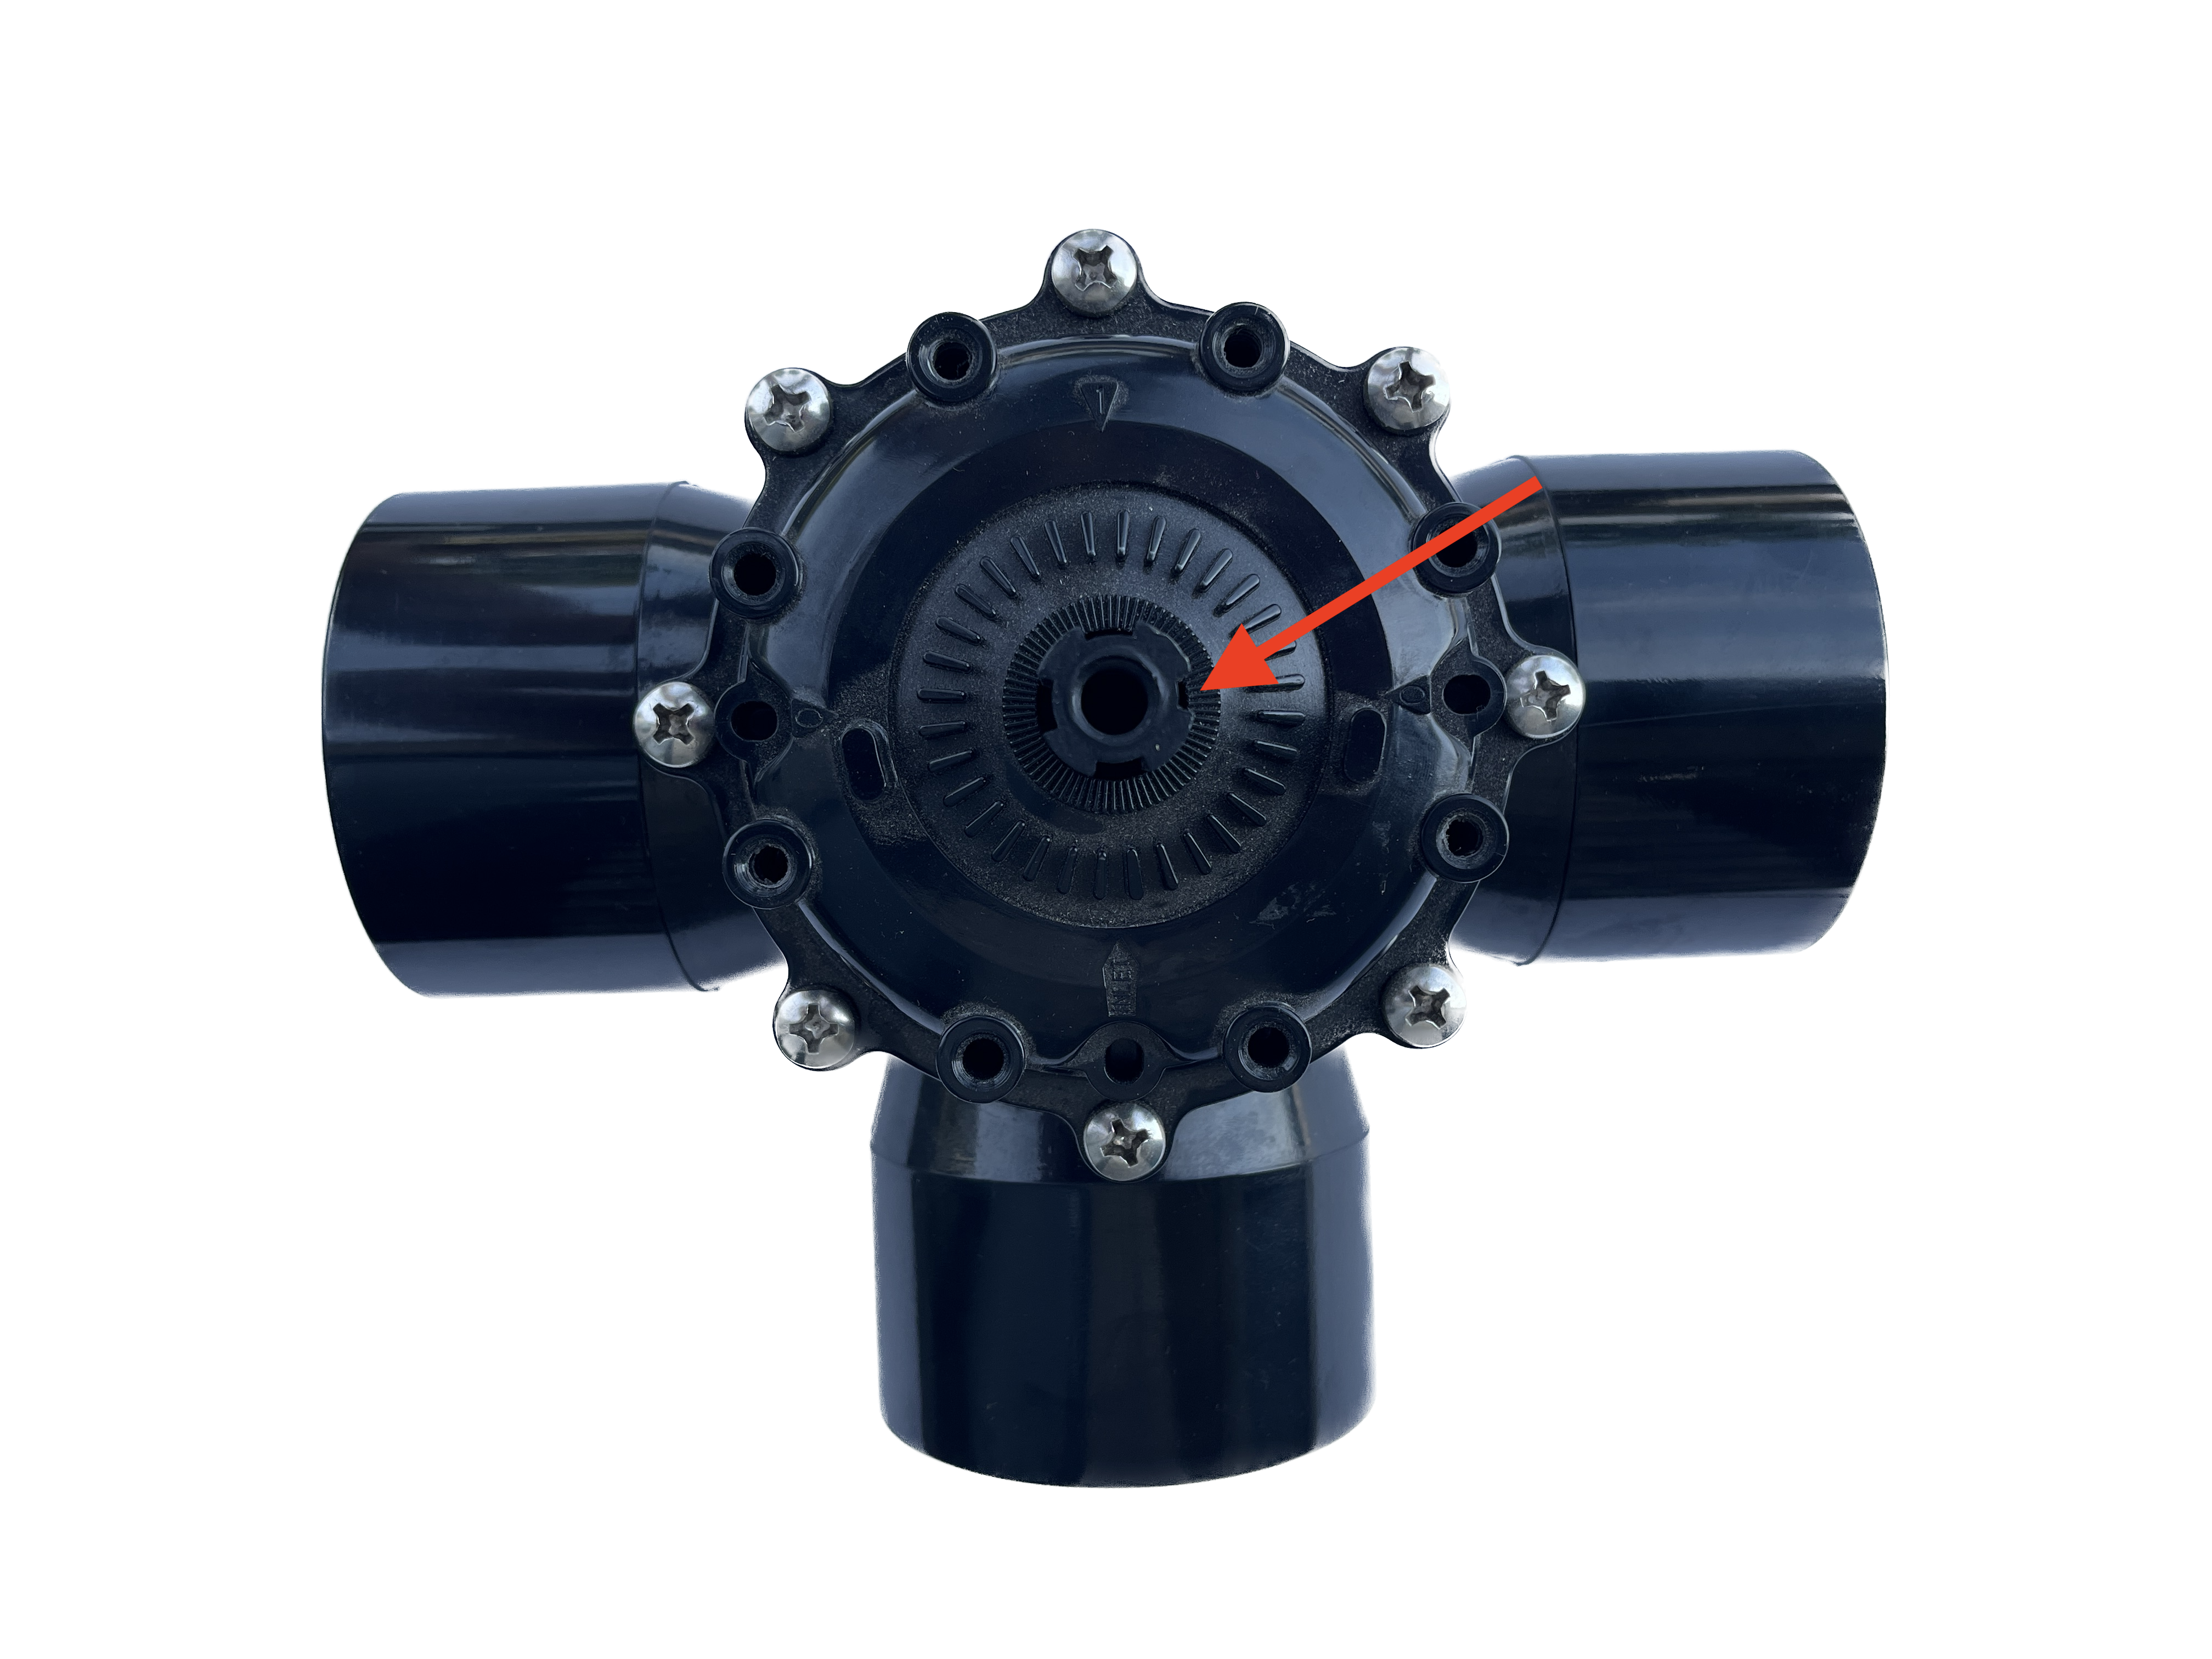
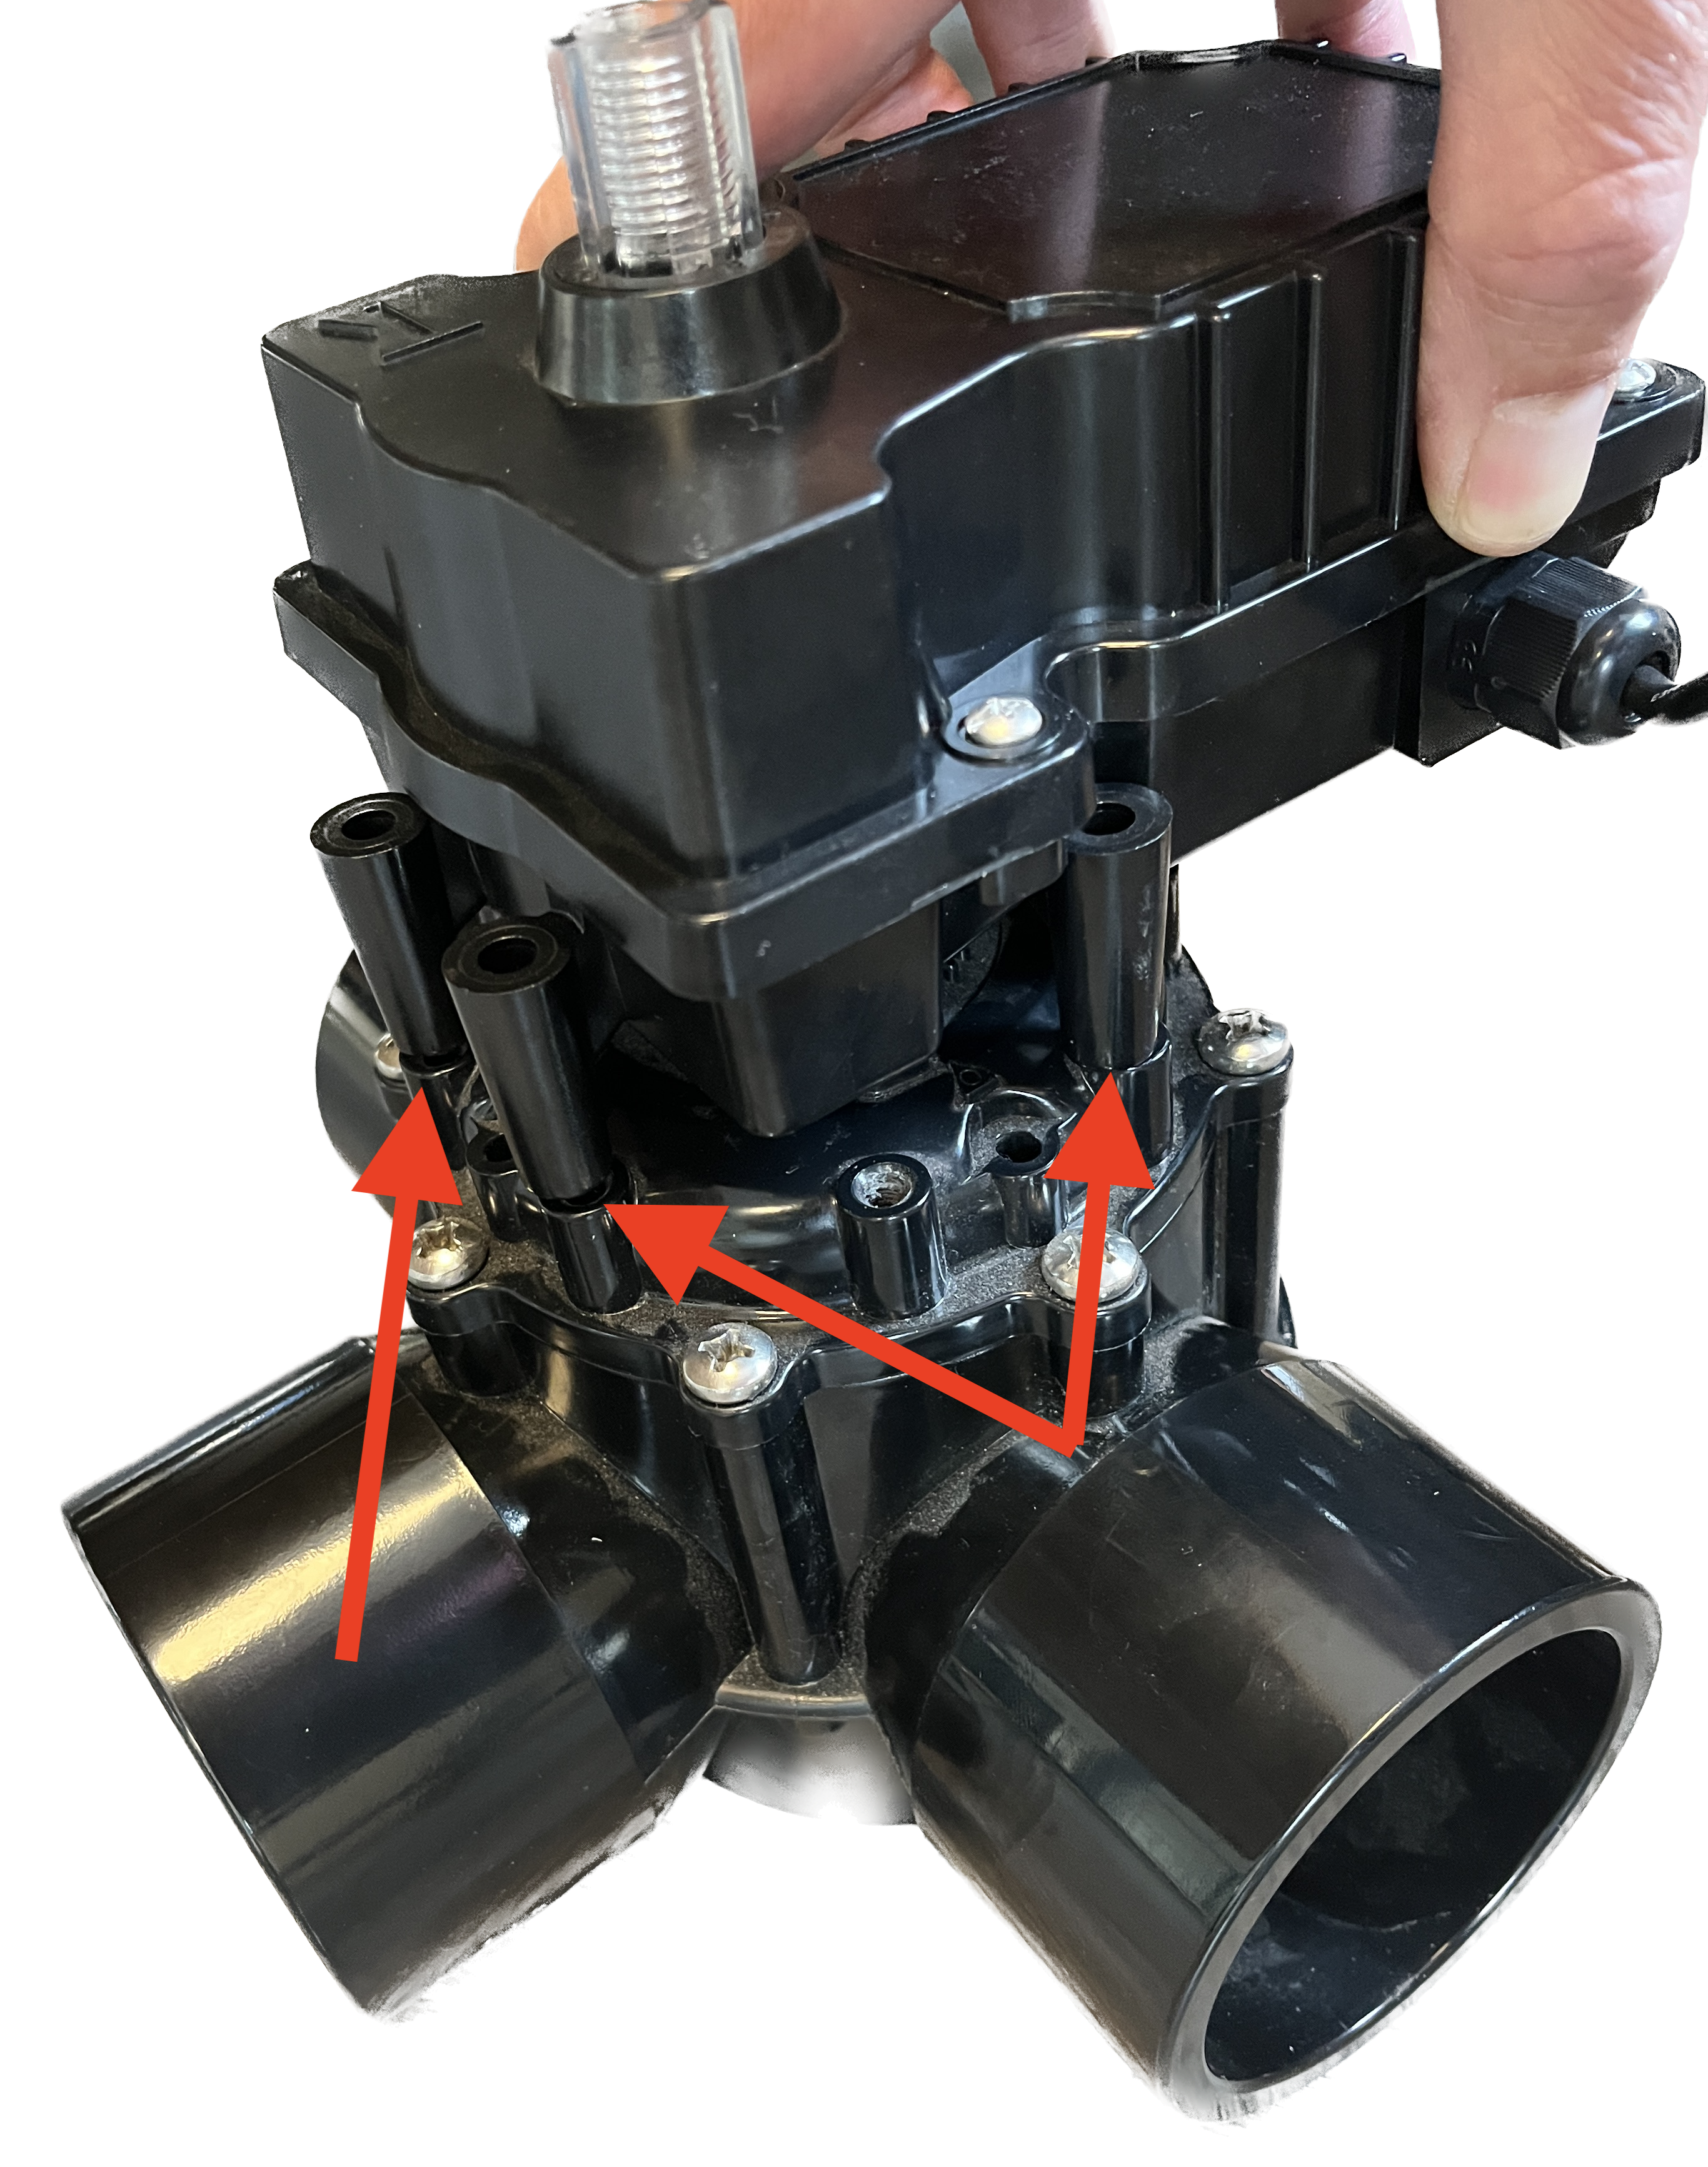
The 3-way valve has 4 notches, one of which is smaller than the other three.
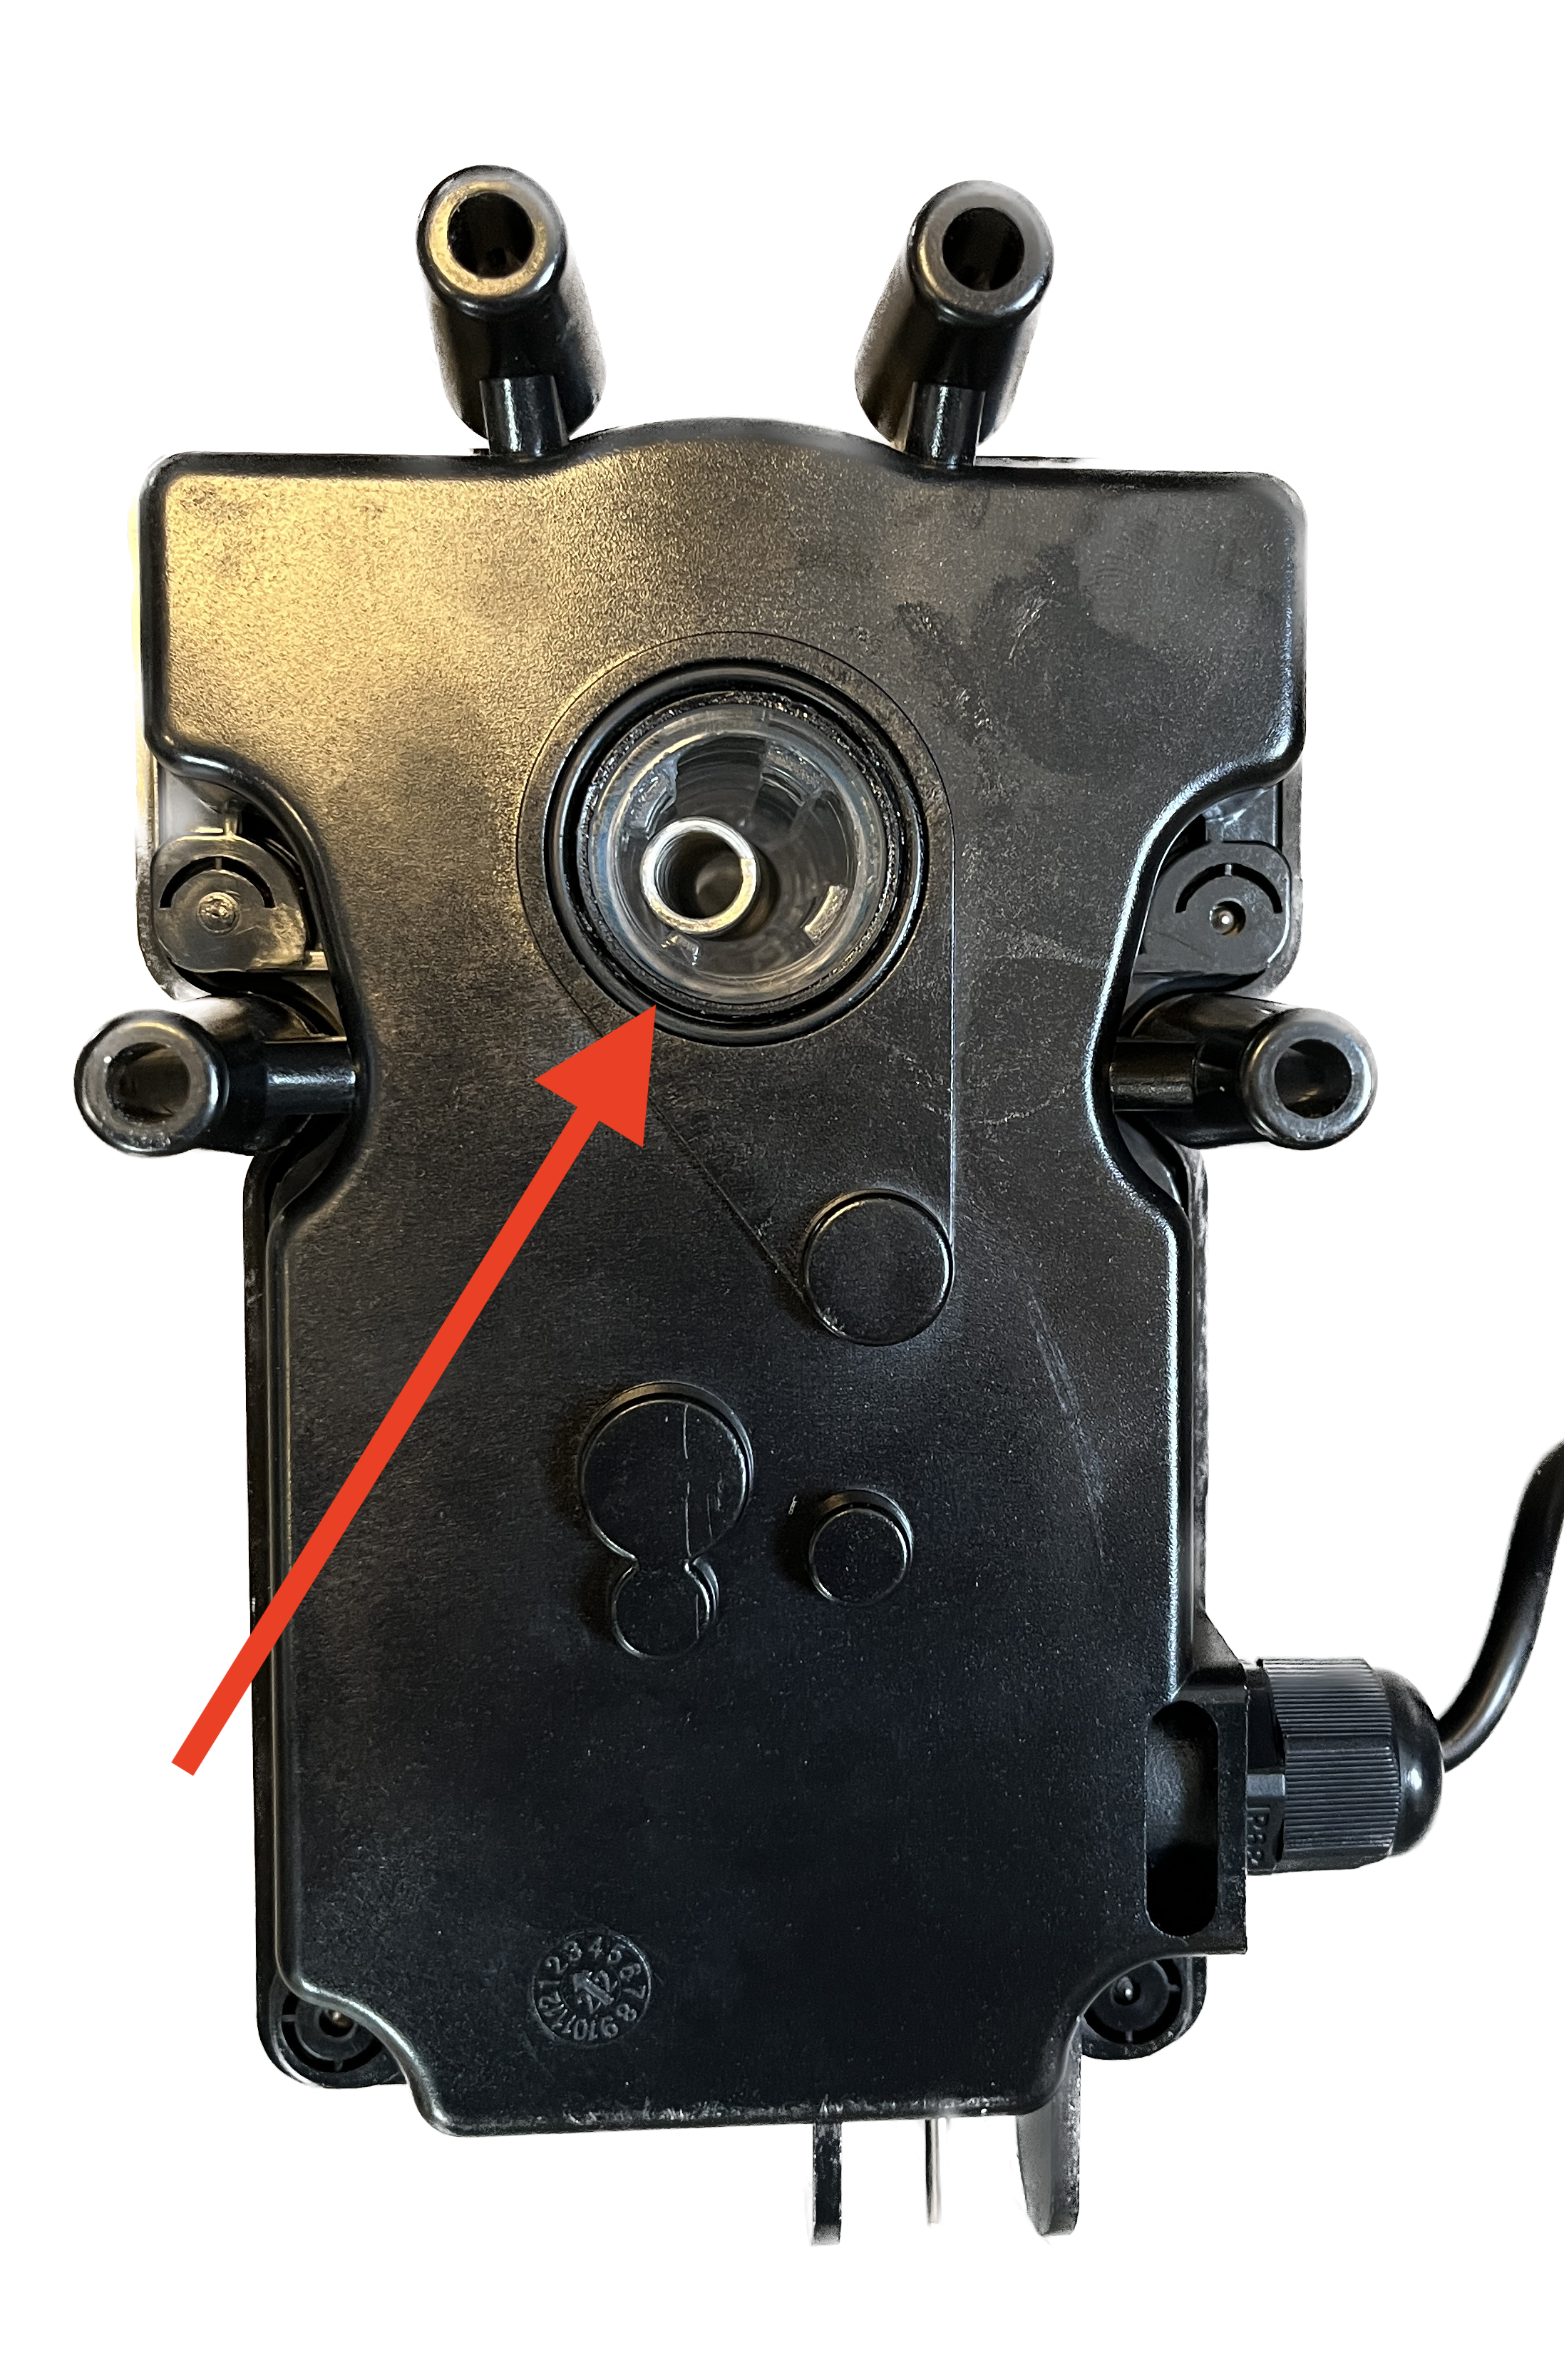
The bottom of the motor has 4 tabs, one of which is smaller than the others.
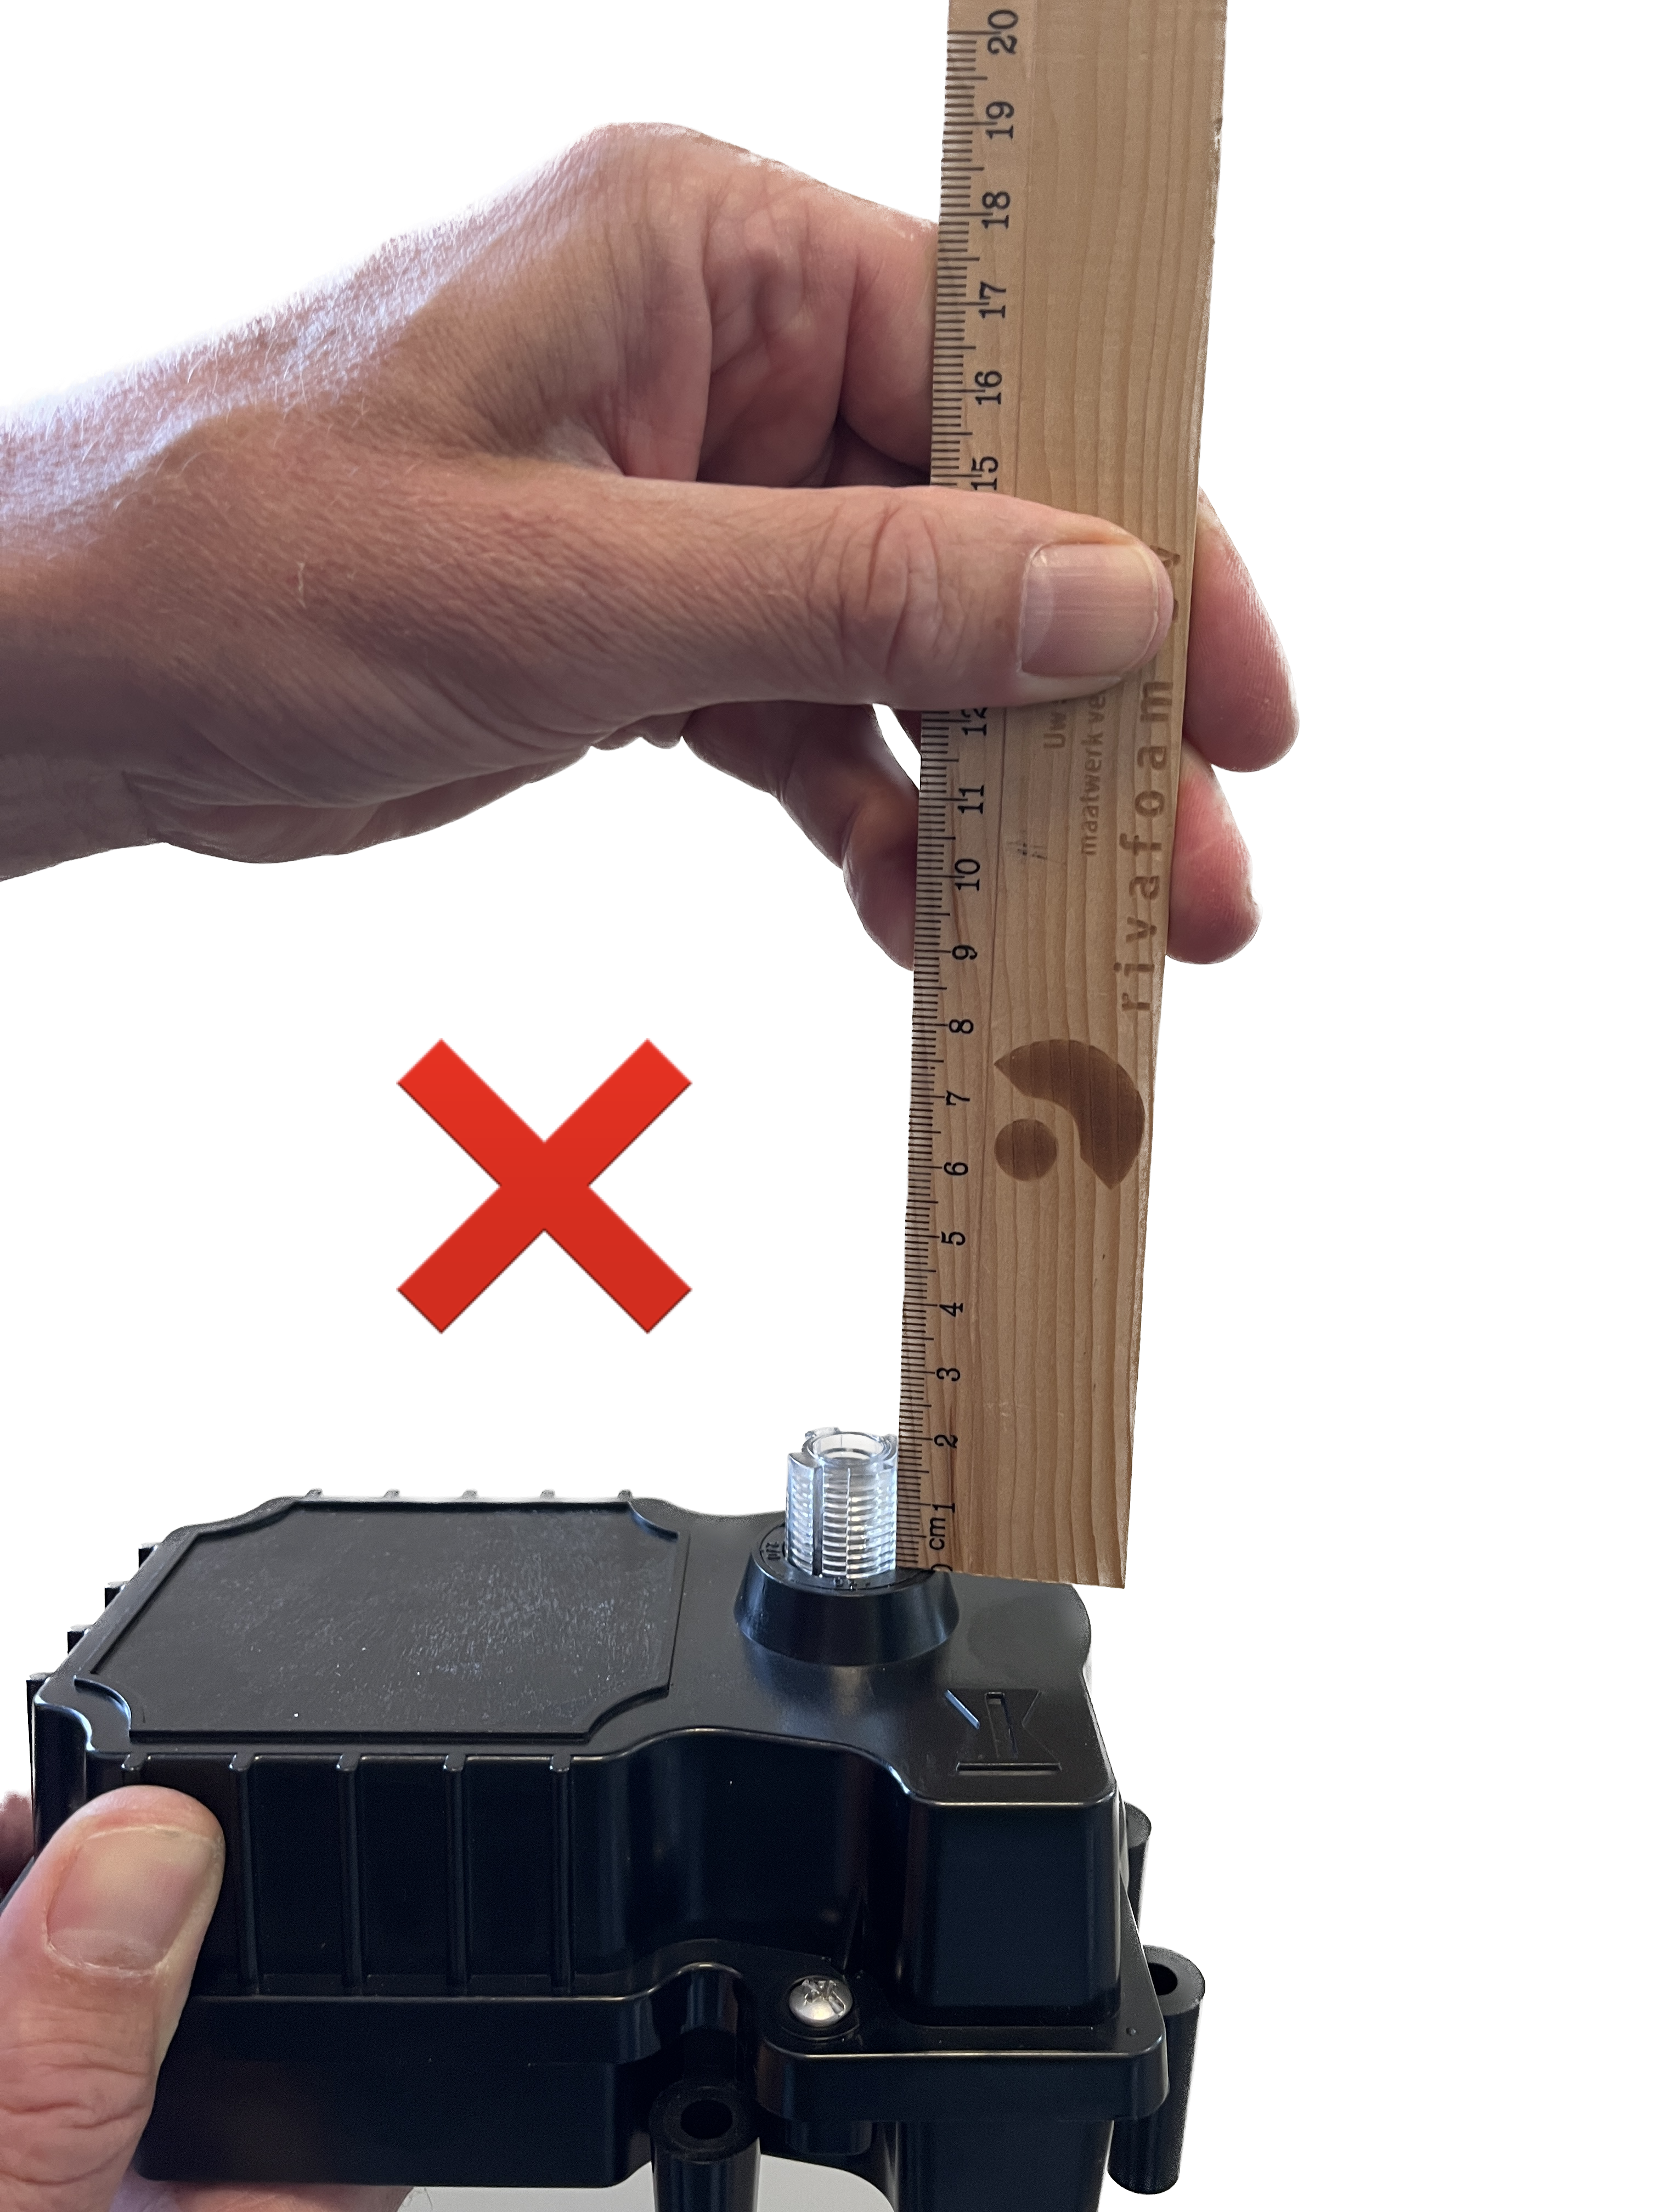
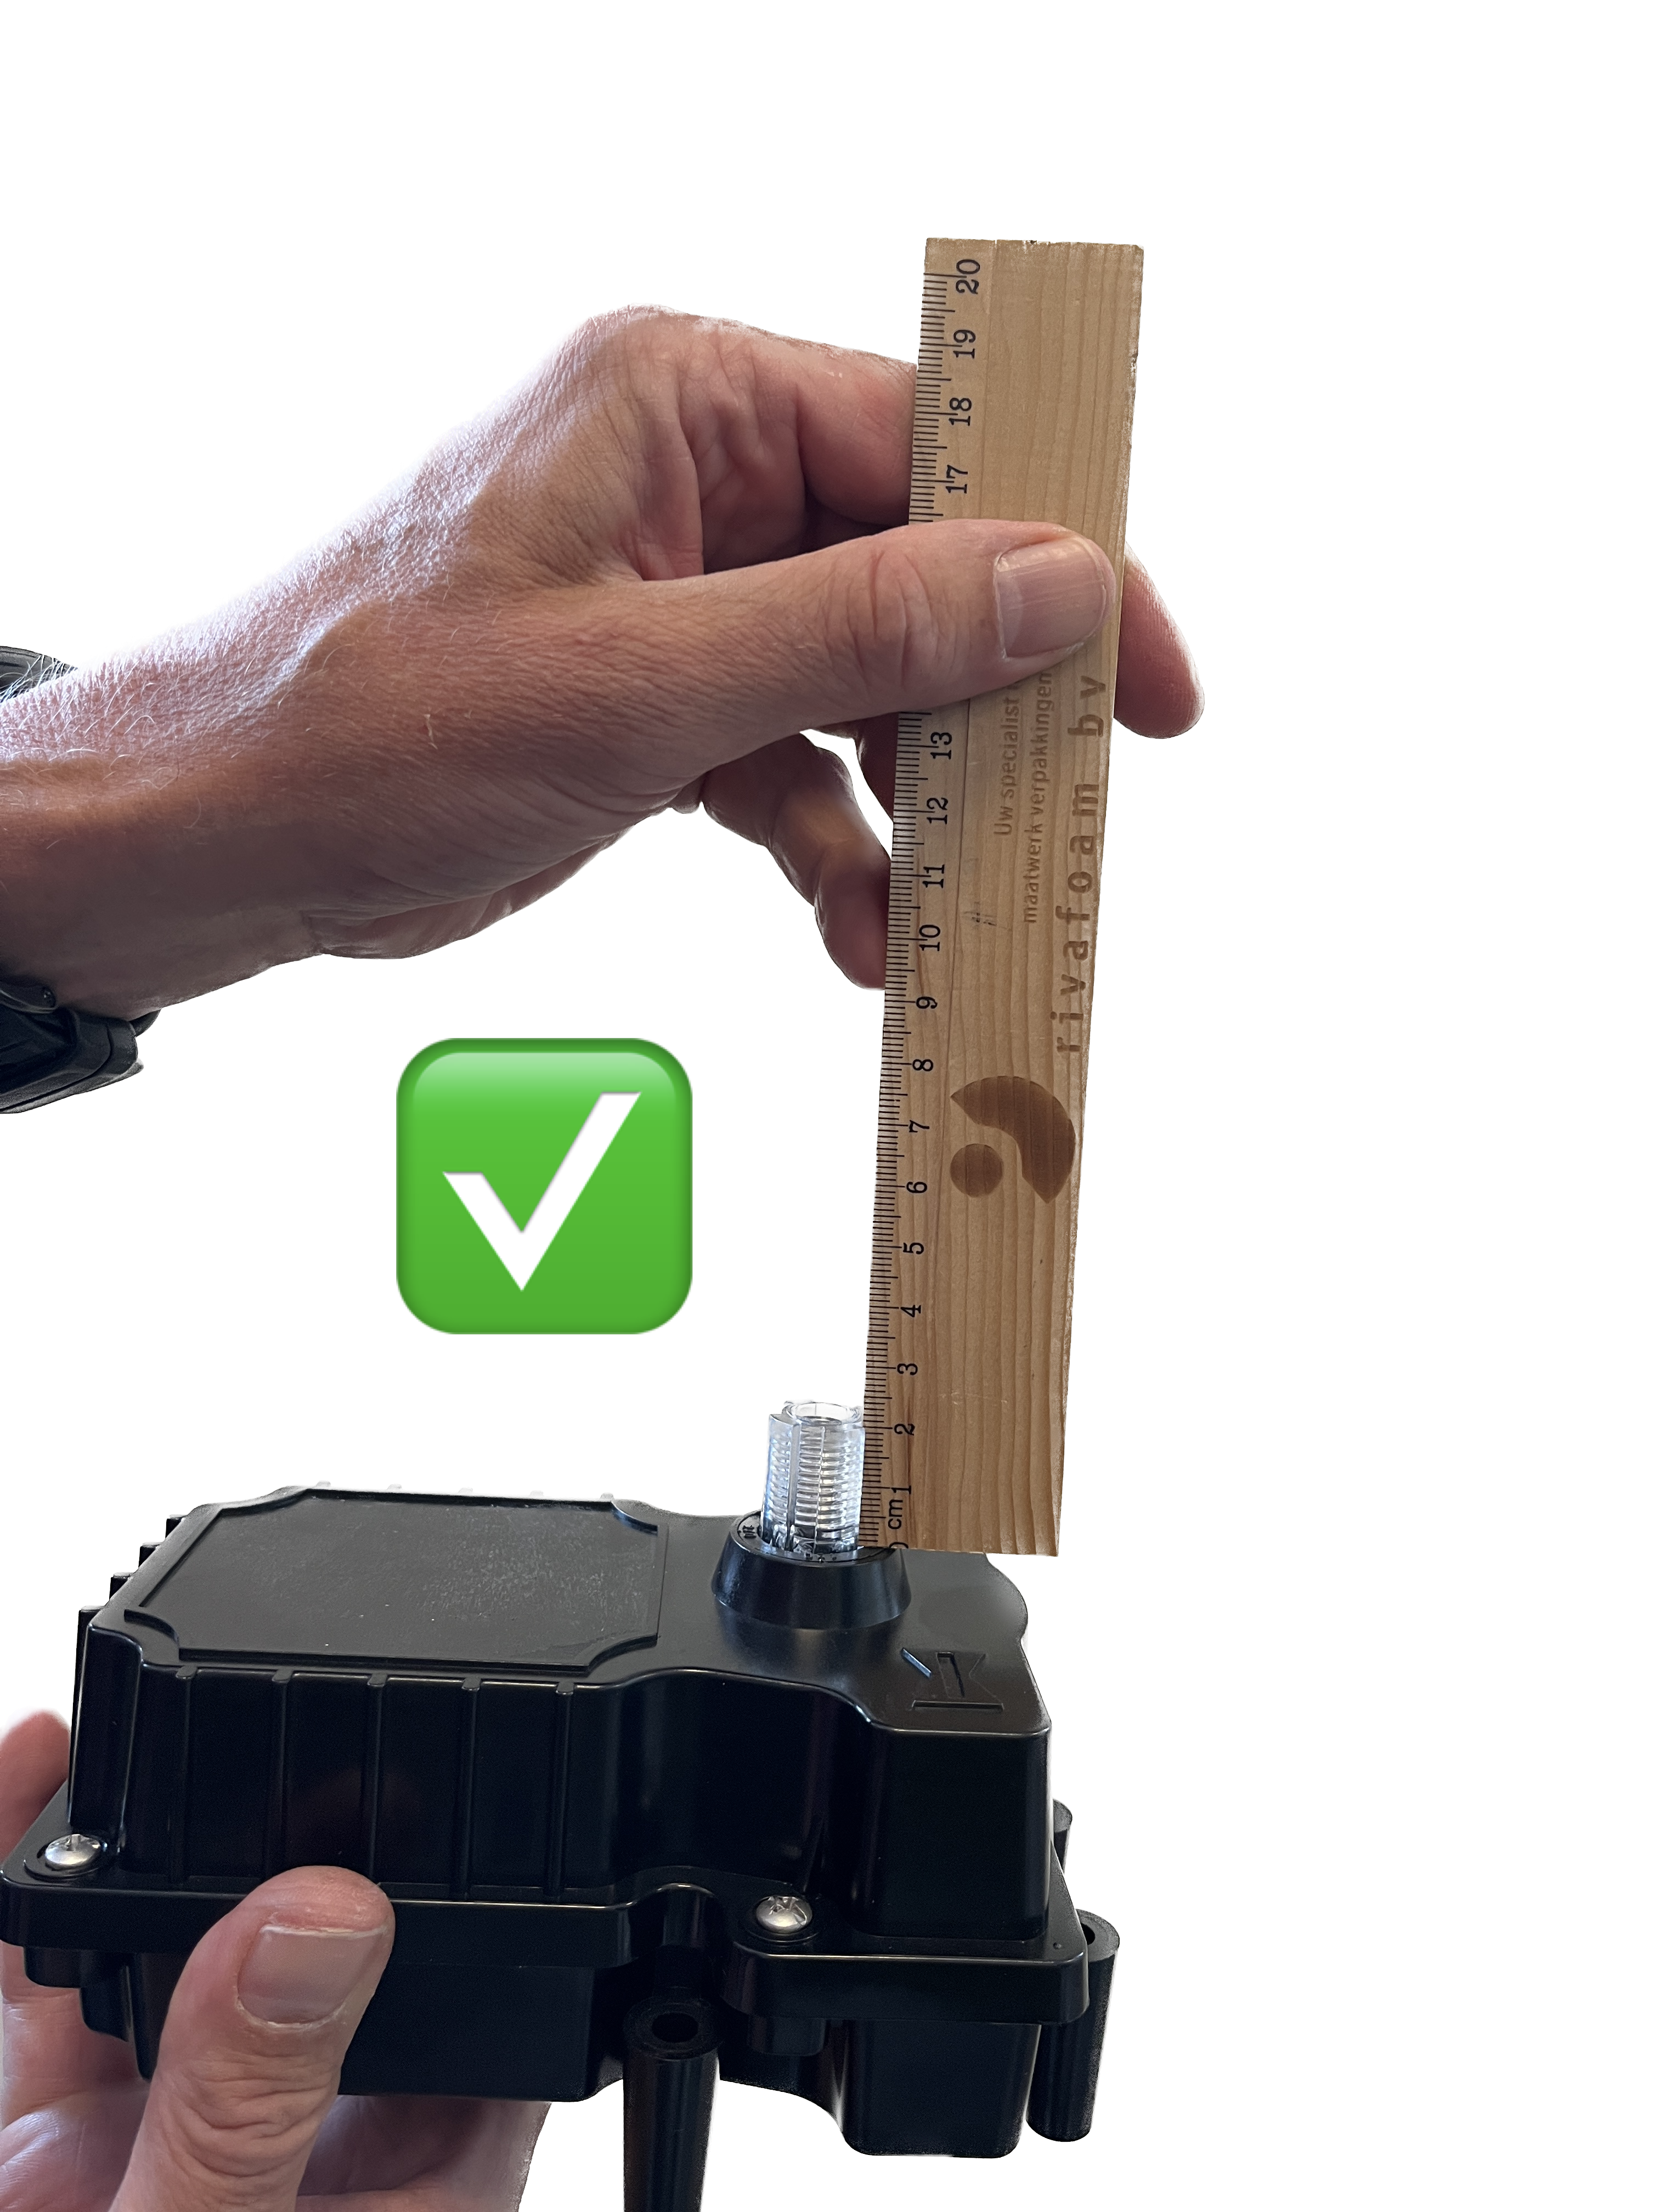
The motor may be in freewheel mode. Then the transparent part is in the low position (approx. 15mm long). Make sure it comes to its active position. You do this by pulling the plastic part outwards. You must do this while rotating the transparent part. At a certain point, you can pull it out slightly (5mm), and the length is then about 20mm. Normally, the plastic part is already in the correct position. You can easily measure this with a ruler.
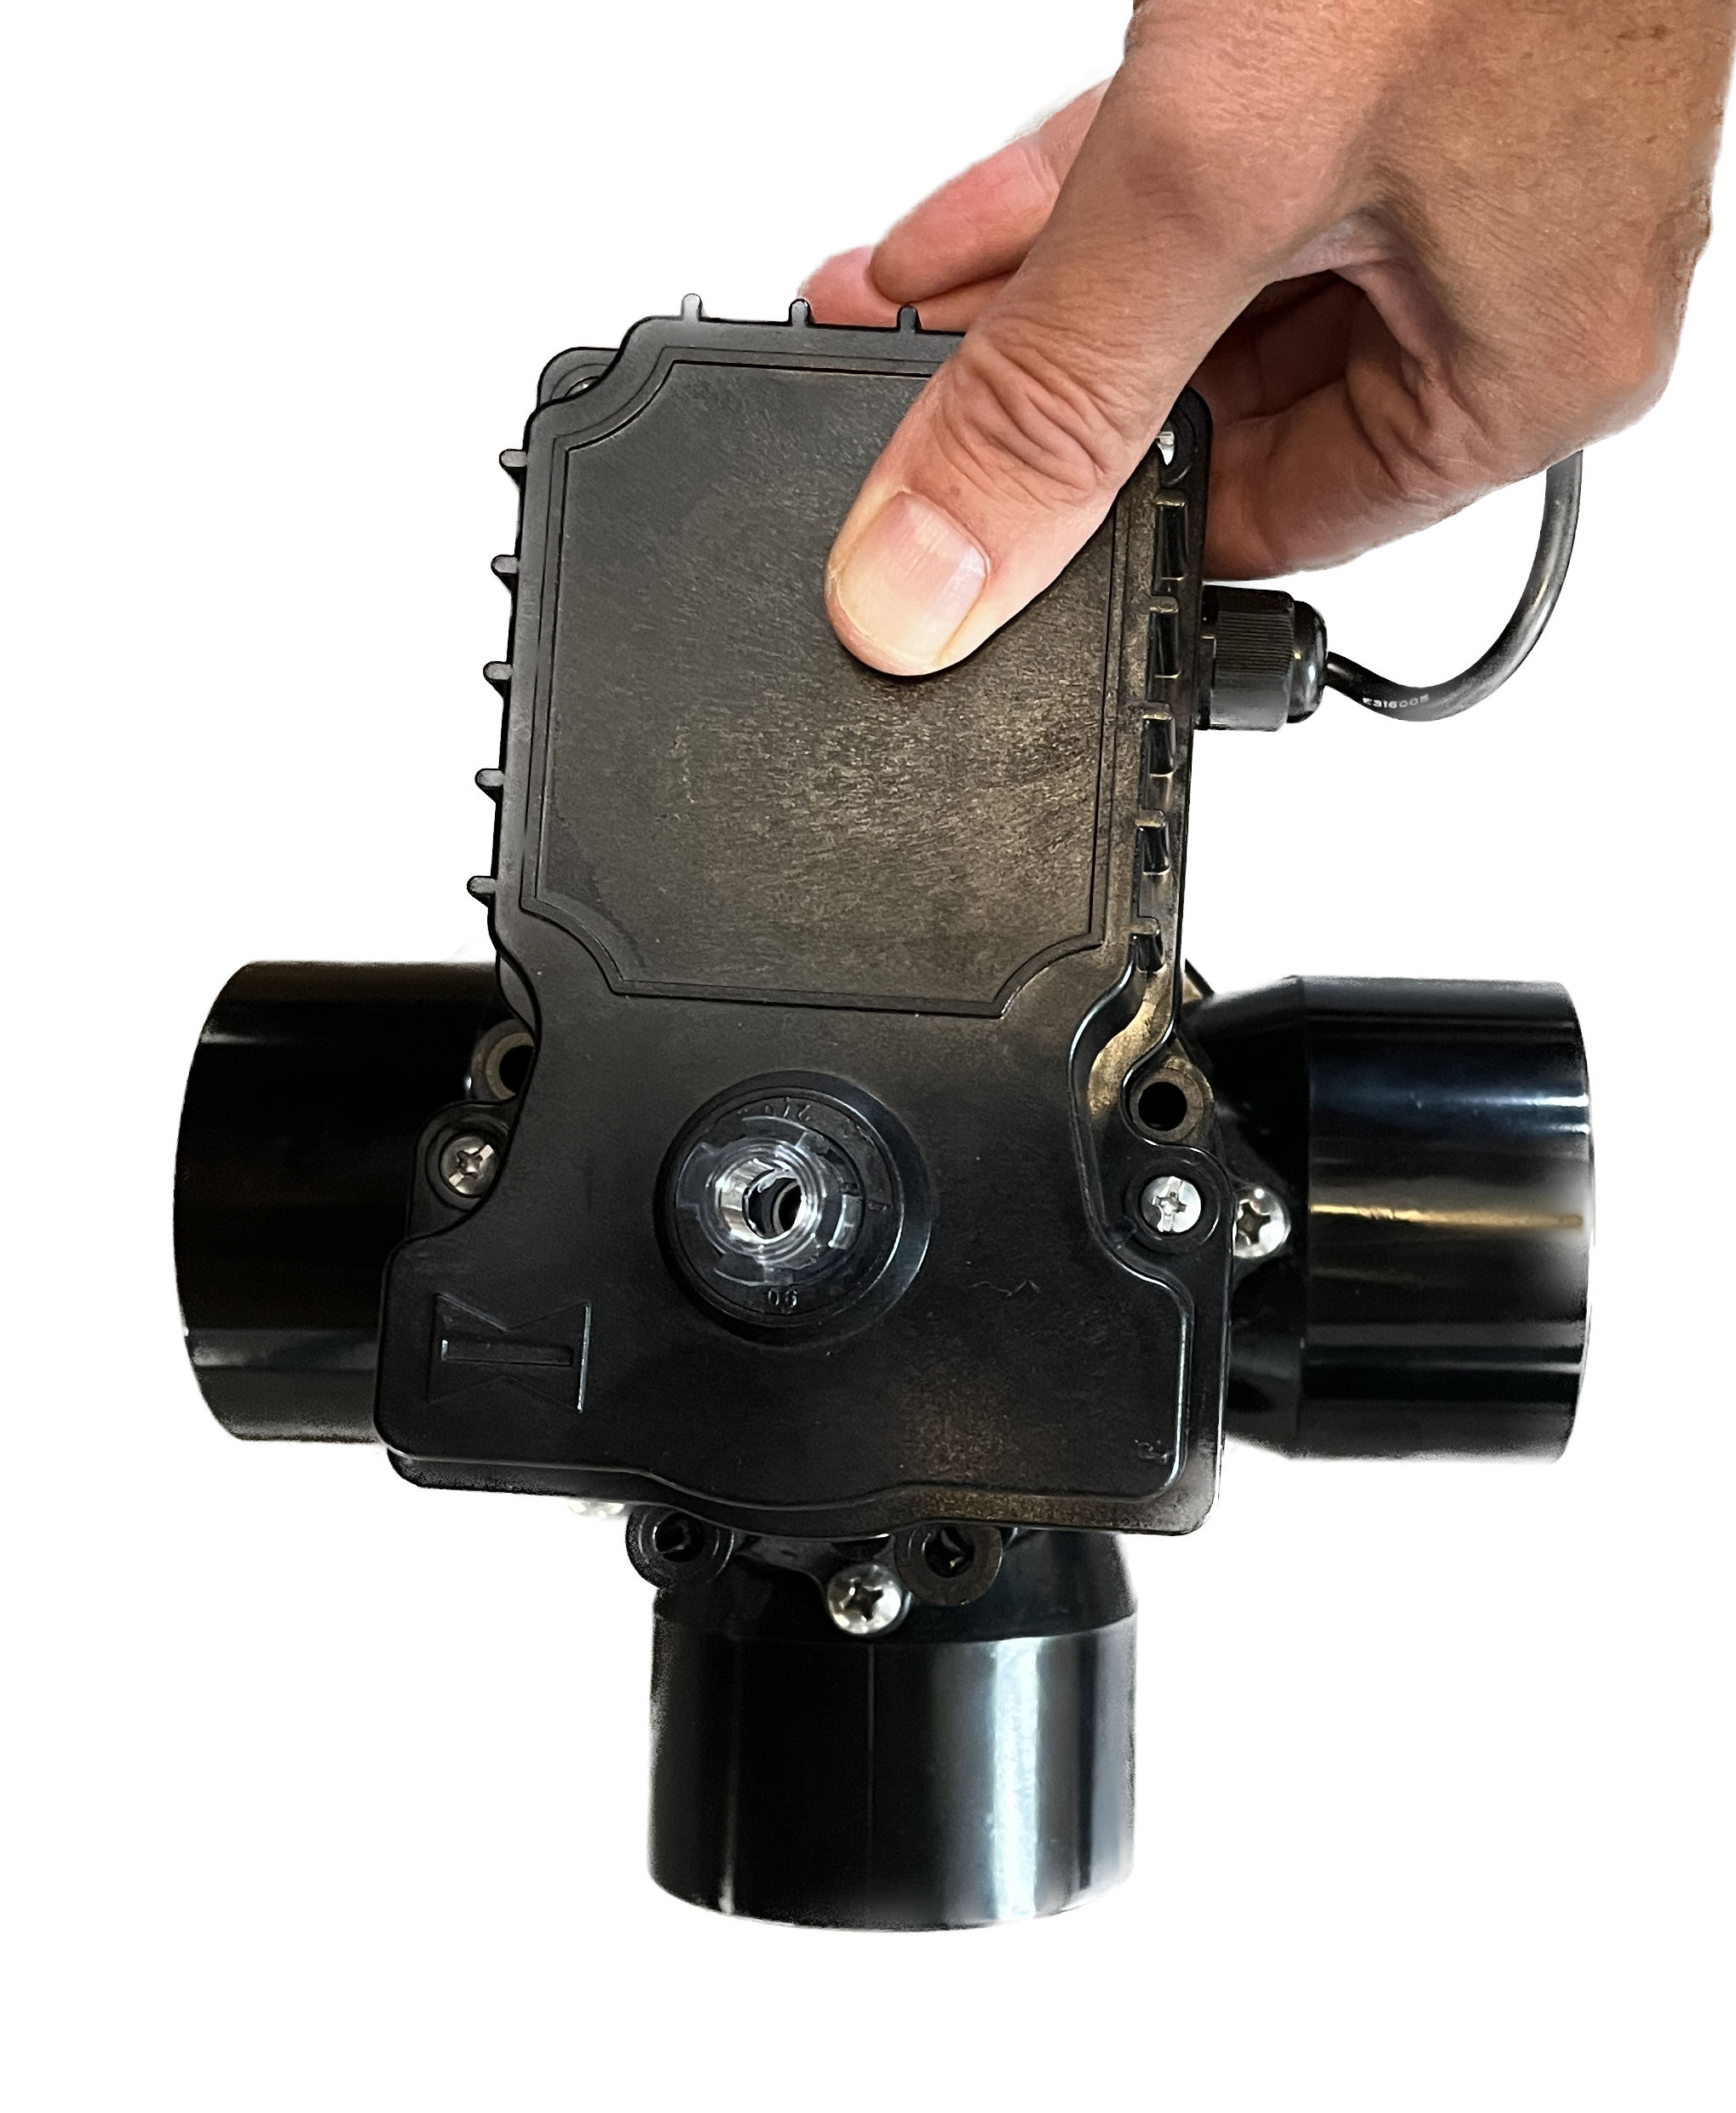
- Now place the motor on the 3-way valve: the smallest notch on the motor should align with the smallest notch on the 3-way valve.
- Now rotate the motor so that it is positioned as shown in the photo. In this position, you can then insert the screws so that the valve and motor are connected.
- Tighten the screws by hand.
- Now screw the plastic screw without the handle onto the motor.
4.2 Electronics
The control unit has an IP55 protection rating. Protect it from direct weather influences such as sun and rain.
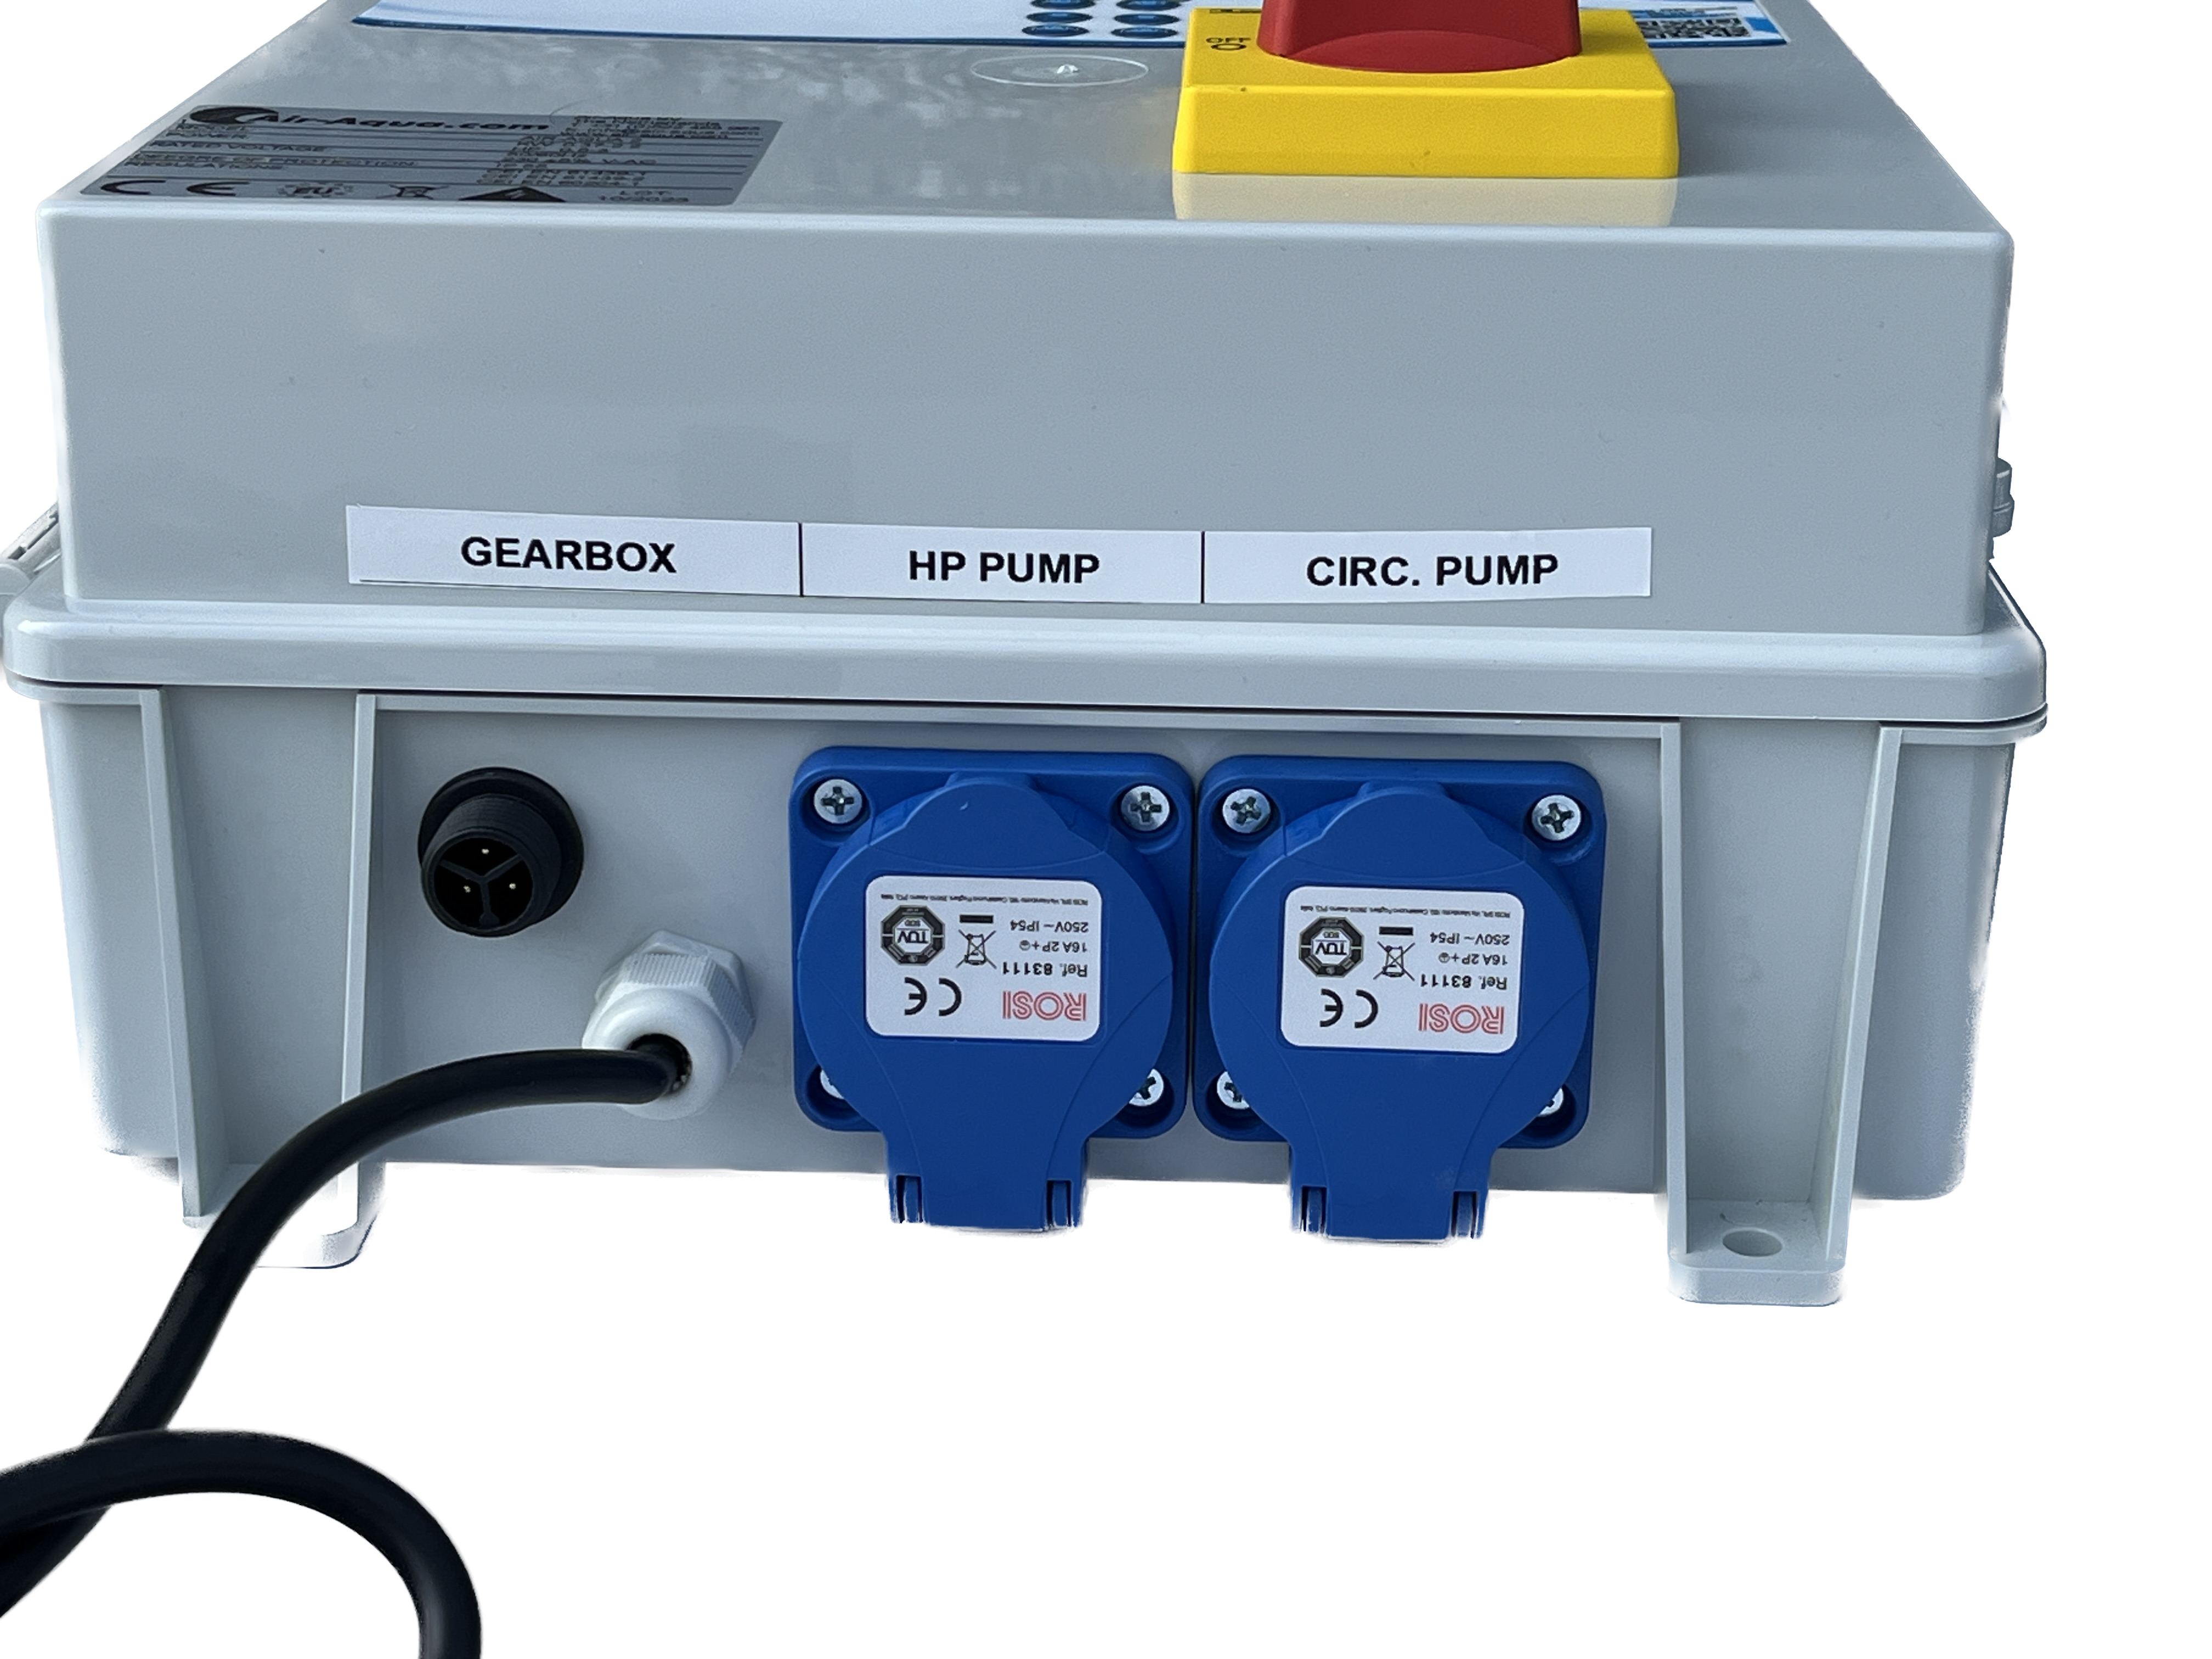
4.2.1 Connections
The control box has 3 connections:
- GEARBOX
Connect the motor connector of the flush valve here. - HP PUMP
Optionally connect a flush pump here -> see SuperBead manual when to use a flush pump. - CIRC. PUMP
Connect the pond pump here.
4.2.2 Operation of the control box
The operation of the electronics is as follows:
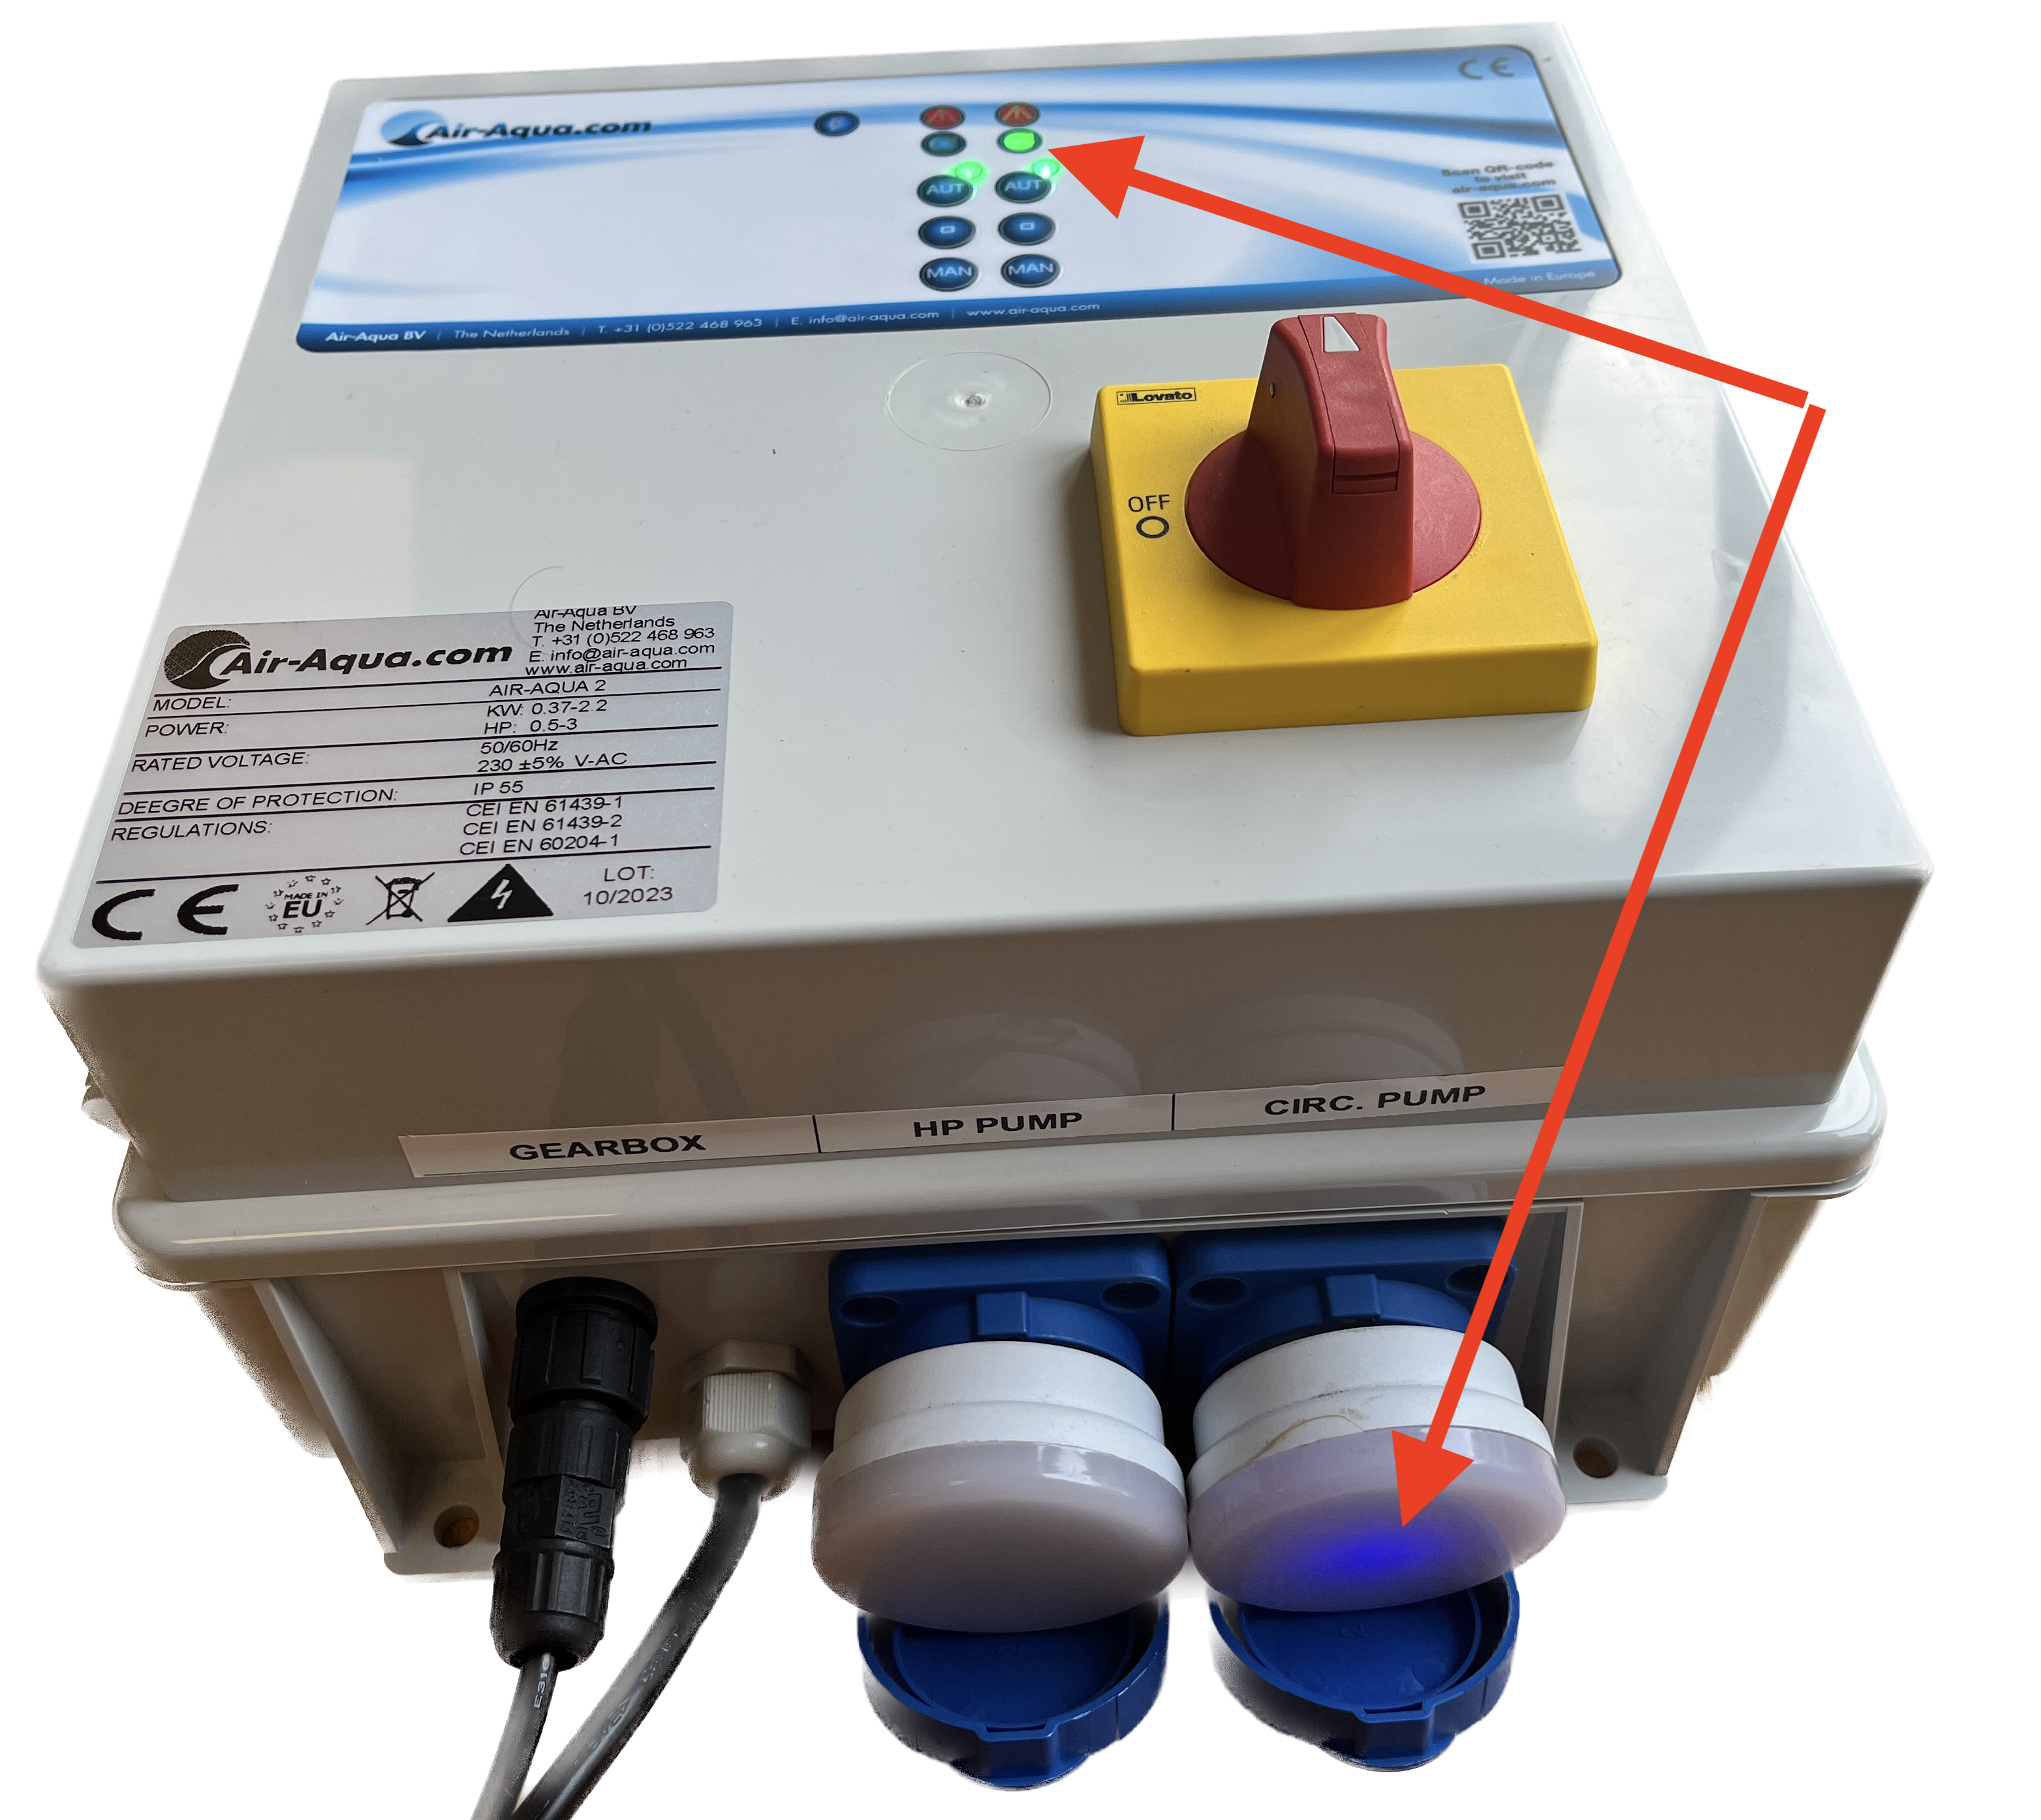
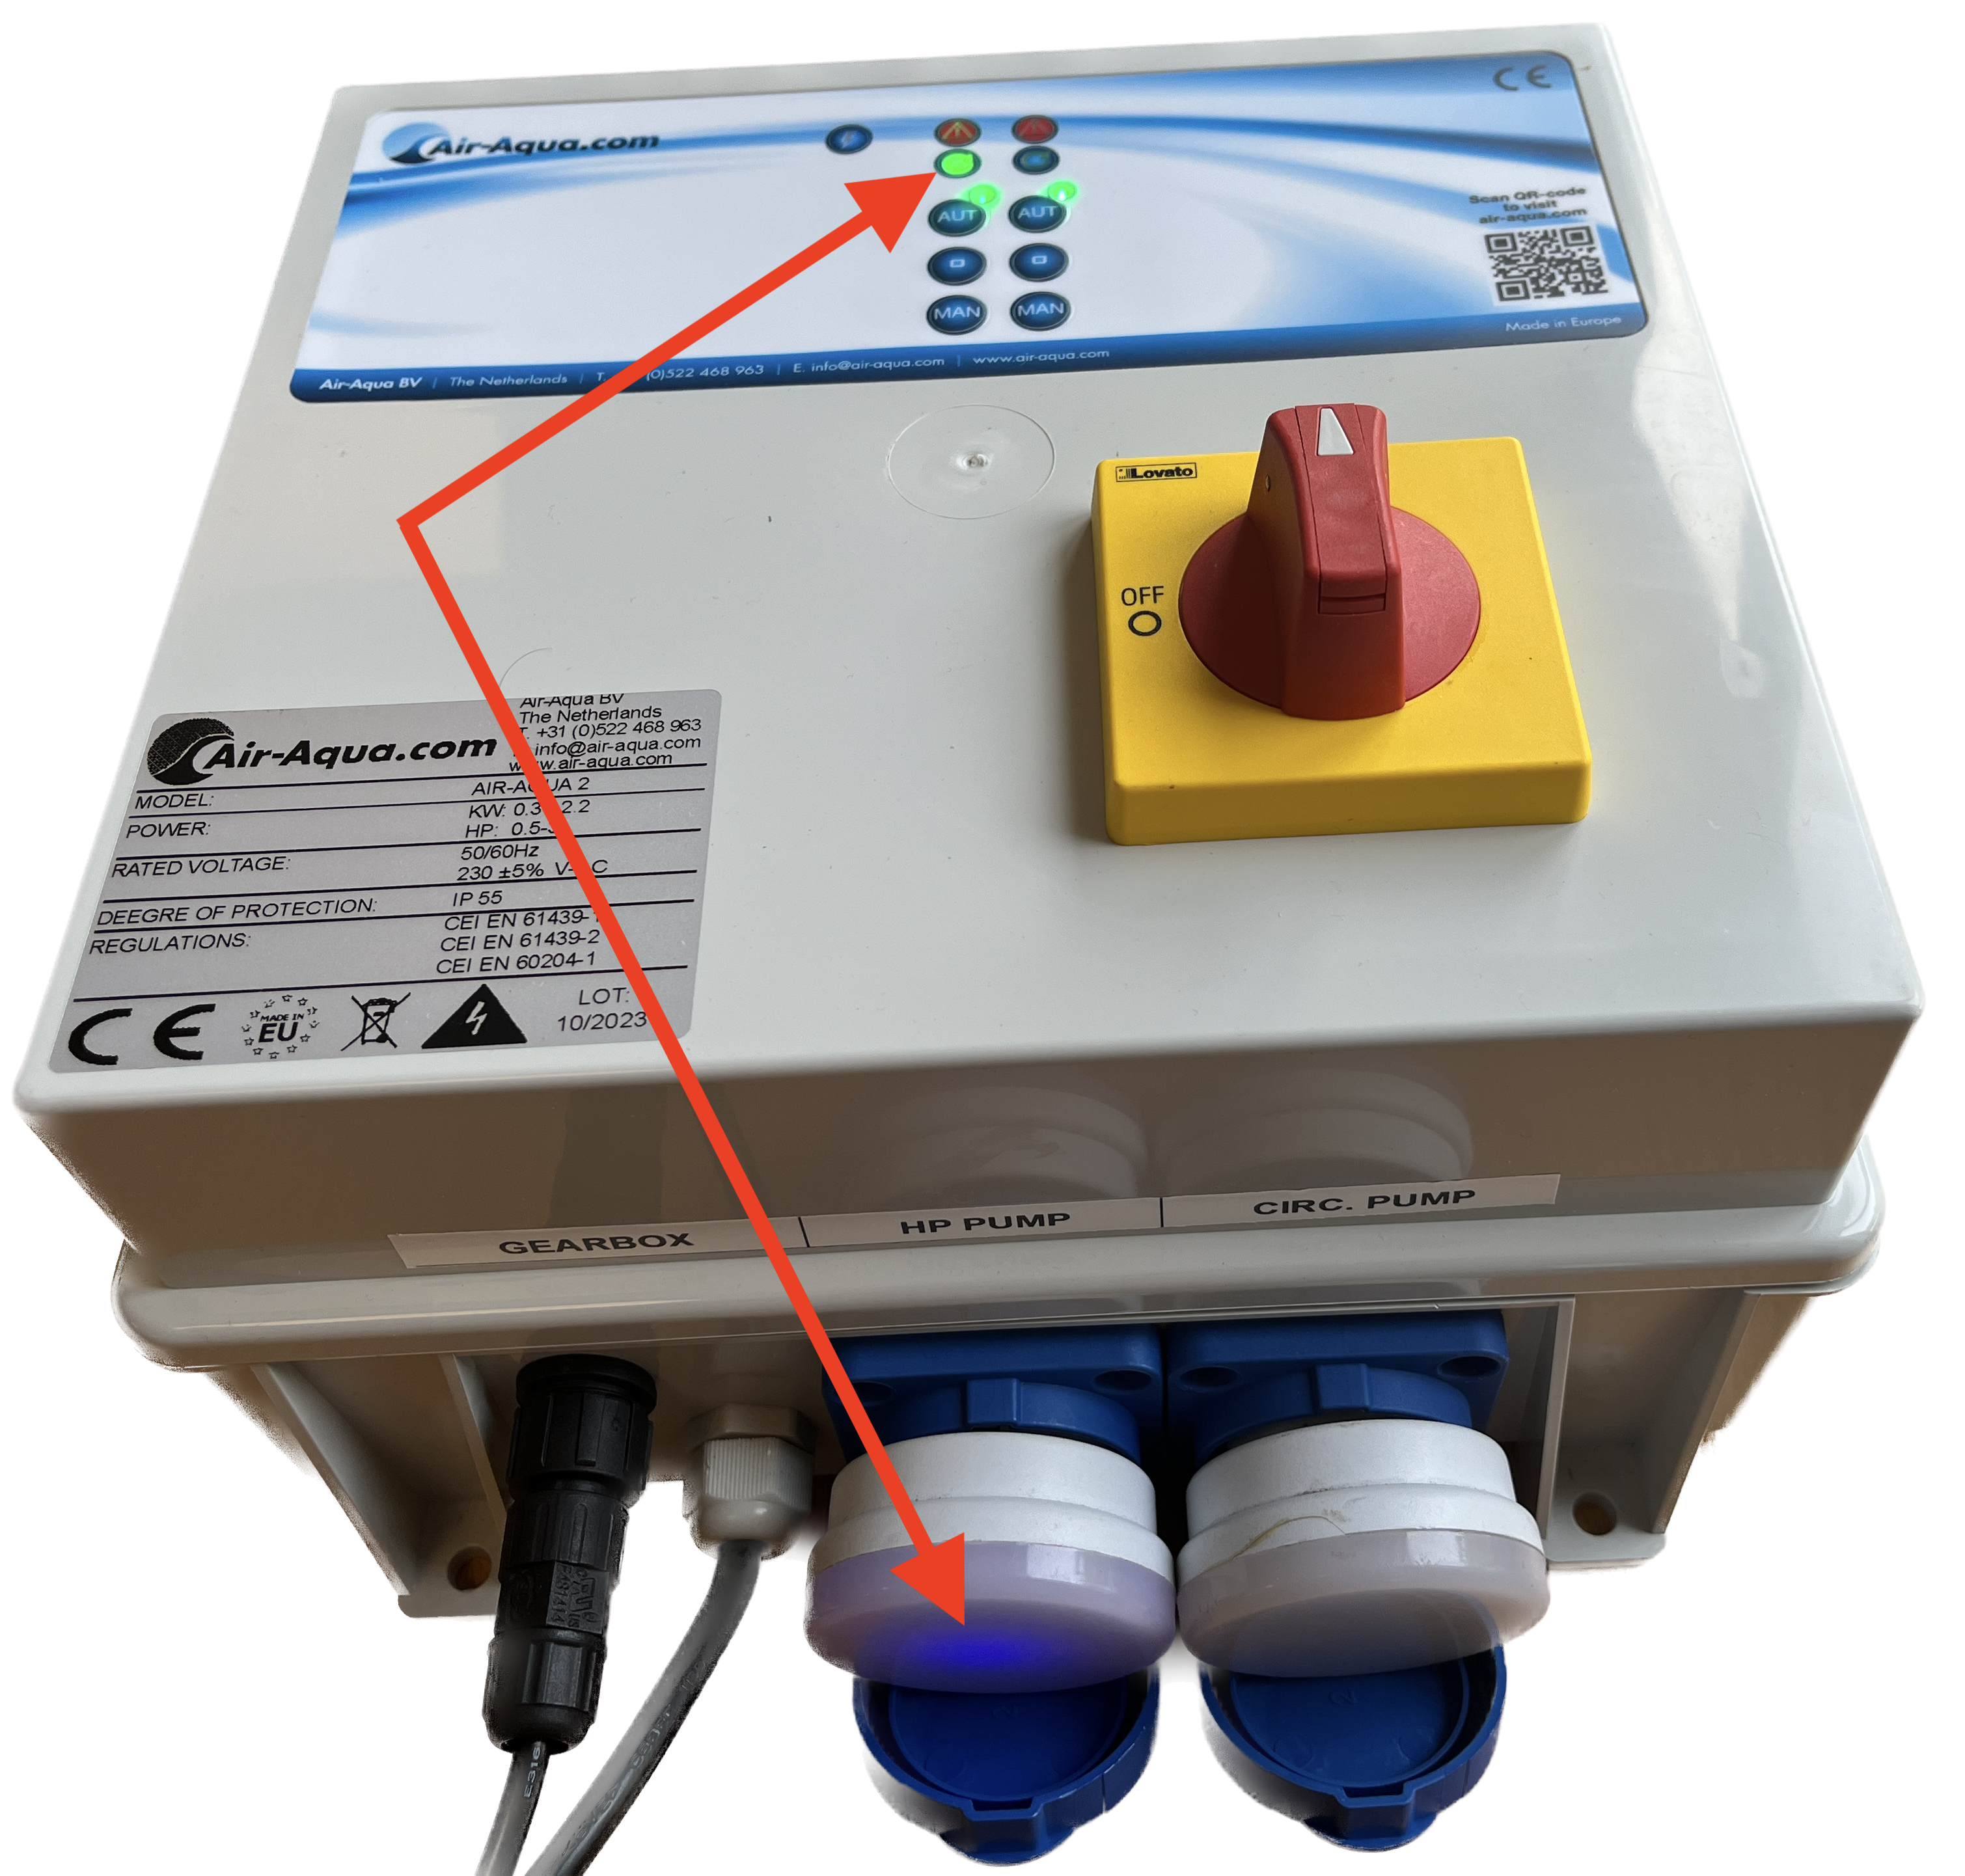
- When turned on via the red button ('off' -> 'on'), a flush cycle is first performed. The left light with the arrow lights up, and the (optional) flush pump is activated while the valve rotates. The valve remains in the flush position for about 2 minutes and then rotates back. During the rotation of the valve to the normal position, the flush pump and pond pump are turned off. About 10 seconds after the valve closes, the pond pump is turned on. The right light with the arrow is now lit.
- After the valve closes, it then takes 24 hours before the next flush is performed. This flush frequency can be adjusted to a cycle of 12, 48, 72, 96, and 120 hours.
4.2.3 Changing the Flush Frequency
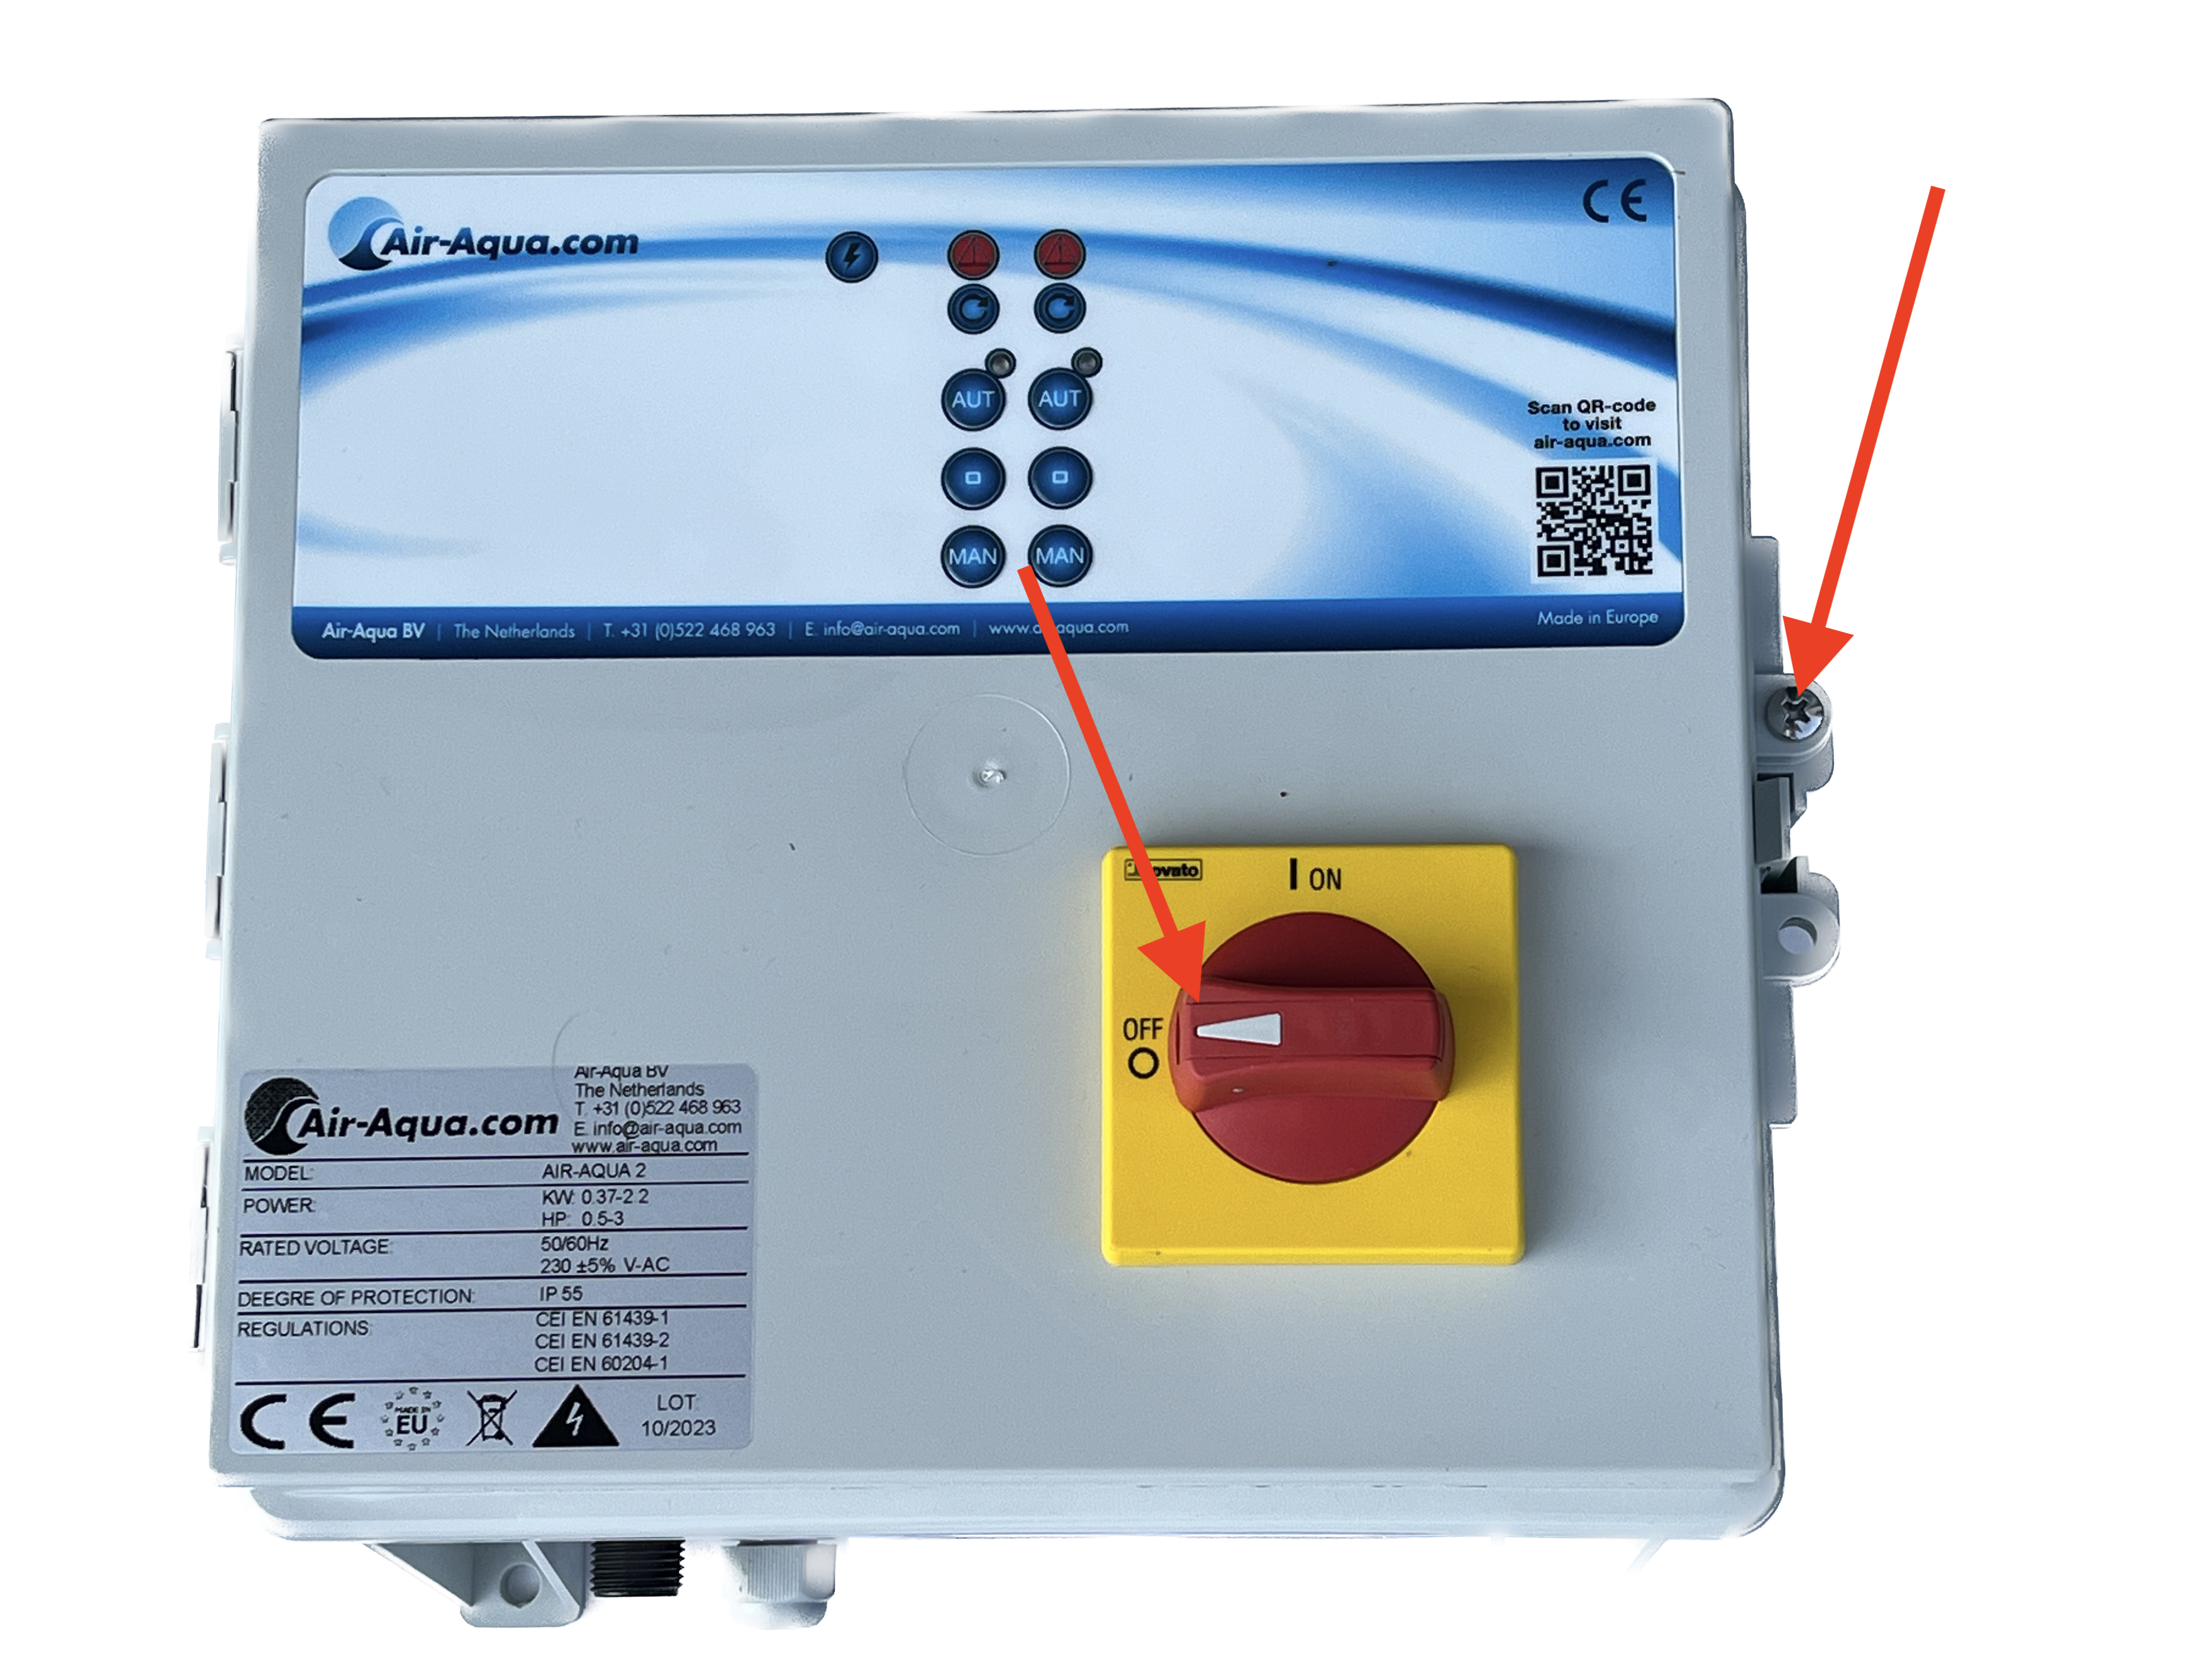
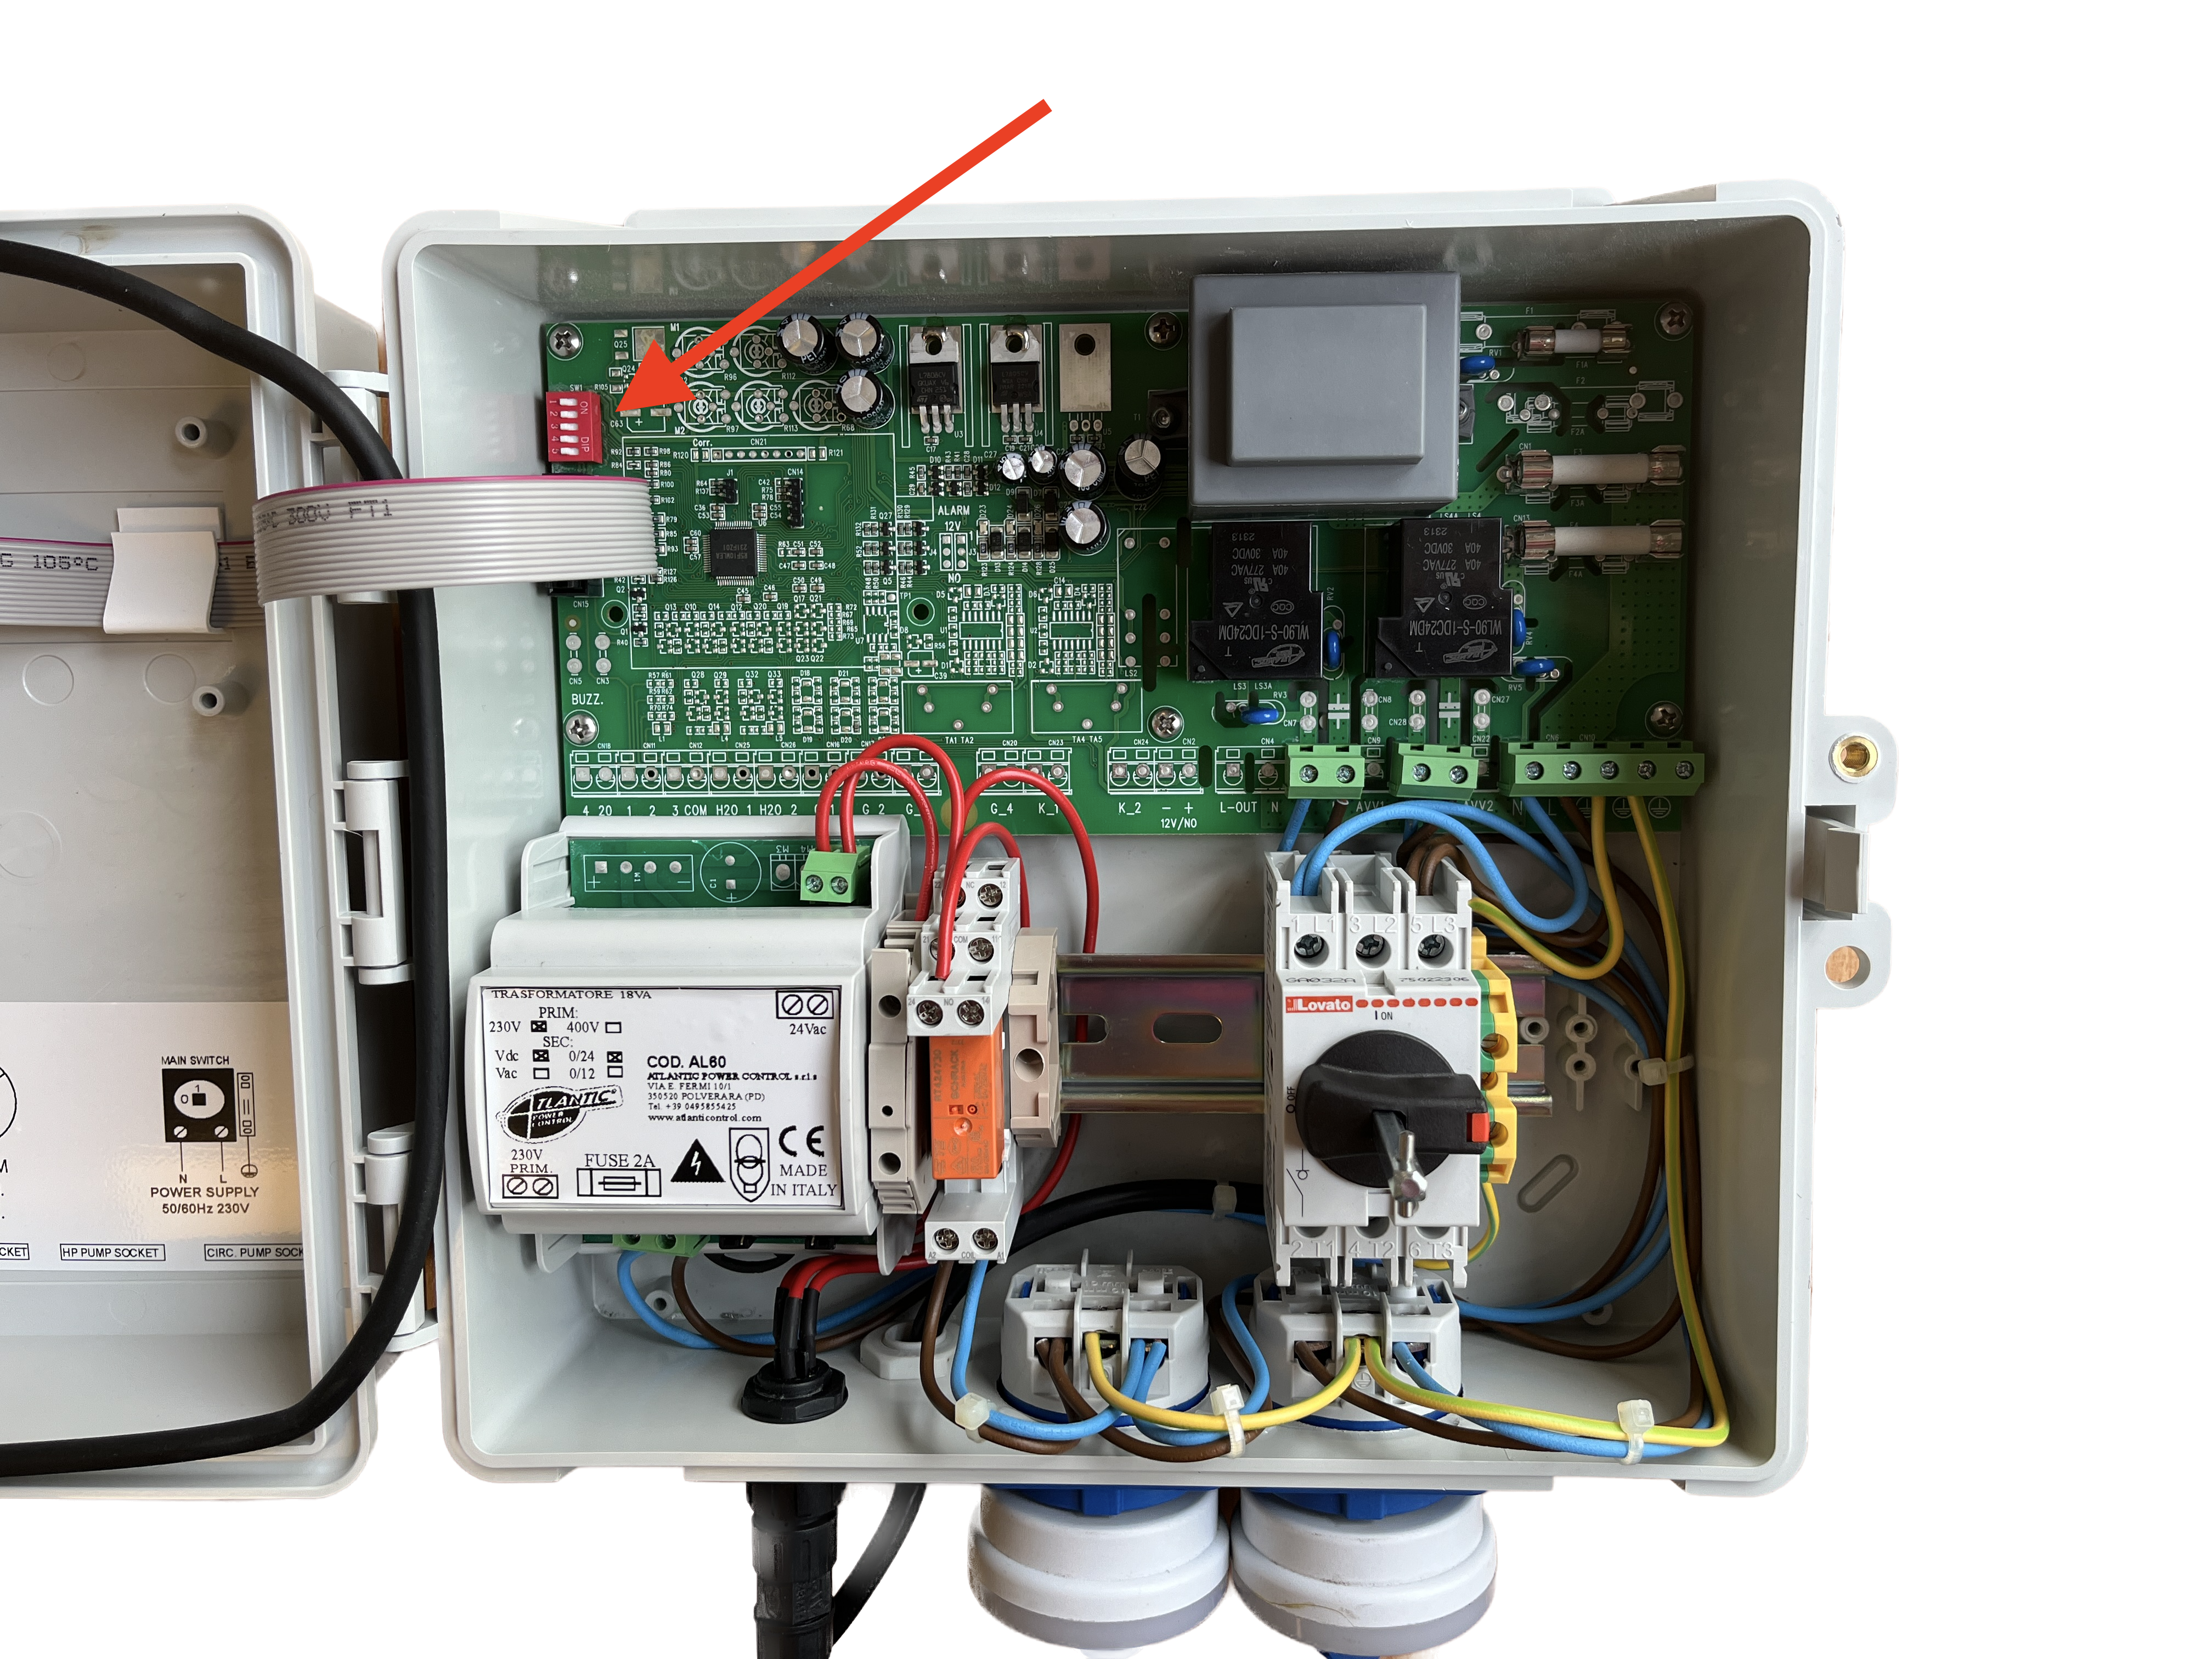
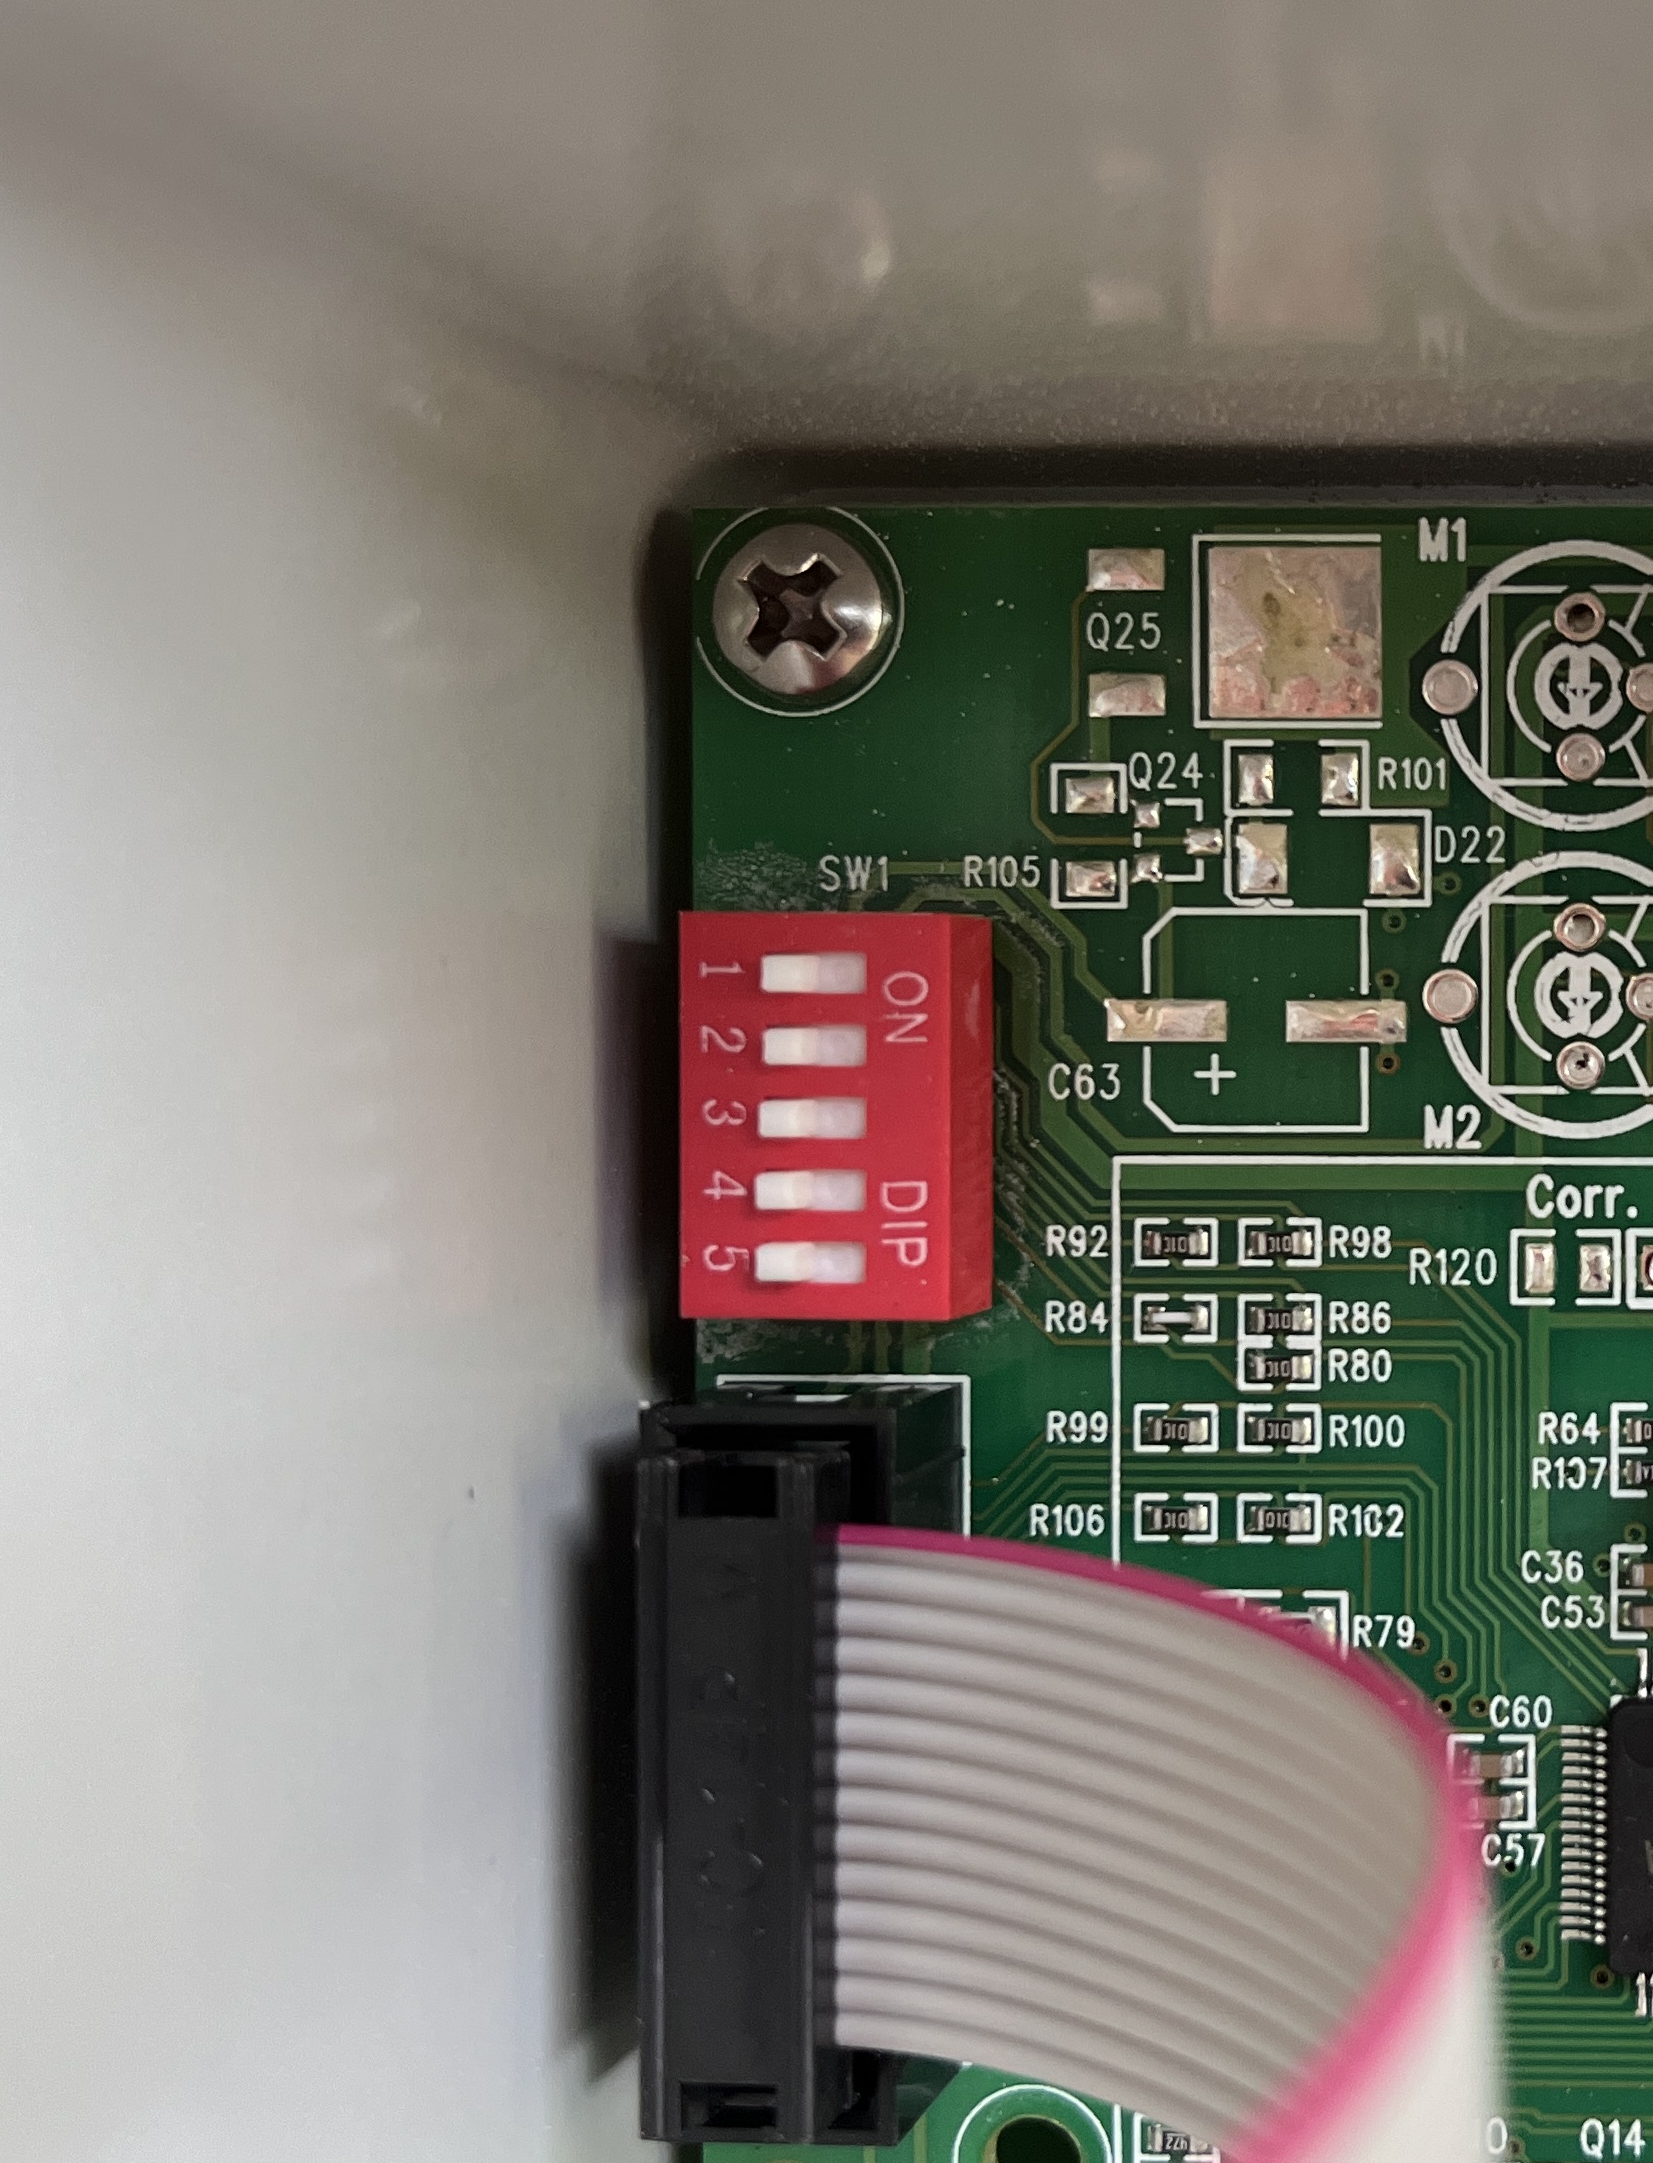
The flush frequency can be adjusted. By default, it is set to 24 hours. To change this, first set the red switch to the 'off' position. Then remove the plug from the outlet. Remove the screw and open the cover of the electronics.
Dip switch setting and flush frequency:
- All switches 'off' -> every 24 hours
- Only switch 1 'on' -> every 12 hours
- Only switch 2 'on' -> every 48 hours
- Only switch 3 'on' -> every 72 hours
- Only switch 4 'on' -> every 96 hours
- Only switch 5 'on' -> every 120 hours
If the switches are set differently than described above, a flush will be performed every 24 hours. If all switches are 'on', it will flush in demo mode (a flush every 10 minutes).
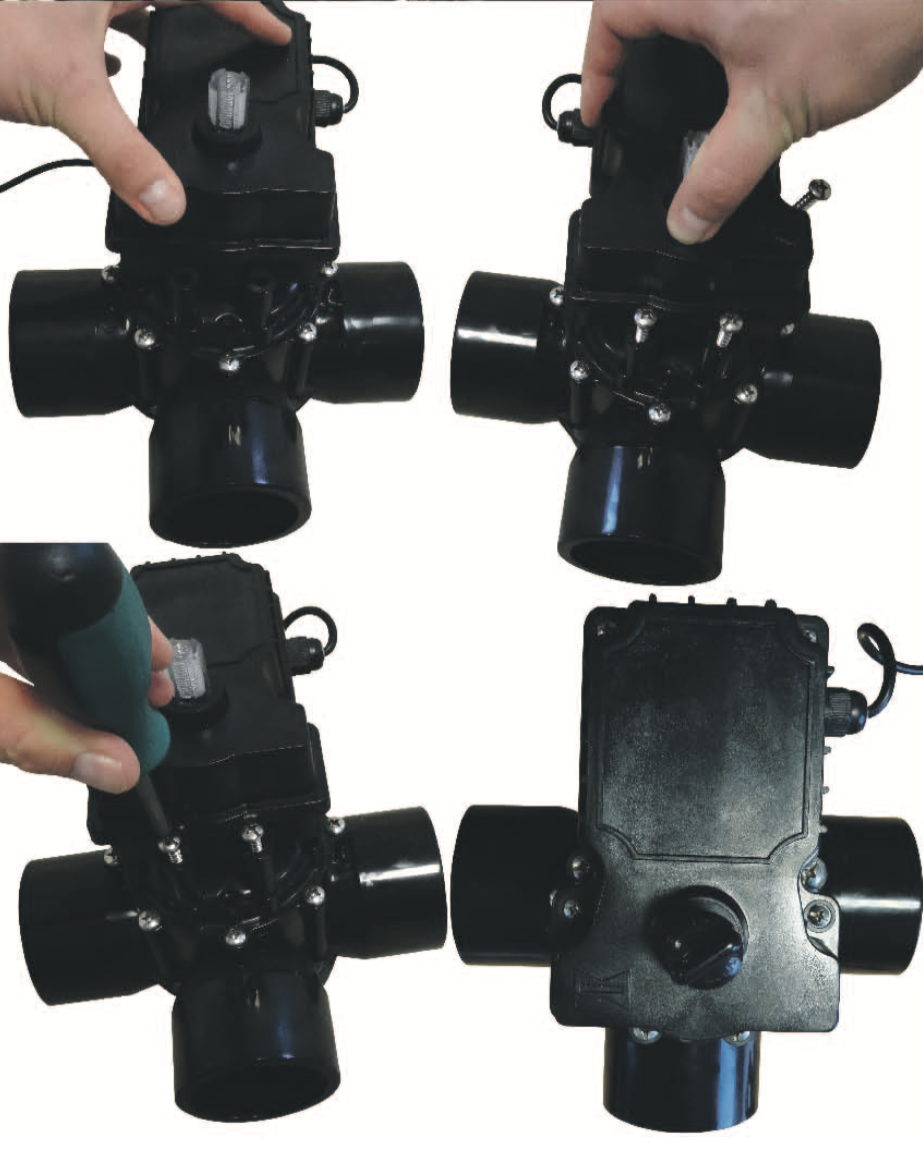
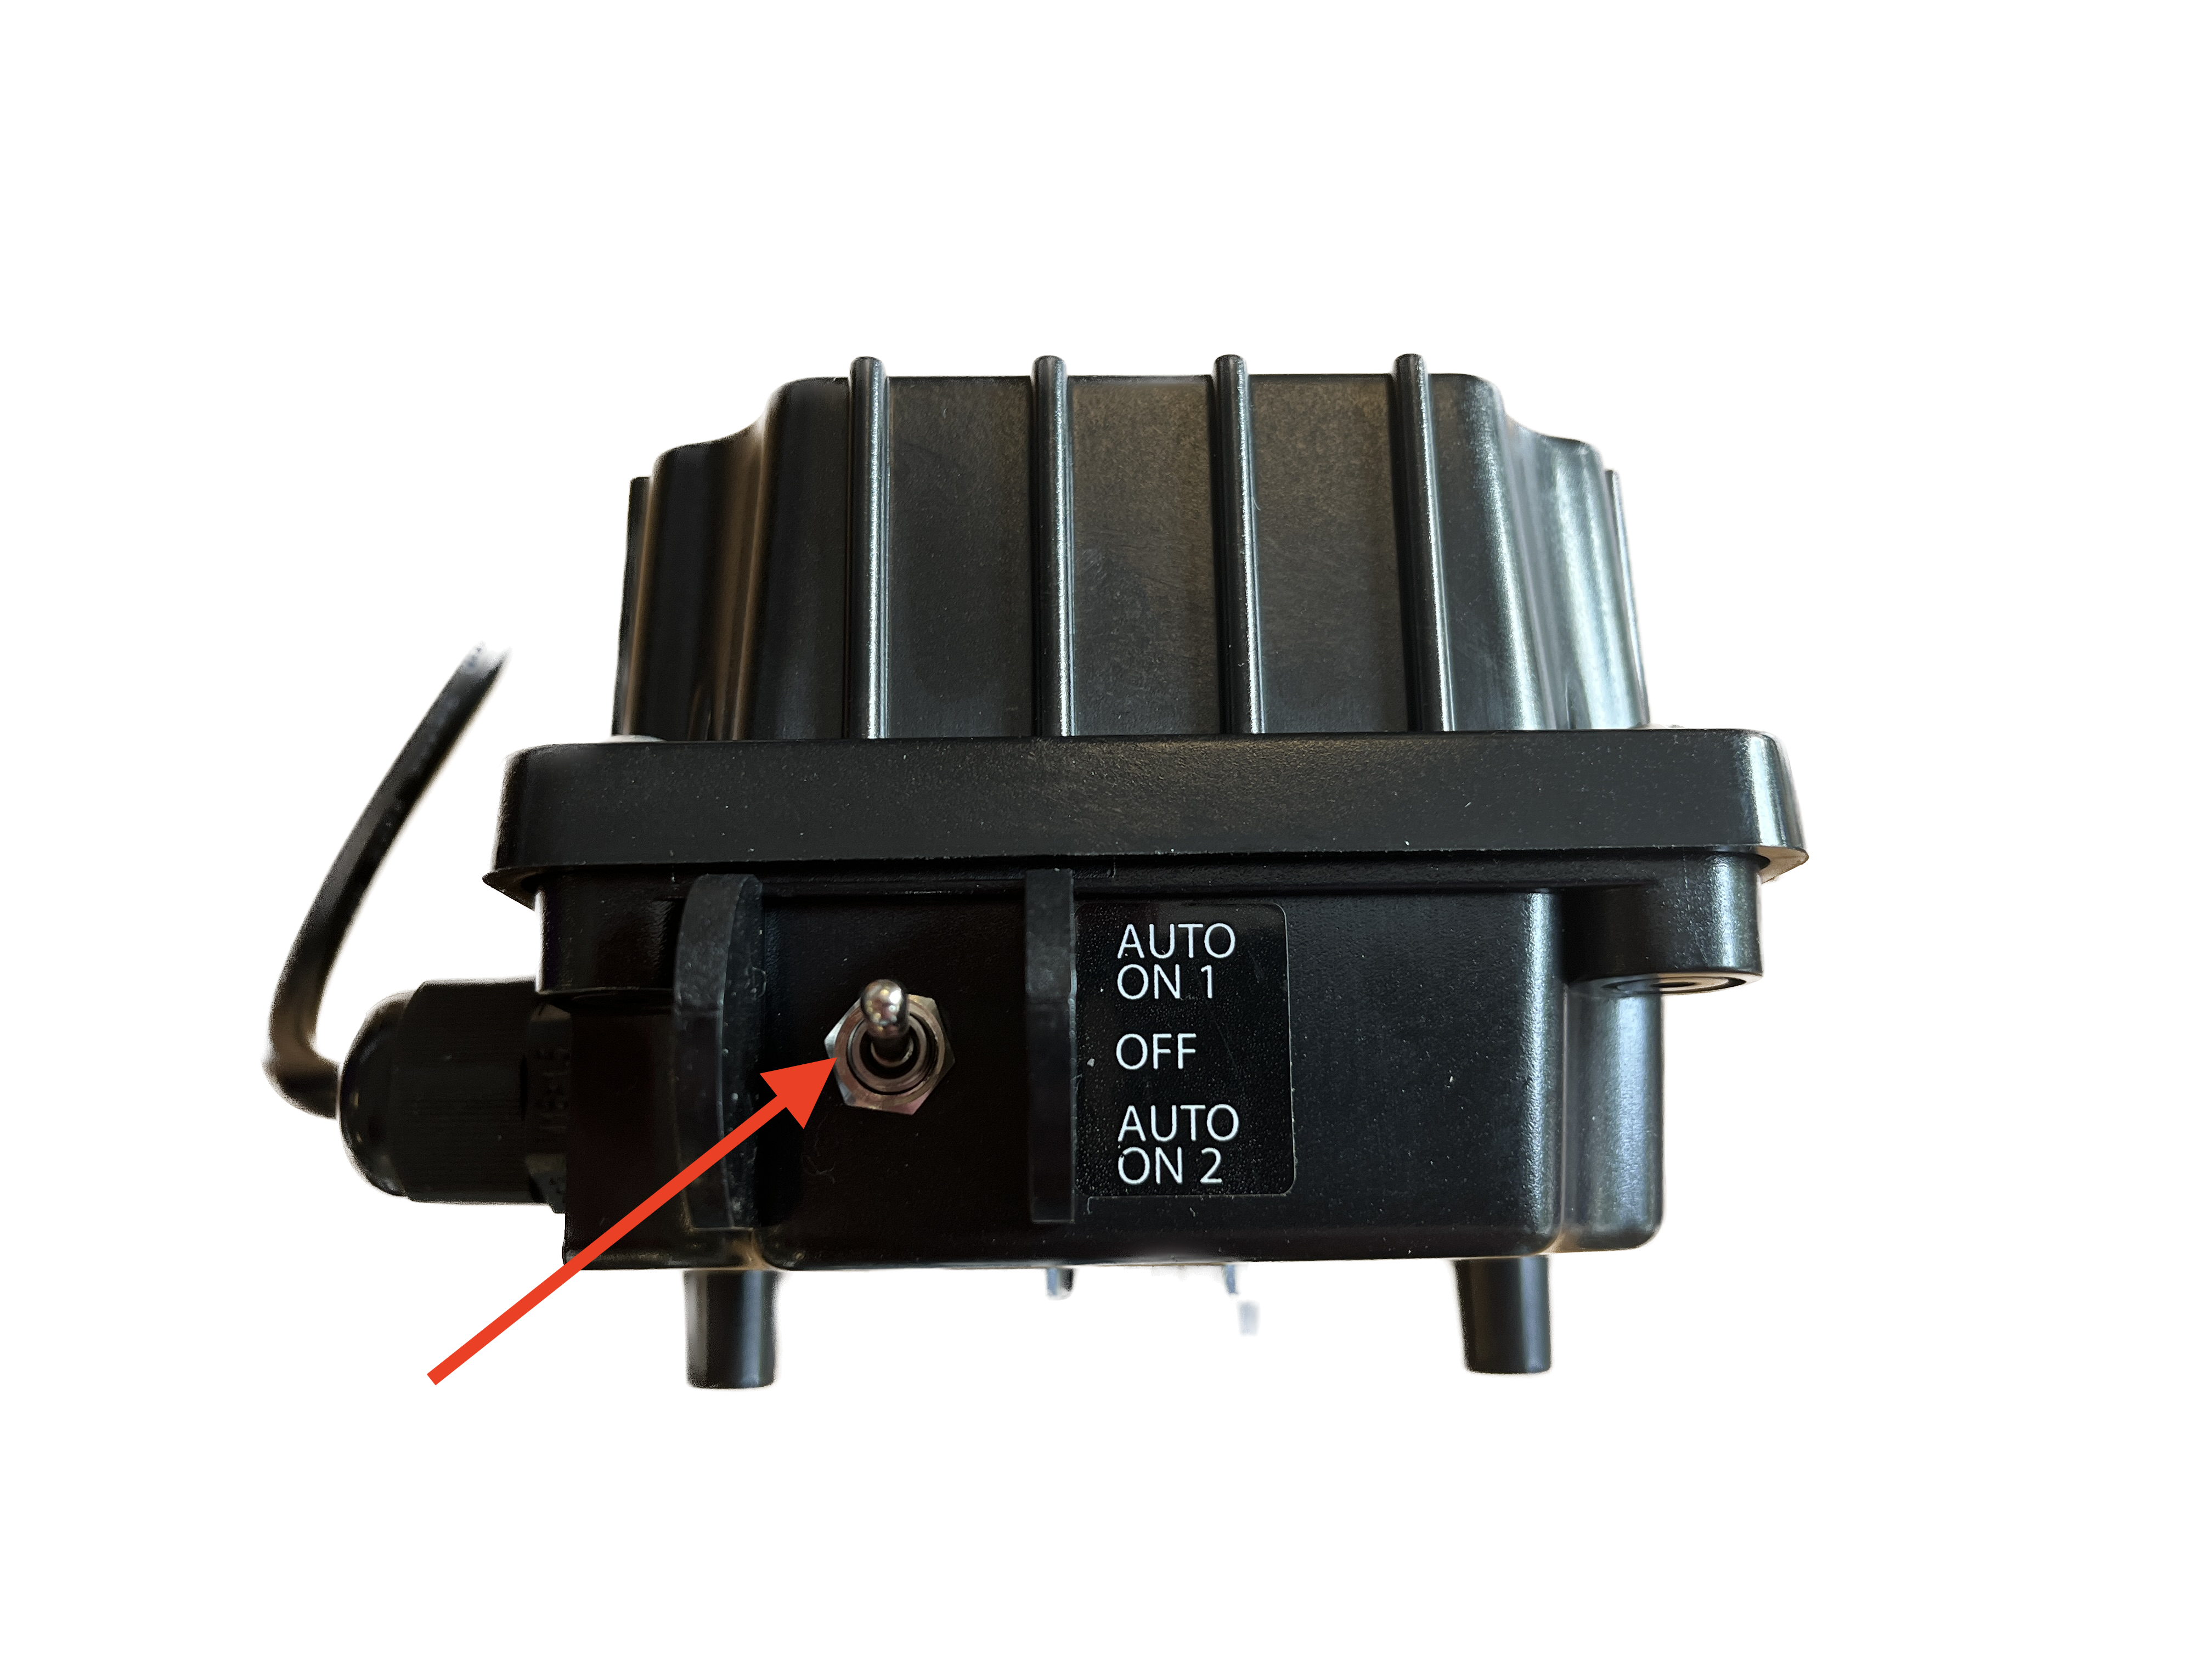
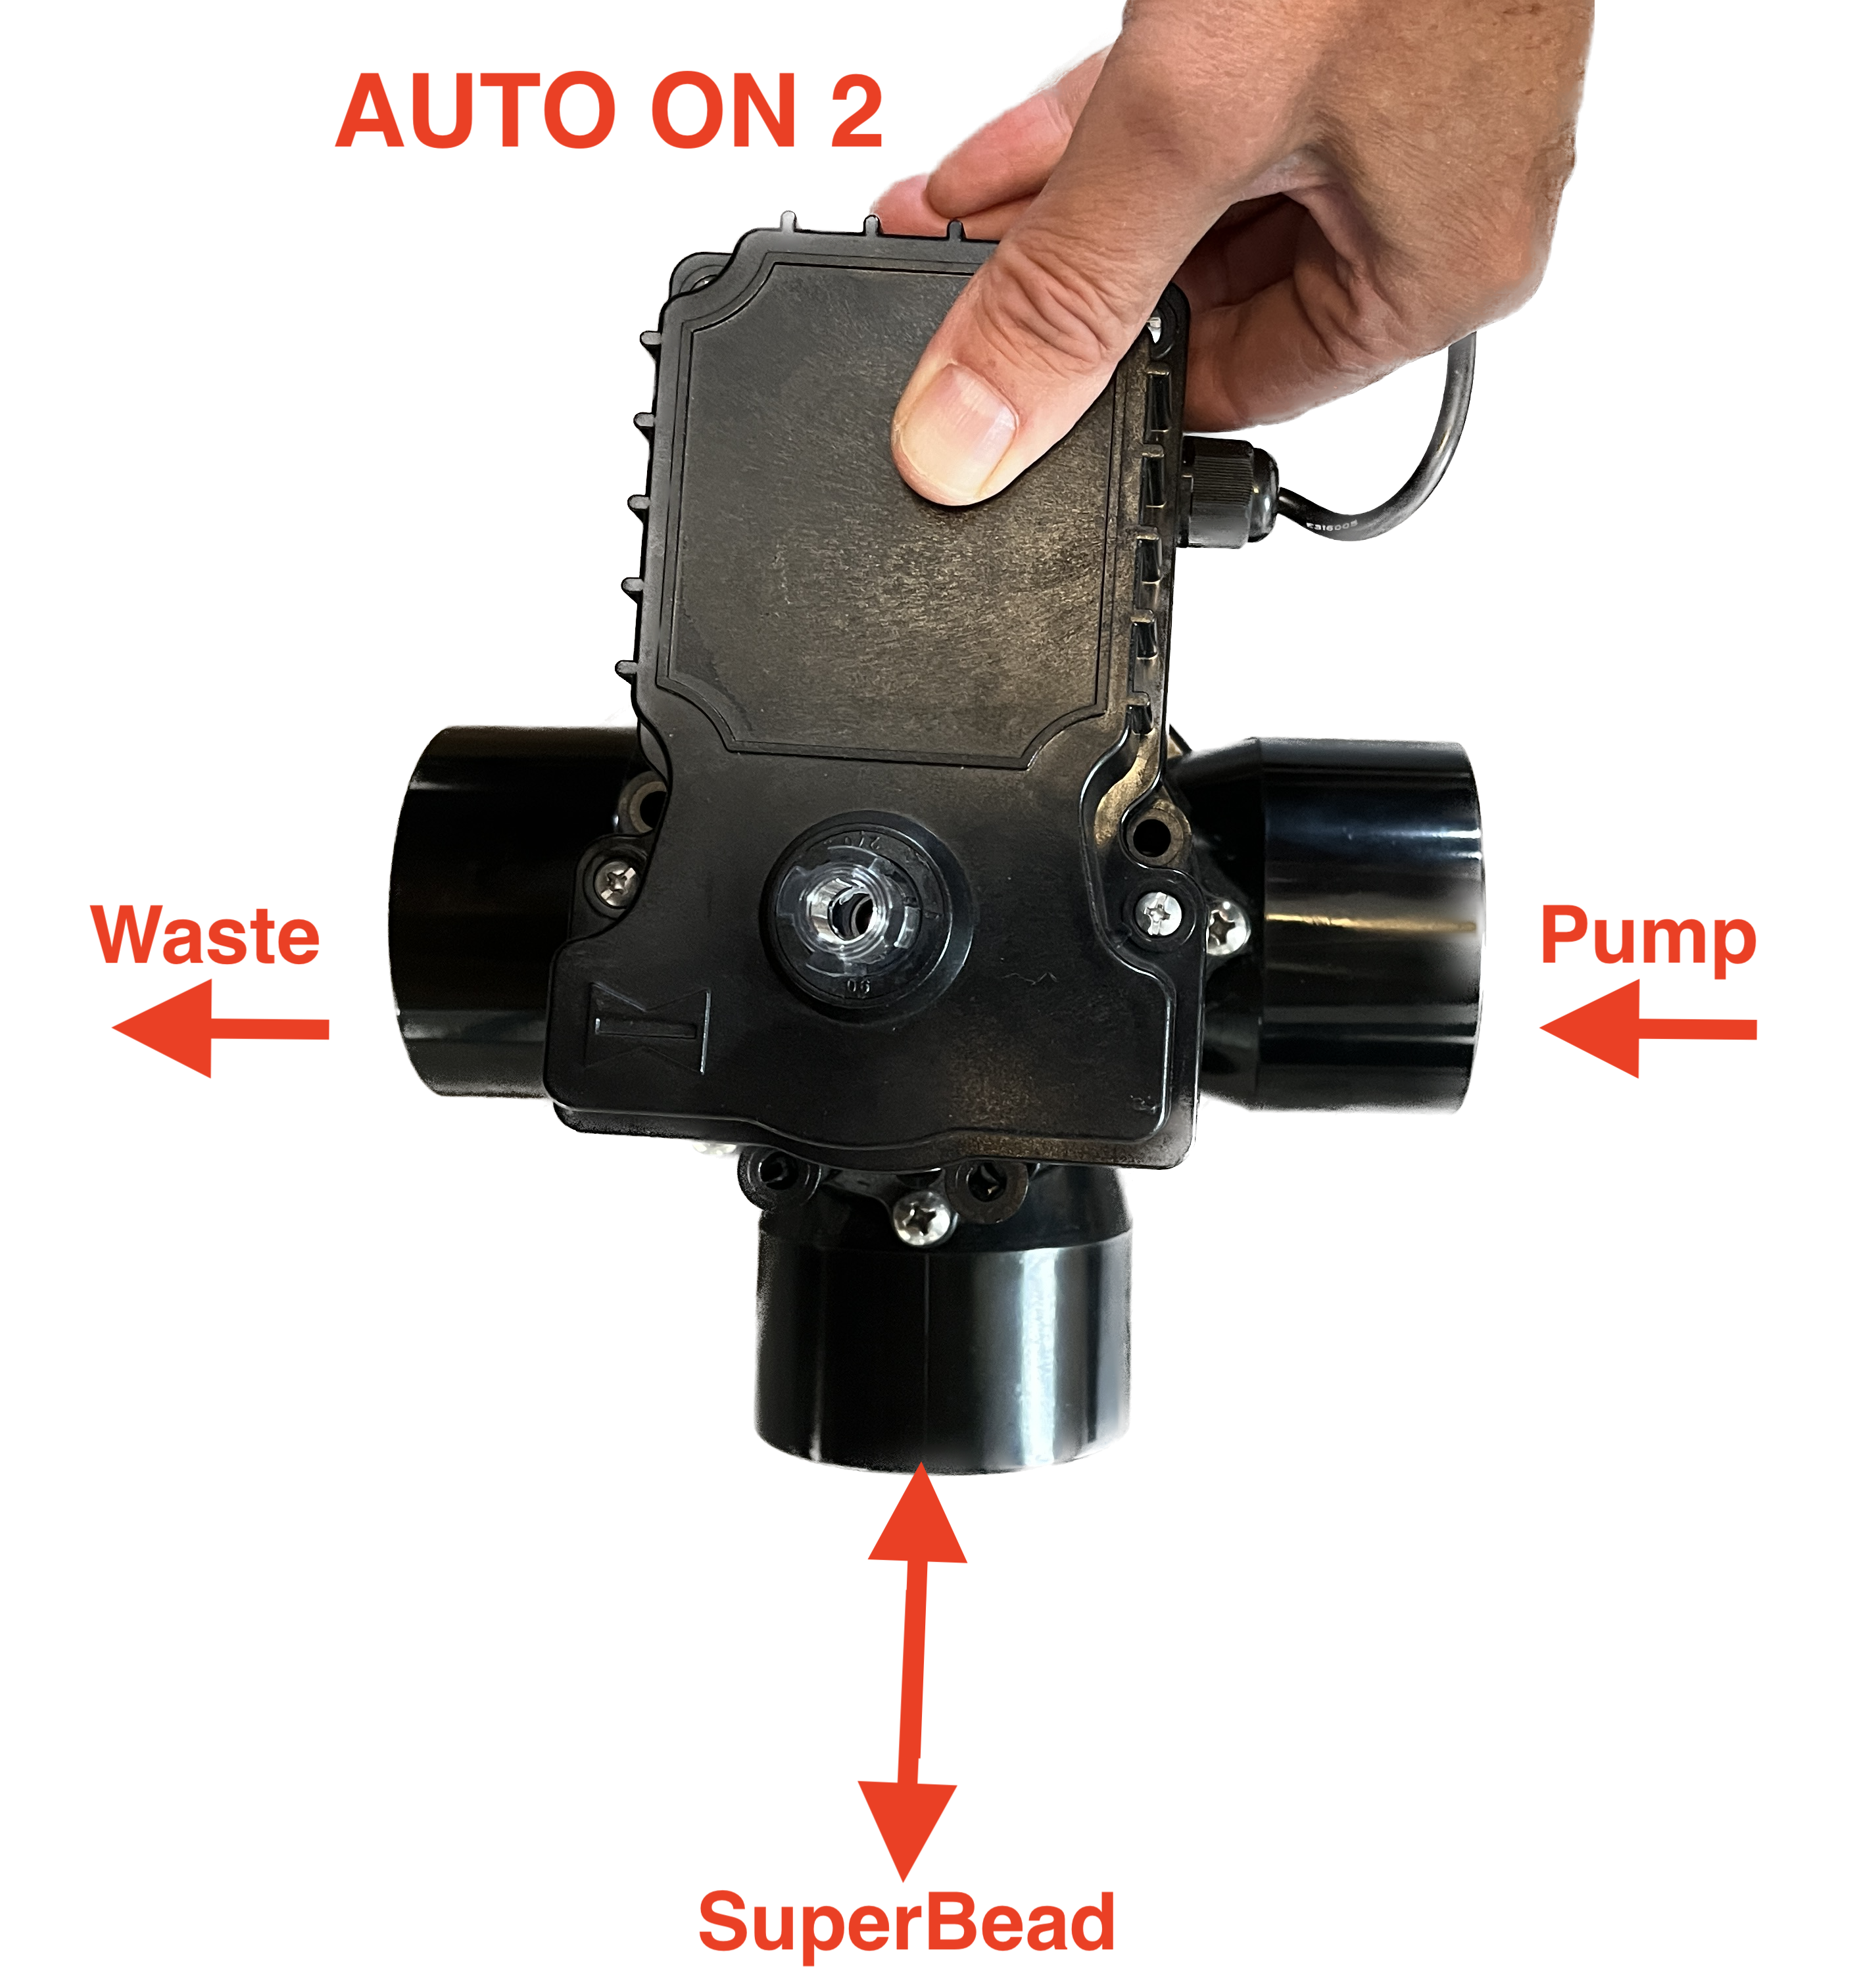
4.2.4 Changing the 3-way Valve Flush Position
The initial position of the valve is easy to change. In the attached images, you can see the configuration when the switch is set to 'AUTO ON 1' and 'AUTO ON 2'.

4.2.5 Additional Remarks
The following remarks regarding the flushing process of a SuperBead filter:
- SuperBead Small: maximum flush duration = 40 seconds
- SuperBead Large: maximum flush duration = 2 minutes
- The use of a flush pump with a capacity of 20m3/hour (Small) or 30m3/hour (Large) is strongly recommended to pump the water to, for example, the sewer. This ensures a good flush process.
- After a power failure, an automatic flush always starts. Note that from that moment on, the time interval of the flush frequency begins to count.
5 Technical Specifications
Model No.: Air-Aqua 2
Power: 0.37-2 kW
Voltage: ~ 230V +/- 5% - 50/60Hz
Protection Class: IP55
Complies with the following standards: EN 61439-1/EN 61439-2/EN60204-1