
Manual SuperBead
Translation, Übersetzung & Traduction:
Installation and user guide for the SuperBead filter
SuperBead filters are manufactured by:
Air Aqua BV
Weth. Ohmannstraat 1
7951 SB Staphorst
The Netherlands
+31 (0)522-468 963
info@air-aqua.com
Table of Contents
1. Foreword
2. Defects and claims for compensation, disclaimer
2.1 Defects and claims for compensation
2.2 Warranty
2.3 Hidden defects
2.4 Improper application
2.5 Returning the product
2.6 Claims
2.7 Spare parts
2.8 Subject to alterations
3. General
3.1 Water Quality
3.2 Easy Cleaning
3.3 Adaptable and versatile
3.4 Straightforward to fit and use
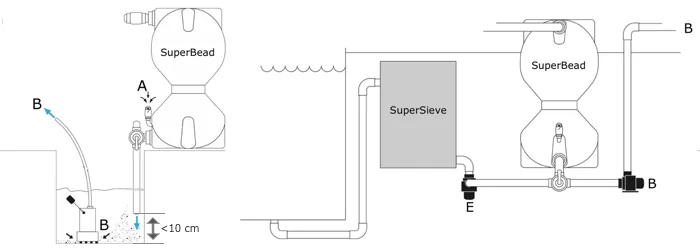
4. Use of the filter/Siting
4.1 Choose a site close to a drain for the waste water
4.2 The Siphon Head
4.3 Firm Base
4.4 Future Access
4.5 Outside or Under Cover?
4.6 Standard Flow Pattern
4.7 The functioning
5. Assembling the SuperBead Filter
5.1 Connection parts SuperBead
5.2 Filling with Beads
5.3a Bottom inlet/waste - metric
5.3b Bottom inlet/waste - inches
5.4 Top outlet
5.5 Extending the waste-outlet
5.6 Plumbing Tips
6. Choosing the correct size of pump
6.1 The Minimum Head
6.2 Maximum Pressures
6.3 Which Pump
6.4 Strainers
7. The correct size of ultra violet (UV) unit
8. Important Points
8.1 Air-breaks and Negative pressure
8.2 Aeration of filtered water returned to the pond
8.3 Non-return valves/Footvalves
8.4 Operating SuperBead without a pre-filter
9 Starting the filter for the first time
10. Running-in your filter
10.1 Establishing Nitrification
11. When to backwash the SuperBead filter
11.1 Monitoring the standard backwash
11.2 Recommended minimum backwash cycles
11.3 Making the backwash fully automatic
12 Long term maintenance
12.1 Monitoring
12.2 Additional Monthly Maintenance
12.3 Check valves
12.4 Pump Strainers
12.5 Waste and Top Outlet Screens
13 Winter Running
13.1 Closing the filter down as an option
14 Water Quality Maintenance
14.1 Partial water changing
14.2 Set the backwash frequency to water change for you
14.3 Monitor your pond and fish to avoid problems
15 Filter Troubleshooting
This guide aims to provide you with correct and complete information.
PLEASE KEEP UP THIS USER GUIDE CAREFULLY! ON CHANGE OF OWNERSHIP PASS ON THE COMPLETE USER GUIDE!
Read this guide through carefully before you start to install the product. If you are uncertain about the contents of this guide or do not fully comprehend the assembly instructions and/or
do not understand something regarding this product please contact the shop where the product was purchased.
The General Terms and Conditions of Air-Aqua apply for all products.
2. Defects and claims for compensation, disclaimer
2.1 Defects and claims for compensation
Except in the case of a further claim, we are only liable for defects to the delivered goods until the risk has been transferred to the purchaser.
Minor deviations between the appearance and workmanship of the product delivered and the specifications in the contract or minor limitations of usability will be deemed insignificant.
The warranted condition, endurance and usability of the product is solely subject to the specifications agreed in writing, in the product specification and/or in this guide.
Further oral agreements, especially from preliminary talks, advertising and/or in related industrial standards are only valid as an integral part of a written contract.
Only conditions and specifications specifically laid down by us are valid. We do not accept conditions or specifications laid down by third parties.
The specifications laid down in this guide are valid. If the customer wishes to use the product for a purpose other than the intended purpose, he or she is obliged to
thoroughly examine the suitability of the product for this other purpose. We give no warranty and accept no liability for any use other than that explicitly approved by us in writing.
Any changes made to the product will result in the loss of warranty and all claims and rights will lapse.
The user is held responsible for the proper use of the filter. The user guide does not discharge you from your liability for the proper and safe
application, installation, operation and maintenance of the filter.
On using this guide you agree that in no circumstances can or will the manufacturer be held liable for any personal injuries or damage to property that might result from using the device.
This applies specifically for any damage due to improper piping or plumbing. Damage due to failure to clean or maintain the filter regularly is not covered by the warranty.
Our warranty for defects is strictly limited to supplementary performance. We will eliminate any defects or deliver substitute goods at our discretion. Where supplementary performance fails or is disputed or impossible the customer has the right to withdraw from the contract. The manufacturer explicitly limits the warranty to the filter itself. We are not reliable for consequential damage, or damage caused by a malfunction or failure of the filter, such as a loss of animals.
The customer is required to conduct a detailed inspection of the goods immediately after delivery. Any defects should be reported immediately in writing. Hidden defects should be reported immediately after their discovery. The customer should report damage caused during transport within 24 hours to the carrier and/or the delivery service. If the customer fails to meet the requirement to inspect the goods and report any defects or damage, then this will result in the loss of warranty.
We except no liability for the improper application, use, maintenance and handling of the product by the customer or its subsidiaries, nor for usual wear and tear. This applies specifically to the consequences of thermal, chemical, electrochemical or electrical influences as well as for infringements of our use and maintenance guides. The same applies to damage resulting from changes or adjustments made by the customer, which have not been approved by us in beforehand.
Damage directly attributed to the improper use of the product is, in principle, for the customer’s account. If the customer returns the product, break-proof packaging should be used. The customer is liable for any damage that can be attributed to inappropriate packaging.
Claims against us become time-barred within a year after the initial delivery of the goods to the customer. The same applies to damage claims regardless of their juridical cause. The limitation period does not apply to claims based on the malicious concealment of damages, injury to life, body or health or other damage resulting from intent or wanton negligence.
We hold spare parts available for a period of 5 years after initial shipment of the product. Our respective list prices apply for spare parts.
The manufacturer has the right to change the product at any time without prior notice being required, as long as these changes advance the reliability or quality of the product. No claims can be made if, for example, the design, functionality or performance of the filter fundamentally changes. The confirmed filter specifications are always guaranteed.
Congratulations on the purchase of your new filter.
SuperBead filters are ideally suited to koi ponds, ornamental fish tanks, fish holding systems and aquaculture facilities. They provide excellent water clarity whilst at the same time working as an efficient biological filter, breaking down fish waste. A correctly sized unit can achieve this clean and clear water quality on its own, or it can be used in conjunction with other filter equipment.
The SuperBead’s major advantage is the ease with which it can be cleaned. This simply involves turning off the pump and opening the waste valve to start the backwash process.... no wet hands! Trapped dirt is loosened from the media and flushed to waste. By carrying out this backwash regularly, fish waste can be removed from the system before they have fully broken down. This greatly reduces the nutrient loading on your system and further improves water quality for the fish. On the automatic upgrade models the whole process can be fully automated to trigger valve opening and backwashes.
Use the unit as a standalone filter, or use it to boost an existing filter system. Fit the SuperBead filter near your existing pond, or at a distance. Site it at the pond edge, well above the pond or below water level. Hide it behind a bush or fence, or even in a shed or garage. The unit takes up a fraction of the space of some other types of filter, and no labour intensive excavation is necessary to site it.
3.4 Straightforward to fit and use
SuperBead filters require no additional blowers or multiport valve operations to run or backwash. But as with any equipment, the filter will function at its best if it is fitted and maintained correctly. Please take a short while to look through this guide before you get going, so that you can get the very best from your new filter system.
Choosing the wrong site may cause the filter to function less well or make it awkward to carry out maintenance in the future. The filter can be some distance from the pond, but use wider pipe bore and a more powerful pump may be required to overcome the friction loss in the longer pipework.
4.1 Choose a site close to a drain for the waste water
Dirty water flows from the waste outlet during the backwash to a drain. Pipe it to a convenient nearby drain. The drain or sump must be below the filter’s waste outlet.
If necessary, raise the filter higher, or fit a sump tank below the filter with an auto sump pump that can pump the waste water away.
You can also connect a waste water pump
directly to the filter waste outlet. In this situation, the filter can be installed below water level.
IT IS ESSENTIAL THAT THE FILTER DRAINS QUICKLY.
RINSING THE FILTER MAY LAST UP TO 40 SECONDS FOR THE SMALL AND 2 MINUTES FOR THE LARGE MODEL.
IF THIS TAKES MORE TIME, THE WORKING OF THE FILTER MIGHT BE NEGATIVELY AFFECTED CAUSING THE BEADS TO CLOG IN THE LONG TERM.
4.2 The Siphon Head
The siphon head (see diagram) is the distance between the filter waste outlet and the air strainer inlet to the filter. This distance is about 10 cm on the filters as supplied, which is adequate if waste outlet piping is short (max. 2 metre). However, by simply raising the filter on a plinth (built from one or two courses of standard building blocks topped with a paving slab) and adding an extension pipe, the siphon head is increased and the efficiency of backwash greatly improved. We recommend that this increased siphon head be created wherever possible.
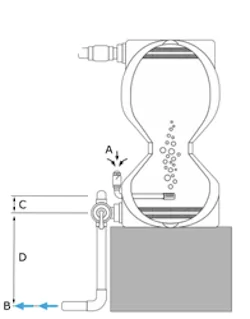
The units are heavy when full of water and must be adequately supported for safety. Position the filter on a level, purpose made slabbed area or concrete plinth.
Regular access is required to the waste outlet valve and sludge drain. The internal strainers could also need removing occasionally. The fittings at the base and top of the filter should therefore be readily accessible and not permanently boxed in or buried. Use dismountable connections as delivered along with the filter!
The filters are suited to outdoor use but if sited in an outhouse, shed or garage, they will not only be out of sight from the pond but also better protected from severe frosts (see 13, Winter Running section).
Water is pumped in through the 3-way valve and the intake and the intake strainer/screen up through the unit. The floating beads pack down into the top of the unit, forming a filter-bed where both biological breakdown of wastes and mechanical filtering of solids takes place. Filtered water leaves through the outlet screen and outlet check valve.
Bead filters have been in development since the 1970s. The distinctive necked design and the bubble washing process are a key to its effectiveness.
The bubble-wash,
as the beads tumble through the washing throat, removes dirt whilst leaving just the right amount of biological film on the bead surface. Alternative means of cleaning the beads
(e.g. propellers, blowers or water jets) can carry a risk of removing too much of the beneficial biological film, with a consequent drop in water quality. SuperBeads avoid this risk.
Fitting an automatic upgrade kit will further simplify the washing process by automatically opening the waste valve, turning off the system pump and turning on the -eventual- flushing pump.
The timer of the automatic valve will ensure the backwashes are carried out as frequently as necessary.
5. Assembling the SuperBead Filter
CHECK THAT YOU HAVE ALL THE RELEVANT PARTS
READ THIS GUIDE BEFORE YOU START POSITIONING THE FILTER
DO NOT GLUE ANY PARTS YET
5.1 Connection parts SuperBead

Model Small:
Standard inlet 90mm and outlet 63 mm
For UK & US inlet 3” and outlet 2”
Model Large:
Standard inlet and outlet 90 mm
For UK & US 3”
Pre-assembled (A/C):
A/C : Perforated pipe 110mm
Connections below (D) (inlet/waste)
- Flexible coupling 90x15 mm
- Flexible coupling 90mm
- 3-way valve (black)
- 15 cm clear PVC pipe, 90mm (waste)
- Reducer PVC, 90 x 3"
E&H: Air inlet
- Non return valve 1”
- 4 cm PVC pipe 1”
- Bend 90°, 1”
- PVC air inlet with strainer
F&I: Top outlet - return to pond
- Model Small: Flexible coupling 90x135 mm
- Model Small: Reducer PVC, 63x90 mm
- Model Small: 8 cm PVC pipe, 63 mm
- Model Small: Standard non-return valve 63 mm, split connector UK & US: one side is 2”
- Model Large: Flexible reducer 90x135mm
- Model Large: 8 cm PVC pipe, 90 mm
- Model Large: Standard non-return valve 90 mm, split connector UK & US: one side is 3”
Extra:
- Hose clip screwdriver 8mm
Filter material
- Model Small: Beads, 1⅓ bags (total 33 kg)
- Model Large: Beads, 3 bags (total 75 kg)
You will also need some solvent cleaner and solvent pipe cement for the PVC pipe.
5.2 Fill the filter with Beads
- Fill with beads at the place where the filter will be placed, because the filter weighs more than 50 kg
(small)/100 kg (large) when filled with beads.
On new systems you may wish to ‘cure’ the beads. (see chapter ‘Running-in your filter’). Do not add more beads than the filter is designed to hold. It can be useful to use a wide funnel at this point to avoid losing beads. Only use genuine SuperBead Media to prevent clogging of the strainers or valve assemblies. Use of inappropriate media will void your guarantee. - Screw the air inlet (hand tighten only) with strainer in the 11⁄2” thread of the filter (hole 2). Ensure the O-Ring is assembled. Do not glue the other parts of the air intake together yet.
- Remove the upper (light yellow) 110mm perforated pipe.
- Lay down the filter and fill it with the bags of beads.
- Pull the filter back to its upright position.
- Mount the upper 110mm perforated pipe back again.
- Glue the other pieces of the air inlet to one unit: the bend to the short 1” PVC-pipe and this to the non-return valve (also 1”).
Note that the arrow (FLOW) points downwards (so the flap opens downwards). The non-return valve may also be rotated in a horizontal position (attention: with its pivot at the top (!)).
5.3a Bottom inlet/waste - metric (No. 2)
- Mount the 135mm side of the flexible coupling to the SuperBead. Make sure the flexible coupling is over the screw which fixes the perforated tube to the housing. This can be pretty tight. If necessary, open the hose clamp as far as it will go.
- Assemble the 3-way valve at the 90 mm side of this coupling
- Connect the 90mm coupling to one of the two free sides of the 3-way valve
- Connect on the other side of the coupling the clear pipe
- From here you can connect to the waste with the 90 mm pipe. See 5.5 for extending the waste- outlet.
- Glue the reducer 90mm - 3”, with the 3” side, to the last free side of the 3-way valve.
- From here you can connect to the pump with the 90 mm pipe.
Be sure to use the correct diameter piping:
- 50mm: max 8 m3/hour
- 63mm: max 15 m3/hour
- 75mm: max 20 m3/hour
- 90mm: max 30 m3/hour
- 110mm: max 40 m3/hour
5.3b Bottom inlet/waste - inches (No. 2)
- Mount the 135mm side of the flexible coupling to the SuperBead. Make sure the flexible coupling is over the screw which fixes the perforated tube to the housing. This can be pretty tight. If necessary, open the hose clamp as far as it will go.
- Assemble the 3-way valve at the 90 mm side of this coupling
- Connect the 90mm coupling to one of the two free sides of the 3-way valve
- Connect on the other side of the coupling the clear pipe
- Glue the reducer 90mm - 3” to the other side of the clear pipe
- From here you can connect to the waste with 3” pipe. See 5.5 for extending the waste-outlet.
- The last free side of the 3-way valve must be connected to the pump. You can choose 2½ (inside diameter) or 3” (outside diameter).
Be sure to use the correct diameter piping:
- 1½": max 8 m3/hour
- 2": max 15 m3/hour
- 2½": max 20 m3/hour
- 3": max 30 m3/hour
- 4": max 40 m3/hour
ONE SIDE OF THE NON-RETURN VALVE IS 63 (SMALL) /90 MM (LARGE) AND THE OTHER SIDE IS 2”/3”
- Mount the 135mm side of the flexible coupling to the SuperBead. Make sure the flexible coupling is over the screw which fixes the perforated tube to the housing. This can be pretty tight. If necessary, open the hose clamp as far as it will go.
- Model Small: Glue the 8cm, 63 mm pipe in the non-return valve; if you are using inches in the 63 mm side! Glue the PVC reducer (63x90mm) at the other side of this tube.
- Model Large: Glue the 8cm, 90 mm pipe in the non-return valve; if you are using inches in the 90 mm side!
 Now press this complete part in the 90 mm (3”) side of the flexible coupling.
- Note that the arrow of the non-return valve points from the filter and that the valve is mounted horizontally (with its pivot at the top). The valve is equipped with split connectors.
- Model Small: From here you can connect to the pond with 63 mm or 2”.
- Model Large: From here you can connect to the pond with 90 mm or 3”.
Be sure to use the correct diameter piping:
- 50mm/1½": max 8 m3/hour
- 63mm/2": max 15 m3/hour
- 75mm/2½": max 20 m3/hour
- 90mm/3": max 30 m3/hour
- 110mm/4": max 40 m3/hour
5.5 Extending the waste-outlet
We recommend that the waste-outlet is extended using piping of at least 63mm/2” and preferably 90mm/3” on the larger models.
Piping length should be restricted to a maximum of 3 metres. The outlet of the piping should preferably be at least 10cm lower than the filter outlet.
The rapid draining of waste from this outlet ensures a vigorous bead wash.
Avoid using excessive numbers of bends and avoid undulations in the pipework that might introduce airlocks.
The very final section of waste pipe, whether a vertical or horizontal drop, can be fitted with a small restriction.
This slight restriction ensures that when the filter is drained, the entire waste pipe fills with water, driving out air and starting a siphon action, which helps to suck water from the filter.
Remember: Rapid draining (40 seconds for the Small and 2 minutes for the Large model) of water from the waste outlet is essential for an efficient filter backwash.
The filter should ideally be relatively close to your drainage system or soak-away for ease of waste-water disposal.
SUPERBEAD SMALL:
RINSING THE FILTER MAY LAST UP TO 40 SECONDS.
SUPERBEAD LARGE:
RINSING THE FILTER MAY LAST UP TO 2 MINUTES.
IF THIS TAKES MORE TIME, THE WORKING OF THE FILTER CAN BE NEGATIVELY AFFECTED.
IN THE LONG TERM CLOGGING OF BEADS CAN OCCUR.
If this is not possible, and also siting the filter as described in 4.1/4.2 is not an option, we strongly recommend the use of a cheap flushing pump with sufficient pumping capacity (20-30m3/hr). The flushing pump is connected to the waste connection of the SuperBead. When flushing the SuperBead, you start the flushing pump which empties the filter within the restricted time. In this way, it’s also possible to have the waste above water level and/or filter installation level.
AFTER THE SUPERBEAD, NO PRESSURE RAISING EQUIPMENT SHOULD BE MOUNTED
The backpressure after the SuperBead must be as low as possible: max. 5 meter head/0.5 bar! High back pressure is easily created at high flow rates in combination with long (too narrow) pipe bores
and/ or pressure-rising equipment such as heaters and/or UV-Units. The top or bottom flexible coupling mounted on the filter might be pushed off of the filter if the backpressure
after the filter is too high. If this happens, you have to mount a screw/bolt to secure these flexible couplings.
To minimise pressure loss on the inlet and backpressure on the outlets:
- use wider pipe/hose bores wherever possible
- all pipe fittings (including UVs) must have the widest possible bores
- avoid multiple fittings with internal restrictions
- avoid using valves on the top filter outlet.
- consider swept rather than knuckle bends and keep bends to a minimum
- flexible hose should be heavy duty, crushproof, opaque, smooth bore, and suited to the pressures likely to be found in the system.
- support pipework with pipe-clips etc., it is heavy when full of water!
- avoid the weight of pumps or external UVs being carried by the inlet/outlet fittings. Failure to do so, could void your guarantee.
- you may not want to fix/glue the pipework permanently until after the test run has taken place./span>
6. Choosing the correct size of pump
The pump size is related both to the volume it pumps and the pressure with which it pumps. The maximum pump flows to aim for are shown in the table in section 6.3. It is possible to run the filter at lower flow rates when used on smaller systems or if ‘ticking over’ during winter months. For best results the filter should be run at no less than 30% of the rated maximum flow. This flow is required to supply the filter organisms with the necessary oxygenated water for efficient filtration. 6.1 The Minimum Head
There is some loss of pressure across the bead bed, especially as the filter approaches the time for backwash. Although pumps with a relatively low maximum head (2 metres) may be powerful enough to completely fill the filter when the pump is first switched on, there is a risk with such pumps of ‘underpressure’, which leads to poor filter performance. To avoid this we recommend using pumps with a rated head of at least 2.5 metres (8 feet) or at least 2 metres more than the ‘working head’ of the pump. The working head is the vertical distance between the water level in the originating pond/tank, and the highest point in the filter/pipework loop that returns to the pond. Flow rates should be calculated at the pump’s working head, not the maximum pump flows quoted by some manufacturers, which are taken at zero head.
On these filter models we recommend that the filter hull is not exposed to pressures exceeding 0.7 bar, equivalent to a head of 7 metres. Never use a high pressure pump (e.g. a powerful swimming pool pump) as these may exceed the pressure rating. Such pumps can also give high pressure surges when started. Therefore, for all pumps with a quoted head exceeding 7 metres we consider it essential to use a bypass tee before the filter inlet, with an appropriate pressure regulating spring-check valve (min. 1.5”/50mm bore) to prevent excess pressures building on the filter./span>
The table below notes the maximum filter flow rates and the volumes that might be filtered at a two or three hour turnover rate. On heavily stocked commercial systems the required turnover rate might be once or more per hour, and the volume treated would need to be reduced accordingly. Your dealer should be able to recommend suitable pump models. Remember that a small pump may not suit longer pipe runs or high head situations. If in doubt, it is better to have a slightly larger pump, rather than to have a small pump with no spare capacity. Surface mounted pumps should be of the self priming type or installed in a way that ensures they cannot run dry.
| Modell | Max. feed rate per day (Max. Koi @ 1% feed rate) |
Max. flow m3/hr | Max. pond volume | Suggested pump size |
| Small | 400 gm | 17.5 m3/hr | 25 m3 | 2.5-17.5 m3/hr @ 0.2 bar |
| Large | 1000 gm | 35 m3/hr | 70 m3 | 5-35 m3/hr @ 0.2 bar |
SuperBead filters contain internal screens with slots of c. 1.5 mm spacing designed to prevent loss of beads. The rate of internal screen clogging will be reduced if solids of greater than 1.5 - 2 mm and strands of blanket weed are removed before being pumped to the filter. This greatly reduces the need for screen maintenance. Therefore it is very important to fit an appropriate strainer before the inlet or a device (like a welded screen sieve or drum filter) filtering out fine particles (also see Appendix Two). Very fine additional strainers (e.g. fine open-cell foam blocks) are neither necessary nor desirable, unless specified by pump manufacturers.
7. The correct size of ultra violet (UV) unit
UV units are a recommended option for control of ultra- fine green algae and bacteria causing milky water. Their use is described in Appendix One.
8.1 Air-breaks and Negative pressure
If the filter return outlet beside the pond is below the level of the air inlet check valve on the filter, there is a slight risk of siphoning occurring.
If siphoning occurs, air can be drawn into the filter through the air inlet during normal running. These bubbles can disrupt the filter media causing
water cloudiness and also result in a dripping air inlet.
This is more prevalent on:
- new or very clean filters
- filters with undersized pumps
- filters with long runs of wide bore piping on the return to the pond
- filters where the pump flow has been throttled back, either by a valve on the pump outlet, or because the pump inlet strainer is clogging.
You can tell if underpressure is the cause of a dripping air inlet by placing your hand temporarily over the return outlet to the pond. If the dripping stops within a minute, then underpressure is the likely cause.
8.2 Aeration of filtered water returned to the pond
System water must be aerated at some point as both the fish and the filter bacteria can consume high amounts of oxygen, especially in warm weather. Consider using a sieve unit before the filter, or a return that encourages some re-aeration of the water, e.g. cascades.
8.3 Non-return valves/Footvalves
To prevent surface pumps from losing their prime when installed above water level, manufacturers may recommend that a non-return valve (‘foot valve’) is situated by the pump.
The inlet valve may be sufficient to maintain prime following short periods when the pump is turned off, but to guarantee prime, site the pump at a level below that of the water in the adjacent pond.
8.4 Operating SuperBead without a pre-filter
The recommendation is that the coarse dirt particles should always be removed from the water with the aid of a sieve system or a drum filter before it enters the SuperBead.
The benefit of this is that the load on the filter is, on the one hand, less, and on the other hand that it may also reduce the rinsing frequency. Keeping the SuperBead's perforated
pipe at the inlet clean is even more important. The perforated pipe has small gaps of approx. 1.5 mm that ensure that the granules stay within the housing.
While each rinse will also partially clean this pipe and although the pipe by design is large, leaves and algae in particular could still clog it over time.
A pre-filter is not necessary when the filter is used for an indoor basin, although it is recommended.
If conditions are such that it is not possible to install a pre-filter in an outdoor pond, then the SuperBead may only be installed under the following conditions:
- Small model, only for ponds up to a maximum of 7 m3
- Large model, only for ponds up to a maximum of 15 m3
- No trees in the immediate vicinity of the pond
There is a higher probability that the internal screen will become clogged. In addition, the filter tends to accumulate more dirt internally. The rinsing frequency may have to be increased.
In addition, the perforated pipe must be cleaned at a higher frequency. Especially if the pump's capacity, even after rinsing, is clearly lower than the capacity measured when the filter was installed,
this is an indication that either the rinsing frequency is too low or the filter's perforated pipe is clogged.
9. Starting the filter for the first time
Start up the pump, do not turn on UVs at this stage. The 3-way valve should be in the correct position (pump to filter open). As the filter fills, the beads will rattle against the side of
the filter body but the noise will stop once the filter is full. The beads and/ or pipework may be slightly dusty, so you may wish to direct the first few litres of water to waste this first time.
It is a good idea to measure the flow rate of water returning to the pond. Use a graduated bucket and stopwatch to calculate the flow rate. Adjust the flow rate as required by using a flow
regulator on the pump outlet. Do not fit flow regulators on the filter outlet. This raises the back pressure on the filter.
If a pressure gauge has been fitted, note the typical pressure on the dial and make a note of it e.g. in this guidebook.
Check for leaks. If there are no leaks and water output is flowing evenly, your SuperBead filter is operating properly.
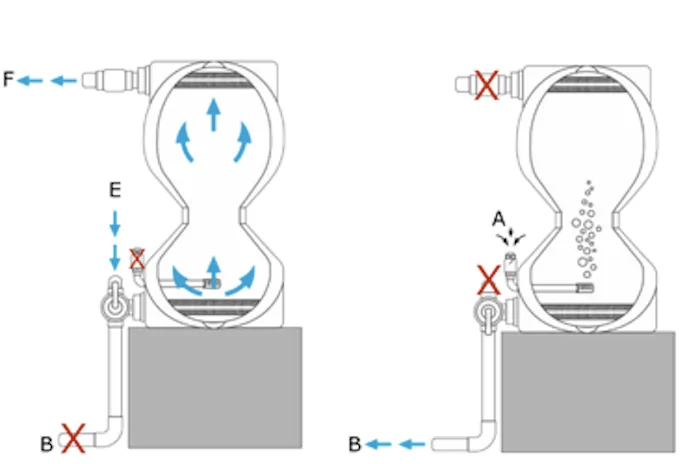
Now is a good time to carry out a trial backwash cycle.
- There is no need to get your hands wet or dirty from cleaning media. Simply turn off the pump and switch the handle of the 3-way valve to the opposite position. The top-outlet check valve will close and waste water starts to run from the waste outlet.
- Immediately, make a note of the time or use a stopwatch.
Put your ear to the side of the filter and listen. Air is sucked into the filter through the air inlet check valve. As beads tumble clean in the cascade of air bubbles they rattle against the side of the filter body. Allow the filter to drain down completely. This first time, the water from the waste valve should be no more dirty than the pond water itself. Listening to the unit allows you to hear what a normal backwash should sound like. - As soon as the flow from the waste outlet drops to a trickle, make a note of the time or turn off your stopwatch.
THE FILTER SHOULD BE EMPTIED WITHIN 40 SECONDS (SMALL) OR 2 MINUTES (LARGE)
The time taken to drain the filter is representative of the minimum time that your filter is likely to take for a backwash cycle and acts as a benchmark to compare with in future.
Note this time in the space on the last page. Always allow time for the filter to drain down completely. - Switch back the 3-way valve and restart the pump. Note the time taken for the filter to refill on the last page. This will also act as a benchmark for the future as it gives an indication of the cleanliness of the strainer on your pump and the perforated pipe in the SuperBead.
Your filter is now tested and operating correctly. The floating bead media packs down in the top of the filter and will soon start to filter out particles. Filtration of the finest particles and biological breakdown of waste also takes place here once the filter has matured.
Apart from backwashes, your filter should run 24 hours a day to support the biological organisms that will colonise the filter media; just like your fish they need oxygenated water to flourish.
Although mechanical filtration starts straight away, it can take up to three months for full biological activity to mature, especially in brand new ponds and in cold weather. Patience is necessary during this phase.
If there are no fish in the pond, commercial additives are available that contain ammonium salts and nitrites that imitate fish waste and help the filter to mature.
Otherwise, there are a number of steps that you can take to aid the maturing process:
- Consider ‘curing’ the beads. All plastic media have a smooth surface that can take some time for bacteria to colonise. There is anecdotal evidence to suggest that soaking the beads in a strong solution of Potassium Permanganate (1gram per 10 litres for ten minutes) can help to oxidise the plastic surface and leave a thin deposit that can encourage bacterial attachment. Rinse the beads in fresh water before adding them to the filter.
- Do not immediately introduce large numbers of fish. Build up fish stocks gradually using hardy fish of lower value to begin with.
- Feed fish more lightly than normal in the first two months.
- After the first few days of operation, add a commercial filter seeding agent that contains filter bacteria. Alternatively swill out the debris from an existing healthy (!) pond filter and pour it into the pond near the pump intake.
- Avoid the use of pond medications during the filter maturing period. Some medications can severely disrupt filter organisms and many medications can temporarily reduce filter activity, especially on first use. If in doubt ask a specialist before using any treatments.
- Avoid turning on UV units during the first month. The water may green temporarily but this is rarely harmful.
You can monitor the maturing process by using standard pond test kits. The most useful ones at this stage are pH, nitrite (NO2), ammonia/ammonium (NH3/NH4) and nitrate (NO3). The pH should remain relatively stable and need only be checked occasionally at this stage. Typically, acceptable pond pH values range from 6.5 to 9.0 with the ideal range for pond fish being between 7.0 and 8.5.
10.1 Establishing Nitrification
The major soluble waste product produced by fish is ammonia and its ammonium salts, and this is the first product to build up in the water. Bacteria that break down organic waste and uneaten food also add to the levels of ammonia in the water. Within a week or two (in a few days in warm weather), specific bacteria that feed on ammonia start to build up on the surfaces of the beads in the filter, and they begin to break the ammonia down into nitrites. As the nitrite levels become more detectable in the water, the ammonia levels usually start to fall. Finally, other specific bacteria increase in numbers to feed on the nitrites converting them to nitrates. The whole process that results in the breakdown of these nitrogen containing products is known as nitrification and the fluctuations in these waste products typically follows the pattern illustrated in the adjacent graph.
| Typical water quality during filter maturation |
||
 |
||
|
Time --->
|
Ammonia (NH3/NH4) and nitrite (NO2) are both stressful to fish, and whilst they are present in the water, further additions of fish should be avoided.
Once the filter has matured sufficiently, these two waste products should be reduced to below detectable levels and only the more benign nitrate (NO3) may be detectable.
However, a sudden increase in loading at any stage (with fish or fish food) may overwhelm the filter resulting in a reappearance of ammonia and nitrite until the filter bacteria can increase in numbers to cope.
11. When to backwash the SuperBead filter
During the maturing period, whilst new ponds are relatively free of waste, the filter will take some time to become dirty. The delicate film that supports the growing filter
bacteria will also begin to form on the surface of the beads. In order to avoid disrupting the bacteria at this crucial early stage, avoid backwashing the filter for two to four weeks,
especially in ponds with clean water. The major sign that a backwash is necessary is when there is a notable drop in the flow from the filter outlet.
Check that this is not merely due to the strainer on the pump or inlet of the perforated pipe of the filter becoming clogged.
11.1 Monitoring the standard backwash
If the flow has dropped to around a one third of the initial rate (or the inlet pressure gauge, where fitted, has risen to 1.4 psi / 0.1 bar above the typical level when clean),
then the backwash procedure must be carried out.
Once the filter has matured the standard backwash frequencies must be implemented. Once established, the beneficial bacteria on the surface of the beads can withstand numerous backwash
cycles without any major disruption of nitrification. Indeed, tests have shown that the gentle bubble wash actually improves the efficiency of nitrification by the filter bacteria.
If in doubt ...backwash!
| Minimum Backwash Frequency | Backwash Water Loss (litres) (approximate) |
|||
| Model | Winter <10°C | Spring & Autumn | Summer | |
| Small | once or twice weekly | 3 to 4 times a week | once a day | 150 litres |
| Large | once or twice weekly | 2 to 3 times a week | once a day | 400 litres |
Regular backwashing flushes out solid waste before they break down and pollute the water. Also, by removing waste at this stage, nutrients are removed from the water and the growth of algae can be reduced further. The process keeps the filter at maximum biological efficiency and minimises the need for any other maintenance. Regular backwashing is essential in heavy loading situations. On automated aquaculture systems the filter can be set to backwash every few hours if required. You simply cannot backwash a SuperBead filter too often. The bubble-wash and necked-design are keys to the efficiency of the SuperBead filter. They aid the cleaning of the beads whilst maintaining a healthy thin film of biological organisms on the bead surface. Unlike static chamber filters where media can become coated in an excessively thick biofilm, the bubble-wash ensures that the maximum proportion of bead surface area is always available for biological filtration to take place.
11.3 Making the backwash fully automatic
Manual backwashing by turning off the pump and operating the 3-way valve is easy enough, but does not make full use of the automatic potential of the filter. Make the whole process fully automatic by fitting an automatic motor on top of the 3-way valve. Ask your supplier about availability.

It is very important to periodically monitor the backwash operation:
- listen to the beads sloshing in the filter
- check the backwash time and the action of the check valves
Aim to monitor this operation at least once per week. This will show up any possible problems before they become serious.
12.2 Additional Monthly Maintenance
Once a month an additional series of backwashes should be carried out - three to five times in a row. This dislodges any more persistent waste that may have collected in the filter,
and further reduces the risk of bead clumping.
The top outlet check valve and air inlet check valve are low maintenance items. Very occasionally the facing or seating may need to be cleaned.
If the air inlet drips, see the troubleshooting guide and the section on air breaks and underpressure (8.1).
Remember that the strainer on the pump will need to be cleaned from time to time. If this becomes clogged with debris or blanket weed, the filter may not fill or drain correctly,
flow rates will be affected and the air inlet may drip.
12.5 Waste and Top Outlet Screens
Over time, the waste outlet (bottom) screen (or very rarely the top outlet screen) may slowly clog with more persistent immoveable dirt, strands of algae, or
snails, especially when no pre-filter has been used. Periodic removal and cleaning of the screens may prove necessary in these cases, especially if too coarse a strainer is being used with the pump.
Using a suitable pre-strainer (see sketch at section 4.1) and carrying out the regular series of extra backwashes (see 12.2) will minimise the need for maintenance to these screens.
In the winter when temperatures are lower (below 8-10°C), feeding rates for koi should be reduced and maintenance can be less frequent. To avoid chilling the fish in water currents,
avoid drawing in water from the pool base and instead draw from 30-60 cm below the surface. Consider reducing the flow rate through the system – biological and filtering activity
will still take place in the SuperBead Filter even at only 30% of maximum recommended flows.
Wherever penetrating frost may be a problem, insulate filter pipework, valves, the filter, external UVs and top-up valves and pipework.
Take special care of pipes where there is little water movement e.g. the waste pipe. Standard closed-cell pipe insulation wrap and hot- water-cylinder
jackets can be used but make sure that they are kept dry for maximum insulation. As the filter is sealed, and produces no smells, it is often desirable to position it in a frost-free outhouse,
garage or utility room. This gives additional protection from freezing even if the pump should stop due to power failure.
13.1 Closing the filter down as an option On smaller systems and in very cold climates, an option is to turn the filter off after the first
severe frost and leave it clean and dry until the spring. To prepare it for winter carry out four backwashes in a row to leave the beads as clean as possible, and then leave the filter to dry.
Disconnect the pump from the inlet and leave the outlet completely open..
The filter may have passed its initial maturing period, but biological filters continue to mature over months and years as different micro-organisms establish on the filter media.
This maturing process can be set back by long power cuts or when pool treatments are used, especially for the first time.
The water quality also continues to change due to the gradual build up of products in the water e.g. nitrates (NO3) & dissolved solids. Conversely, some minerals may become depleted in the water as
they are used up by the fish, plants and filter organisms. In lakes this aging process in the water body is offset by streams and heavy rains which bring in fresh water and new supplies of minerals,
and flush out wastes that are building to excess. In a closed system like a koi pond it is necessary to carry out regular partial water changes to mimic these natural refreshing processes.
14.2 Set the backwash frequency to water change for you
An easy option is to carry out backwashes at a rate which will give you the level of water change required per week, e.g. 5% per week in the summer is the rate used by many koi-keepers.
The table (11.2) shows the typical water loss per backwash. A high frequency of backwashing does not upset the filter organisms but actually improves filter efficiency.
Adding water to make up for evaporation is not equivalent to a water change, as this does not remove any waste products. Water needs to be removed from the pond e.g. through the backwash cycle,
from a bottom drain or with a pool vacuum before water is added. Use a tap water conditioner or an appropriate tap water filter to make large quantities of chlorinated water safe to add to the pond.
Take advice from local specialists if your source of water has chloramines, is direct from a borehole, or is high in metals such as iron.
14.3 Monitor your pond and fish to avoid problems
Monitoring the general water appearance and the behaviour of fish is invaluable as a guide to water quality, but the only sure way to know is to carry out regular water quality checks.
Use a range of good quality pond test kits as stocked by all major aquatic stores. Keep a record of changes in water quality in a logbook, noting dates and times. This is a useful
to keep an eye on the natural daily and seasonal fluctuations in water quality, and the affects of any treatments or water changes. It also allows problems to be dealt with before they take hold,
and so helps maintain the overall health of the fish and pool system. The following troubleshooting guide to water quality is a summary to be used in conjunction with other sources of
information on good fish husbandry. It is best to read through it before problems occur.
Q: The water has suddenly become green / milky grey
A:
Q: The water has suddenly become very dirty
A:
Q: There has been a power cut
A:
Q:
A:
REGULAR BACKWASHING OF THE SUPERBEAD FILTER CAN ELIMINATE MOST OF THESE PROBLEMS BEFORE THEY OCCUR.
If these problems occur, backwash your filter four or five times in a row and increase the frequency of the regular backwash. If problems persist:
Q: The air inlet drips water
A:
Q: I don’t like the plug of cloudy water that is sometimes seen in the filter output just after restarting the filter
A:
Q: The backwash appears to stop before the filter has emptied
A:
Q: I’m going away on summer holiday for two weeks
A:
Q: Can I use my system pump to drain the filter?
A:
Q: How do I fit the filter below adjacent water level?
A:
Germicidal UV controls free floating algae and blooms of bacteria that are too small (< 5 micron) to be readily captured by the filter. Despite design differences,
the major factor in UV unit performance is the lamp wattage and type of lamp. In heavily shaded ponds, green water control may be achieved at 50% of the normally recommended wattages,
whereas in very shallow ponds and areas of intense sunlight, higher wattages will be required.
THE BACK PRESSURE AFTER THE SUPERBEAD MUST BE AS LOW AS POSSIBLE.
The SuperBead filter is ideal for use alongside existing filter equipment and can boost the filtration capacity of any system. This is particularly useful if an increase
in fish stocks is overloading the existing system. In particularly high loading situations the SuperBead filter can be supplemented with ancillary equipment to give the best results.
Aeration is recommended in all cases. Where natural aeration from waterfalls or fountains is limited, the most convenient form of supplementary aeration is to use a high efficiency air
pump with air stones in the pond. Ensure air bubbles do not get drawn into the SuperBead filter.
If you require further assistance please contact your dealer. It is helpful if you have all the relevant information about the filter (model), pump type, valves and hoses etc. to hand.
SuperBead Filters undertake continuous product development which may make technical modifications to current models. The information and pictures shown here are for guidance only.
On heavily loaded aquaculture systems or when food is used with high levels of fat and protein this procedure can be carried out every one to two weeks.
The backwash process loses some water, which will need to be made up with new water added to the pond. This is most easily carried out with an automatic top-up valve.
This waste removal and top-up acts as a partial water change. In a system running at close to maximum pool volume capacity, the lower recommended frequency of backwashing
might only result in a water change of around 1% in a summer week. This level of water changing is much too low to maintain water quality in the long term and additional partial water changes will be necessary.
Algae blooms (green water) and bacterial blooms (milky grey water) can sometimes occur, especially during the maturing period or following a sudden increase in dissolved nutrients.
The problem will be controlled by an effective UV unit. If a UV does not appear to be working, check the lamp and clean the quartz sleeve if necessary. Water with high mineral content
can sometimes coat the quartz sleeves. Other sources of cloudiness include excess (fatty and protein rich) food and particles washed in from surrounding soils.
Temporarily reduce feeding and consider the very sparing use of flocculating agents (but not in very soft water).
If air is being drawn into the filter system during normal running, it will disturb the beads and prevent them from catching dirt properly.
Check that there are no pipework leaks around the pump or filter inlet and that the pump is not clogged or drawing in air from e.g. air stones.
Check that the filter return to the pool has not been moved to a lower position, or into the water itself, as siphoning at this point can draw air into the filter through
the air inlet valve (see 8.1 - air breaks).
If the power cut has only been for a few hours, there should be no problems providing the filter has been maintained correctly. If the filter has been particularly dirty
or feeding levels particularly high or the weather particularly warm, then the filter organisms may run out of oxygen more rapidly. In these cases or where the power cut
has been lengthy (over 12 hours), carry out one or two backwashes as soon as the filter has refilled, to remove foul water and dying organisms. Keep feed rates low for
a few days and monitor the water for ammonia and nitrite.
• The filter takes much longer to drain during a backwash
• I can hear the bead bed dropping in one lump (with a ‘thunk’) during the backwash cycle
• The filter sounds different during the backwash cycle
• The pressure gauge reading does not drop to the normal level after cleaning
Slow draining can be due to gradual clogging of the waste outlet screen and/or ‘gelling’ of the bead bed. Screen clogging can be due to strands of algae, growths of sponge-like
bryozoans within the filter or tiny snails which have become wedged in the slots. Gelling of the bead bed is caused by beads sticking together due to an excessive growth
of the biological film on the bead surfaces as a result of infrequent backwashing.
• drain the filter
• check that the main pump strainer is not clogged
• if the lower or upper outlet screens have clogged rapidly, improve the strainer on your pump inlet
Take steps to improve the backwash strength e.g. increase the siphon action by increasing the waste pipe head (see 4.1/4.2) and minimise restrictions on the waste outlet.
For persistent gelling of beads, either:
Check ‘underpressure’ symptoms overleaf (Section 8.1). Check whether the valve rubber is clean.
This is normal for all bead filters and does not harm the fish. Reduce the density of clouding by increasing backwash frequency, or carry out a second backwash just as the filter has refilled.
If you wish to eliminate clouding, fit a tee & valve, or a 3-way valve on the filter outlet pipe and direct this plug of water to waste for a few seconds. Use a short piece of clear pipe/hose
in the waste line to monitor clarity.
This can happen if there are airlocks in the waste outlet plumbing, or if blanket weed or other debris has built up on the inlet strainer, and is collapsing back onto the
strainer when the filter is drained.
In lightly stocked water garden ponds the fish will find some natural food. This can be supplemented by small amounts of food from an automatic fish feeder.
Double check that all the valves in the system are working correctly. It is recommended to carry out routine maintenance some days before you go on holiday, to check that everything is in order.
If an automatic upgrade kit and timer is installed and you also have an automated top-up system, the filter will carry out the backwashes for you.
Alternatively, as the reduced feeding will reduce the loading on the filter, it should be possible to leave the filter for the two weeks without a backwash. Carry out a triple backwash before leaving and carry out
a triple backwash on your return. Alternatively, where someone is coming in to feed the fish, they can be shown how to operate the simple backwash process.
No, Opening the waste valve whilst the pump is still on will flush pond water through the 3-way valve to the waste outlet.
You need a separate (cheap) pump with large flow (20-30 m3/hr), mounted on the waste outlet of the filter (see 4.1).
Install a flushing pump on the filter outlet or make a sump, lower than the base of the filter (see 4.1 and 5.5).
Installation
Closed chamber UVs (with a protective quartz sleeve for the lamp) are recommended. Plumb them between the pump and the filter.
Rather not after the filter as this increases back pressure at the filter (see 5.6).
Choose a unit with wide bore connections, rated for flows in excess of the maximum filter flow. High flows and a too small chamber of the UV leads to loss of water flow.
Fit in this case multiple units in parallel. Support the UV and pipework sufficiently with brackets and pipe clips to avoid damage to the filter. Mount it in a way that encourages
the unit to be full of water during running, with a side/upward pointing outlet to release airlocks. Ensure that the unit is accessible for maintenance, dismountable for repair/replacement,
and that electrics are protected from water.
Operation
It is generally safe to leave the UV turned on for the 2 minutes it is left dry during the filter backwash. If it is likely to be left dry for longer, it should be turned off during the backwash.
If it is connected to the same supply as the pump it will automatically switch off during the backwash, though excessive switching on and off of the lamp can shorten its effective life.
Follow the manufacturer’s guidance on safety, maintenance and lamp changing. On new systems it is best to leave the UV turned off during the first four weeks of filter operation to
minimise damage to beneficial bacteria present in the water flow whilst the filter beads are becoming colonised.
Pre-filtration can be achieved with sieve devices (SuperSieve/Drumfilters) -see picture in 4.1-, in-line coarse strainers and existing gravity-fed settlement or brush chambers.
Water can be pumped from these to the SuperBead. However, it is important to clean these pre-filters very regularly to remove organic waste before it is broken down, otherwise blanket weed growth
may be a more noticeable problem. Any pre-filter to the SuperBead should aim to remove particles larger than 1.5 mm. This will prevent large solids from clogging the strainers of the SuperBead Filter
and also assist the main filter in removal of organic particles before they break down, so helping to reduce algae growth.
With existing gravity-fed multichamber systems the most straightforward option is to pump the water from the last chamber of the filter to the SuperBead filter and then back to the pond.
Alternatively, the existing pump can be throttled back and an additional pump can draw water from the middle chamber of the filter to the SuperBead. The SuperBead filter will give additional nitrification
of fish wastes and will also help to ‘polish’ the water by removing the small particles that can get through multichamber systems. However, this arrangement does not make use of the SuperBead filter’s
ability to remove the bulk of solids from the system before they break down, and unless excess solids are regularly removed from the multichamber filter there may be an increased tendency for blanket
weed growth in the system. It is preferable to adapt the multichamber filter to pump fed operation.
For existing pump-fed multichamber systems, the water should be pumped instead to the SuperBead filter and into the chamber filter before returning to the pond by gravity. When regular backwashes are carried
out this will make the best use of the SuperBead’s ability to remove solids from the system before they are broken down.
The multichamber filter will then remain cleaner and more able to function as a biological filter rather than a mechanical trap for sediments. It is important to use a suitable strainer on the pump
feeding the SuperBead filter to remove larger solids. Your backwash-frequency should then also be higher. In this situation, with a poor pre-filtration we advice you to reduce the max. flow
of the small model to 7 m3/hr and for the large model to 15m3/hr. Ensure sufficient aeration in the chamber filter’s transfer ports.
With Vortex Units and existing gravity-fed settlement or brush chambers, water can be pumped from these to the SuperBead Filter. This situation is not an ideal one, because larger particles
could enter the SuperBead and clog the inlet strainer. If so, it‘s wise to use some Japanese mats in the chamber, which in fact are then used as pre-strainer. However, it is important to clean
these chambers very regularly to remove organic waste before it is broken down, otherwise blanket weed growth may be a more noticeable problem.
Trickle Towers can be fed from the outflow of the SuperBead filter. The trickle tower greatly boosts oxygenation of the water and assists nitrification in heavily loaded commercial situations.
Water then flows back to the pond from the trickle tower under gravity.
Fluidized/moving bed filters boost nitrification capacity in heavily loaded systems but are unable to remove solids. They can be used alongside the SuperBead Filter which will remove the solids from the system.
Fluidized/moving beds should be plumbed independently from the SuperBead Filter.